There are several main differences between the FT MRA imaging mode and the Real Time imaging mode Acquire tabs:
The Pause When Full and Save Image buttons are not available.
The Review tab is inactive.
A Delay text box appears, allowing you to enter a system delay value in seconds. The value defaults to the delay set by the prescribed acquisition. The delay period is the time after the Go 3D button is clicked and the scan actually starts.
The Go 3D button appears, allowing you to initiate the prescribed acquisition. This button remains active when Real Time scanning is in progress. If the Pause Scanning button is selected, the Go 3D button becomes inactive.
About this task
Fluoro Trigger is a 2D Real Time acquisition and reconstruction that is used to monitor a region of interest. It allows you to trigger an elliptic-centric-view-ordered acquisition of a 3D volume of interest once a patient’s vessels have sufficiently enhanced. The 3D acquisition is synchronized to the peak concentration of contrast in the vessels.
Use the Fluoro Trigger Imaging Option to detect the arrival of a contrast bolus in MRA exams. Use Fluoro Trigger when SmartPrep is not optimal; e.g., when a patient has slow cardiac output or if delayed imaging enhancement is desired.
From the Workflow Manager, select the series that has Real Time and Fluoro Trigger Imaging Options and click Setup. Make scan parameter adjustments, as needed.
Use Fluoro Trigger with Multi-Phase to capture both the arterial and venous phase. The Fluoro Trigger screen displays for the first phase only.
Do not click Fallback if you are using a 2D TOF projection image for the localizer. Only use Fallback with a 3-Plane Localizer to set the imaging volume center at R0.
SPECIAL is NOT available if the following are selected: Elliptic Centric, Reverse Elliptic Centric, or IR-Prepared.
From the Details screen, select an Excitation Mode: Non-Selective is recommended with Fluoro Trigger. For more details, see Excitation Mode.
To launch Real Time with Fluoro Trigger, complete the following steps.
Save Rx
Auto Prescan
Scan
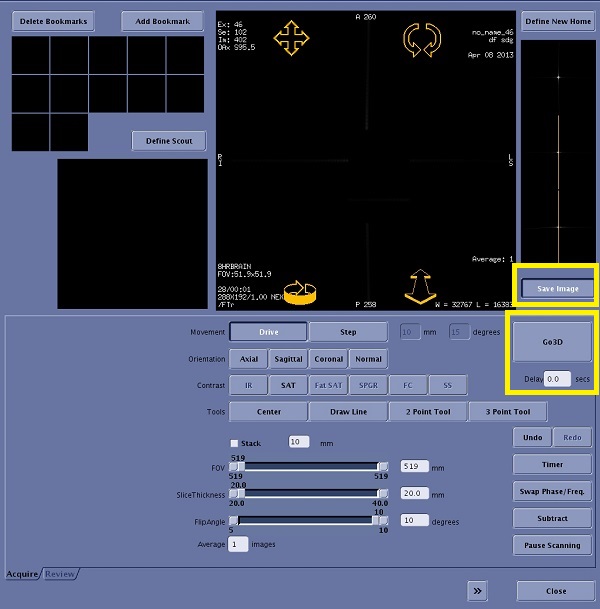
Fluoro Trigger screen is launched Figure 1. Real Time Fluoro Trigger screen
From the Flouro Trigger screen, type a delay time in the Delay text box and modify the flip angle if necessary.
Enter a delay value, in seconds, if necessary. The value defaults to the delay set by the prescribed acquisition. The delay period is the time after the Go 3D button is clicked and the scan actually starts.
For the 3.0T Fluoro Trigger option, the default flip angle is too high when you initially enter the Fluoro Trigger screen. This flip angle results in poor differentiation between fresh flowing blood and arrival of contrast. Therefore, lower the flip angle on the Fluoro Trigger screen to distinguish between flowing blood and arrival of contrast.
Save Image is a toggle button that enables the pre-trigger real-time images to be saved as a separate series in the database. The default status is set from the System Preferences screen. For more details, see Save FTMRA Realtime images.
Navigate to the location you want to observe for contrast arrival.
The FT MRA viewer displays the Real Time images as the Real Time data acquisition is taking place. Watch the vessel of interest for arrival of the contrast bolus.
Begin administering contrast to the patient.
Click Subtract when you start the injection.
Subtract creates a mask image at the selected location and automatically subtracts this mask image from incoming images. By subtracting static tissue, visualization of bolus arrival can be improved. Subtract is automatically turned off if the location is changed, and will require reapplication. Subtract can be used with dual injection cases since subtraction is immune to T1 shortening related signal recovery when compared to SAT based background suppression.
Subtract eliminates wrap artifacts from static tissue if, from the scan parameter Details screen, you select Excitation Mode: Non-Selective. Phase wrap can still be problematic during navigation and therefore monitor contrast arrival in the coronal or sagittal plane with Non-Selective Excitation Mode.
Watch for the bolus on the FT MRA viewer, and click Go 3D once the bolus fills the vessel.
Clicking Go 3D initiates the quiet delay period. The count-down can be observed from the PC monitor or from the magnet cover.
Once the delay timer reaches 1 second, the system automatically switches into scanning mode (an audible switch of the gradients can be heard), the FT MRA screen disappears, and the Scan desktop is again displayed.
The Go 3D button remains active when Real Time scanning is in progress. If you click Pause Scanning, the Go 3D button becomes inactive.
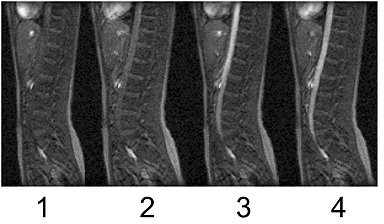
Figure 2. Optimal time to begin acquisition with Centric k-space filling
Table 1. image legend
Number
Description
1
Too soon
2
Too soon
3
Still too soon
4
Click GO 3D.
The first phase scan starts when the first phase delay has elapsed, counting from the time when the you clicked Go 3D. For phases 2 and up, the scan starts as soon as: the scanner is prepped, and the time elapsed since the end of the previous phase (or since you pressed the Scan button, for the first phase) is equal to or greater than the delay prescribed after the previous phase.