

- 00000018WIA30F2B770GYZ
- id_400226781.5
- Mar 24, 2022 3:30:17 PM
Navigator: acquire a body scan
About this task
Use these steps to acquire a Navigator free-breathing, body acquisition. The recommended coil is a phased array coil that has good sensitivity at the top of liver as well as other targeted organs.
Review the description of the respiratory signal on the Navigator Monitor window. Many of the same adjustable parameters are located on both the Navigator Monitor and the Navigator tab. This allows you to define some of the parameters in a protocol and yet have access to them from the Navigator Monitor as you scan the patient.
The Navigator Monitor window opens when the navigator sequence starts scanning. This window remains open for the entire scan. Click Done to close it and click Navigator at the bottom of the Scan Operations area to re-open it.
When the Navigator Monitor window opens, it takes the system time to obtain a baseline as the patient’s breathing and diaphragm movements are monitored. The time during which the baseline data is gathered can be as long as 30 to 45 seconds. For a patient with an erratic heart rate or an unusual breathing pattern, this baseline time may be longer.
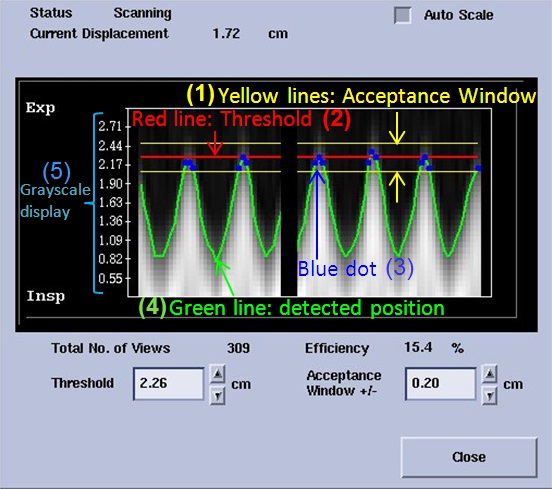
| Number | Description |
|---|---|
| 1 | The signal is only detected if it is within the Acceptance window or between the two yellow lines. Change the value to increase or decrease the distance between the yellow lines. |
| 2 | The Navigator threshold is represented by the red line. As you change the Threshold value you move the Acceptance Window up or down. |
| 3 | The blue dot represents acquired signals. Blue dots only occur between the yellow lines. If there is no green line between the yellow Acceptance Window, then no respiratory signal is detected. |
| 4 | The green line represents the respiratory waveform. |
| 5 | The Grayscale display shows real time navigator signal at the navigator tracker. |
Step-by-step instructions
- Click the Navigator tab and make adjustments as needed. All the values entered on the Navigator tab can be saved as part of the protocol.
Figure 2. Example of Navigator tab for body with navigator triggering 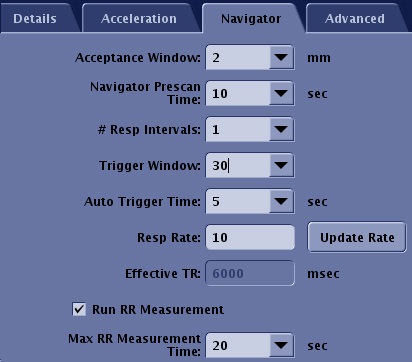
- Acceptance Window is the range for data acquisition. Image data is only acquired when the signal is detected within this range. It can be changed from the Navigator Monitor window during the scan.
- Navigator Prescan Time defines the duration of the Navigator prescan.
- # of Respiratory Intervals determines the pulse sequence repetition time, or Effective TR. One respiratory cycle is the time from one maximum inspiration to the next maximum inspiration.
- Inhance IFIR: Increase the value and the data acquisition period decreases, motion contamination is reduced, and scan time increases
- For other sequences, increase the value and the number of locations allowed increases because the available imaging time increases, which increases the Effective TR.
- Inhance IFIR: Increase the value and the data acquisition period decreases, motion contamination is reduced, and scan time increases
- Trigger Window is the time set aside to stop data collection and allow for variations in the breathing pattern. Typically select a value around 50%. Increase the value and the following occurs:
- the number of locations allowed decreases because the available imaging time decreases
- motion contamination decreases
- Auto Trigger Time sets a time limit for when the system will trigger the next data acquisition point even if green line stays within acceptance window. It is effective to reduce scan time if the patient sleeps. It is available in Navigator Triggering.
Figure 3. Example of Auto Trigger time. If the green line stays within the acceptance window, the system acquires data automatically (2) after Auto Trigger Time (1) 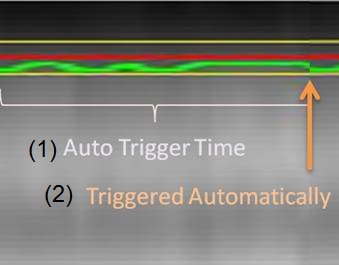
- A shorter time might reduce scan time, but it might cause motion artifact since it increases the risk of data acquisition during inspiration.
- In Inhance IFIR, typically select a long time, (approximately 20 seconds) since the acceptance window is wider and sometimes the waveform during inspiration stays within acceptance window.
- Respiratory Rate is the number of respiratory cycle per minute. It is available in Navigator Triggering. The value effects scan time and available scan parameters such as maximum number of slices
- If the respiratory bellow is attached, click Update Rate to update the value.
- If the respiratory bellow is not attached and you have already scanned at least one series with RR Measurement selected, click Update Rate to update the value.
- If the respiratory bellow is not attached and RR Measurement has Not been run in the exam, type and enter a value in the Respiratory Rate text field.
- Effective TR is not an editable field. The value represents the estimated repetition time calculated from the given Respiratory Rate and # of Respiratory Intervals.
- Run RR Measurement measures the respiratory rate using navigator pulses even if the respiratory bellow is not attached. It is useful to estimate scan time and scan parameters such as maximum number of slices. A Navigator: Update parameter window appears if the patient's breathing rate is rapid and thus the scan cannot proceed.
Figure 4. Navigator update window 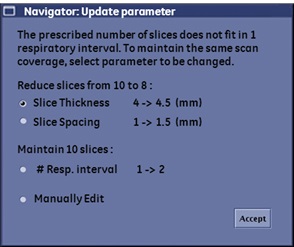
- Select the best option and click Accept. If you do not select Manually Edit, the scan will automatically begin with the changed parameters.
-
Note: that 3DFSE, SSFSE, and Inhance IFIR, Manually Edit is the only option.
- In multi-slice multi-angle scan prescriptions, it is not possible to keep the coverage with increasing thickness or spacing. The only option is to increase # Respiratory Intervals and Manually Edit.
- Once the respiratory rate is measured, the value is applied to successive series.
- When the respiratory bellow is attached, it is not necessary to select RR measurement.
- Maximum RR Measurement Time value determines the maximum duration of RR Measurement. The data acquisition can be stopped anytime by clicking Accept RR on the Navigator Monitor window once the respiratory rate becomes stable.
- Maximum Navigator Interval is the time interval between Navigator pulses and it is only available with LAVA and DISCO. A shorter time improves the time resolution of motion detection but it increases the scan time.
- Slab Tracking turns on a rigid motion correction process for Navigator Gating and Inhance 3D Inflow IR scans. Slab Tracking is not available with LAVA, LAVA-FLEX, 3D Dual Echo and DISCO.
- Pause After Navigator Prescan allows you to control the start of the scan so that you can deliver breathing instructions. It is only available with Navigator Gating.
- Navigator Signal Enhancement is typically selected to improve the stability of the navigator signal when the navigator signal SNR is low. It is only available with Navigator Gating.
Figure 5. Example of a low Navigator SNR 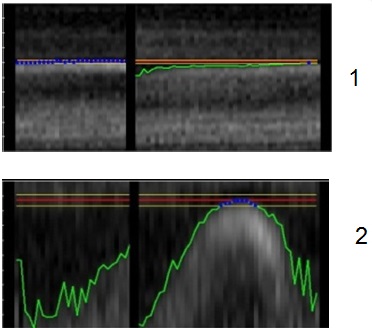
Table 2. Image legend Number Description 1 Auto scale off. 2 Auto scale on.
- Graphically prescribe the Navigator scan locations and tracker.
- Click the
 .
. - Deposit the slices or 3D slabs over the area of interest.
- Display an image on which the liver dome is visualized.
- From the Graphic Rx Toolbar, click Tracker .
- From the Tracker menu, enter length and thickness values.
- In the Tracker Length text box, type 120. Reduce the value for infants.
- In the Tracker Thickness text box, type 20. Reduce the value for infants.
- Click to deposit the Navigator tracker on the image. On the coronal and sagittal localizer images, position the center tick-mark of the tracker line near the top of right hemi-diaphragm and liver dome.
Table 3. Example of good navigator tracker placement Examples of good navigator track placement Tracker placement on a localizer acquired with expiration breath hold. The center of tracker is approximately 1.5 cm below the diaphragm. 
Tracker placement on a localizer acquired with free breathing. The center of tracker is placed on the diaphragm. 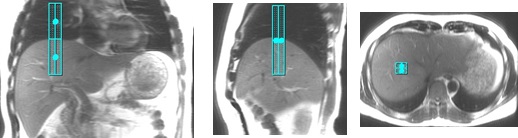
Tracker placement on a localizer acquired with inspiration breath hold. The center of tracker is approximately 1.5 cm above the diaphragm. 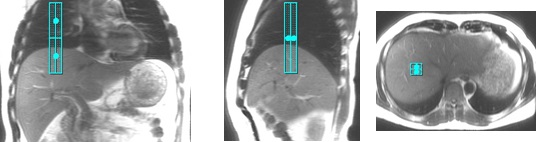
Table 4. Example of bad navigator tracker placement Examples of bad navigator track placement Tracker placed too far anterior. The sagittal and axial images clearly show the tracker misplacement. 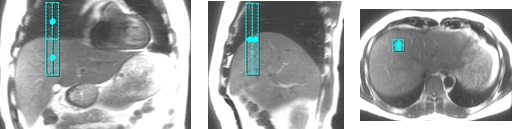
Tracker placed too far medially. The coronal and axial images clearly show the tracker misplacement. 
Tracker placed too far inferior. The sagittal and coronal images clearly show the tracker misplacement. 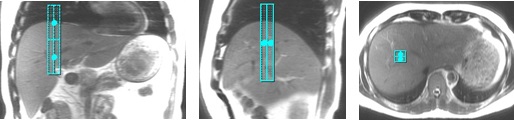
- Click the
- Monitor the Navigator pulse.
Figure 6. The vertical axis of the graph represents the diaphragm moving in the superior/inferior 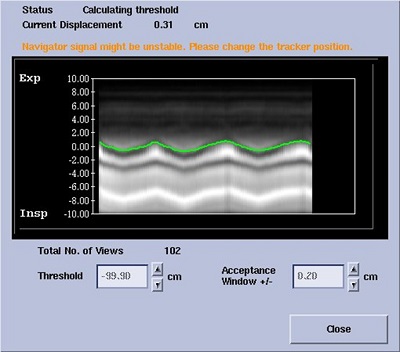
Figure 7. Navigator Monitor screen when RR Measurement is selected from the Navigator tab 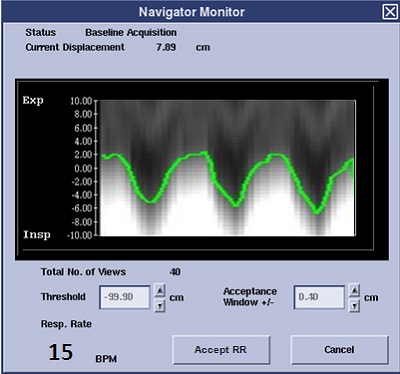
- For details about the navigator waveform, the causes and corrective actions, see Navigator troubleshooting tips.
- When you begin the Navigator acquisition, the Navigator Monitor window opens. The status area of the Navigator Monitor window indicates the baseline is being acquired. As the status of the scan changes, the status area updates to reflect the current status of the scan.
- When the Navigator window opens, the patient’s breathing and diaphragm movement are monitored. The time during which the baseline data is gathered can be set from the Navigator tab, Navigator Prescan Time text field.
- When baseline data is gathered, the Acceptance Window and Threshold fields are unavailable.
- Navigator scan time for Navigator Triggering uses the following formula: scan time = [( number of required repetitions) × (60 sec ÷ respiratory rate) x (number of respiratory intervals).
- Navigator scan time for Navigator Gating uses the following formula: scan time = [(number of required repetitions) × (navigator interval)/efficiency number].
- Select Auto Scale as needed.
- Auto Scale re-scales the display to accommodate major changes in a patient's breathing; i.e., the patient’s breathing began labored and shallow, but now the patient has relaxed and breathing has slowed. Sometimes, setting the threshold does not compensate for this and re-scaling the display helps you set the proper Threshold and Acceptance Window.
- When Auto Scale is off, the entire navigator signal is displayed.
- When Auto Scale is on, the respiratory waveform and acceptance window are magnified.
- If there is a gap between the green line and the diaphragm position, if needed, turn off Auto Scale to see the entire grayscale.
Figure 8. Gap between green line and diaphragm position 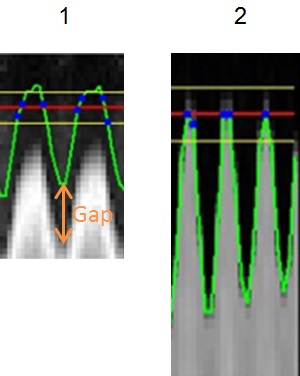
Table 5. Image legend Number Description 1 Green line does not match with diaphragm position. 2 Good match between green line and diaphragm position.
- If there is a gap between the green line and the diaphragm position, if needed, turn off Auto Scale to see the entire grayscale.
- In the Acceptance Window text box, type a value to widen or narrow the acceptance window.
- Navigator Gating: Increase the value in the Acceptance Window and the scan time decreases at the risk of increased motion artifact.
- If the scan efficiency is higher than 40%, reduce the navigator window so that the scan efficiency falls between 30%-40% range. This avoids introducing too much motion while the scan is in progress,
- Navigator Triggering: Adjust the value in the Acceptance Window based on the patient's breathing pattern. For example, use a small value for a shallow breather.
- Except for Inhance 3D Inflow IR, increase the Acceptance Window value to improve data acquisition efficiency especially for an inconsistent breather at the risk of increased motion artifact.
- Inhance 3D Inflow IR: the appropriate Acceptance Window value is calculated if Auto is selected from Acceptance Window menu. If breathing becomes shallower after the navigator baseline acquisition, decrease the Acceptance Window value until the green line is out of Acceptance Window range. If data acquisition finishes during inspiration, increase the Acceptance Window value or the Number of Respiratory Intervals to avoid motion.
Figure 9. Examples of Navigator Signal in Inhance 3D Inflow IR 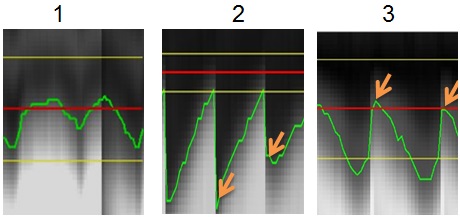
Table 6. Image Legend Number Description 1 A bad example. It shows that the green line stays within the Acceptance window during inspiration. Decrease the Acceptance Window or increase the Threshold until the green line goes outside of acceptance window during inspiration. 2 A bad example. It shows that the image data acquisition finishes during the inspiration phase. Increase the Acceptance Window or increase the # of Respiratory Intervals. 3 A good example. It shows that the image data acquisition finishes at the end of expiration phase.
- Navigator Gating: Increase the value in the Acceptance Window and the scan time decreases at the risk of increased motion artifact.