

- 00000018WIA3056A870GYZ
- id_400252891.4
- Aug 18, 2022 12:56:37 PM
Acquire a scan with ASSET
About this task
- Read the details about 3D TOF with ASSET artifact on 1.5T systems before acquiring a 3DTOF GRE/SPGR with ASSET scan: 3D TOF GRE/SPGR scan considerations.
- Read the details about sagittal T1 FLAIR with ASSET artifact before acquiring a sagittal T1 FLAIR with ASSET scan: FLAIR considerations.
Use the ASSET Imaging Option to scan faster with brain, abdomen, chest, fMRI, extremities and breath hold angiography imaging. You can also use it to decrease artifacts with EPI sequences and to decrease blurring with FSE sequences.
Step-by-step instructions
- Position the patient.
- Only the Supine and Prone patient positions are compatible with ASSET.
- When using ASSET for abdominal imaging, placing a thin pad between the patient and the coil may improve image quality. If the patient is heavy, place an extremely resilient pad beneath the patient and the lower array elements of the coil. The pad should be thick enough to provide adequate separation while compressed.
- In ASSET sequences, large artifacts are likely to result when metal is present in or near the anatomy of interest. This is true even when the metal is as small as a stent, clip, or metallic ink tattoos. ASSET sequences may not provide adequate image quality when metal is present.
- It is extremely critical that the patient position be the same for the calibration and the ASSET acquisition. Do not place the patient’s arms on the abdomen, since breathing motion can result in location differences of the hands between the calibration and the ASSET scan. Provide the patient with clear instructions on holding the hands and arms still during the ASSET acquisition.
Figure 1. Note the mottled image appearance in the circled areas that is due to misregistration because the patient had a different breath hold pattern between the calibration scan and the ASSET acquisition. To avoid this artifact, make sure that the patient breaths with the same pattern for the breath hold for the calibration scan and the ASSET image scan (for example, use a full breath out or full breath in technique). 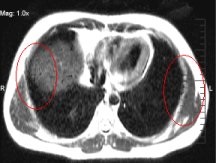
- On the Scan Parameters menu bar, click the arrow to expand the screen to see the Details tab.
- From the Calibration in Prescan menu, select On to automatically acquire a calibration scan as part of Auto Prescan.
- From the Calibration in Prescan menu, select Off to manually acquire a calibration scan.
- For details about the Calibration in Prescan menu options, see Calibration in Prescan considerations.
- If Calibration in Prescan is set to Off, the Calibration Mode menu is displayed in the Calibration scan series. Select a breathhold item from the menu.
Figure 2. Calibration Mode menu 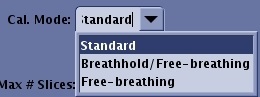
- Perform breathold calibration scan with the same breathold instructions that will be used in the ASSET scan to avoid misregistration artifacts misregistration artifacts with ASSET.
- Breathold misregistration artifacts can occur with ASSET scans due to dissimilar breath-holds between the calibration and ASSET acquisitions, causing attenuation artifacts within the ROI and residual aliasing outside the ROI.
Figure 3. ASSET attenuation artifacts from breath-hold misregistration: 2D calibration using full in-hale (left) and 2D calibration using both full in-hale and full-exhale (right) 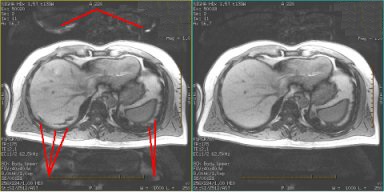
- Breath-hold misregistration artifacts can occur with belly-breathers, where the patient perimeter aliases into the torso.
Figure 4. ASSET aliasing artifacts from breath-hold registration: Note the size difference between left and right images. Patient is a “belly-breather”. The left image demonstrates deeper inhale than the right. As the diaphragm moves in the inferior direction, organs are displaced downward and outward. The left image is larger in the A/P direction and this height exceeds the height of the cross-section in the calibration. Since there is little sensitivity information in the calibration corresponding to this location, the signal from the most-anterior region aliases into the torso. 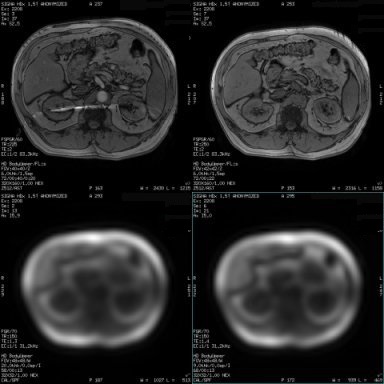
- On the Scan Parameters menu bar, click the arrow to expand the screen, and then select the Acceleration tab.
Figure 5. Acceleration tab 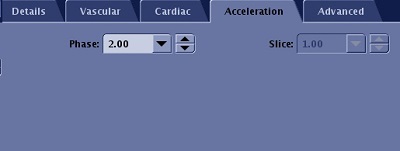
- ASSET supports Phase only or Slice only acceleration depending on the application. Only one of the acceleration controls is available.
- The Phase and Slice acceleration capabilities change based on the selected Frequency direction or Scan plane selection. It is possible to have both Phase and Slice Acceleration entries grayed out due to lack of acceleration support in the selected direction. Set acceleration values once plane and Frequency Direction are finalized.
- Acceleration capability differs from one coil to the next and it also depends on phase direction chosen for acceleration. Adjust Acceleration settings after you select scan plane and coil.
- If parallel imaging artifacts are seen, consider reducing acceleration.
- Setting ASSET acceleration Phase = 1 triggers ASSET based reconstruction, which results in:
- Slight increase in SNR compared to ASSET not selected.
- Applies No Phase Wrap capability with ASSET based reconstruction in phase direction.
- Select a reduction factor in the Phase or Slice field. As the factor gets larger the scan time gets shorter at the expense of SNR. Sample factors:
- 1.3: Three-quarters of the data is collected, which results in a longer scan time but also an increase in SNR. The scan time will be longer than a factor of 2, but there will be less aliasing, moving the artifact farther away from the center of the image.
- 2: Half the data is collected and the scan time will be half the scan time of a non-ASSET scan. Typically use for the shortest scan time.
- You can enter values that are not populated in the menus. Values you enter are automatically rounded to the closest allowed value.
- The last entry in the menu is the maximum allowed Acceleration factor. An error message is displayed if a larger value is entered.
- Acceleration reduces SNR and potentially introduces parallel imaging artifacts such as aliasing and noise amplification. Be prudent when using it.
- Acceleration may not always result in scan time reduction but rather it might reduce image blur or increase the maximum number of slices per TR.
- Acceleration tab with HyperKat option only appears when 4DFLOW, 3DCINE SPGR or 3DCINE FIESTA applications are selected.
Figure 6. ASSET tab with HyperKat 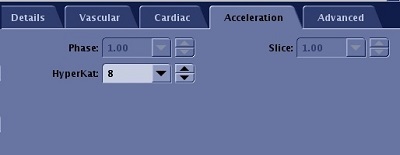
- HyperKat is an auto-calibrating recon using both spatial and temporal correlation with a k-t ARC kernel adaptive to local cardiac motion.
- HyperKat value is displayed on the Series Text screen.
- 8 produces optimal image quality.