

- 00000018WIA30A22970GYZ
- id_400227231.2
- Mar 2, 2022 5:02:41 PM
Real Time iDrive Pro Plus Review tab
Use this information to navigate on the Real Time review screen.
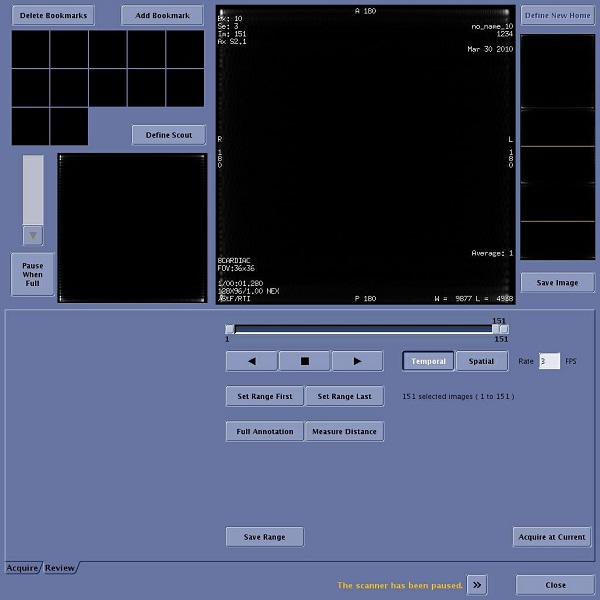
The iDrive Pro Plus Review tab displays for a Real Time scan.
iDrive Pro Plus Review tab parameters
- Delete Bookmarks
- Click Delete Bookmarks to delete all Bookmark thumbnails currently displayed. Note that bookmarks created on the Acquire tab are shown on the Review tab. Individual bookmarks cannot be deleted.
- Add Bookmarks
- Click Add Bookmarks to save the plane, location, and image contrast of the image currently in the Review tab viewer as a bookmark thumbnail for later recall. Bookmarks can be created and deleted in both the Acquire and Review tabs.
- Define Scout
- Click Define Scout to push the image in the Main Viewer to the Scout Viewer. The new scout is also applied to the Scout Viewer on the Acquire tab.
- Pause When Full
- Click Pause When Full to automatically pause the real-time data acquisition when the Real Time Image Buffer is full. The progress bar provides a graphic display of the image buffer capacity.
- Main Viewer
- The Main Viewer displays the real-time images during image review.
- Define New Home
- Inactive on the Review tab.
- Home Images
- Home images are orthogonal images (axial, sagittal, and coronal) acquired upon initialization of a real-time series based on the locations prescribed during the real-time series prescription. The Home images are automatically saved to the system disk.
- Save Image
- Click Save Image to save the image in the Review tab Main Viewer to the system disk. When a saved image is displayed, the word “Saved” is seen below this button.
- Image Slider
- Move the Image slider to scroll through the images to change the image currently displayed in the viewer.
- Play Forward
- Click Play Forward to start a movie in the forward play motion. The images are displayed in movie playback in ascending image number order, starting at the first image in the defined range. The Image slider updates to reflect the image that is currently being viewed.
- Play Backward
- Click Play Backward to start a movie in the backward play motion. The images are displayed in movie playback in descending image number order, starting at the last image number defined in the image range. Play continues according to the temporal or spatial play mode.
- Stop Play
- Click Stop Play to stop the movie playback. You can also stop playback by clicking the selected toggle that started play.
- Temporal
- Click Temporal to play the movie images in a continuous loop from first to last. When the end of the range is reached, play wraps to the first image again. For example, an image set consisting of four images appears in the following order: 1, 2, 3, 4, 1, 2, 3, 4, etc.
- Spatial
- Click Spatial to play the movie images forward, then backward in a repeating loop. Image play effectively recoils off the end of the range in a forward and backward direction. For example, an image range of four images appears in the following order: 1, 2, 3, 4, 3, 2, 1, etc.
- FPS
- Enter a number (1 to 60) in the FPS text to define the rate of movie playback in frames per second. If you enter a value higher than the system allows, the maximum allowed value of 60 is displayed.
- Set Range First
- Click Set Range First to define the first image to be included in a range or set of images for displaying in movie mode.
- Set Range Last
- Click Set Range Last to define the last image to be included in a range or set of images for displaying in movie mode.
- Full Annotation
- Click Full Annotation to display all image annotation in the main viewer. Otherwise, only partial annotation is displayed.
- Measure Distance
- Click Measure Distance to display a line on the main image. The length and angle of the line can be adjusted by dragging either end. The line length and angle from vertical is displayed on the image.
- Save Range
- Click Save Range to save the range of images currently defined on the Review tab to the system disk. When a saved image is displayed, the word “Saved” is seen below the Save Image button.
Do not switch desktops while the Save Range dialog box is up. Doing so will cause the dialog box to display on the Scan desktop without any text and cannot be closed.
- Acquire at Current
- Click Acquire at Current to return the display to the Acquire tab and begin data acquisition at the image location currently displayed in the Review tab Main Viewer.
- Acquire
- Click Acquire to return the display to the Acquire tab.
- Message Area
- The Message area displays messages at the bottom of the Review tab. Click the button to display a message list for the current Real Time session.
- Close
- Click Close to exit the Review tab and stop the current Real Time session.