T1MAP may not be for sale in all markets due to approval or clearance by in-country regulatory agencies.
T1MAP is commercially known as CardioMaps.
Use these steps to acquire cardiac scans that sample the T1 recovery curve at multiple delay times after a saturation or inversion preparation pulse. This allows the application to measure T1 using curve fitting methods and can provide a quantitative measure of tissue characteristics via T1 mapping. Motion correction is automatically performed in reconstruction.
There are two one-click T1 Mapping applications: T1MAP - FIESTA, T1MAP - SPGR. Each one uses a specific sampling pattern (different set of delay times) based on heart rate and expected T1 due to the presence or absence of a contrast agent.
From the Workflow Manager, click Add Task > Add Sequence.
From the Protocol screen, select a cardiac T1MAP - FIESTA or a T1MAP - SPGR protocol from your site or GE library > Chest tab.
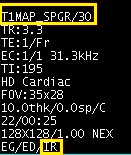
The T1 MAP-FIESTA or T1MAP-SPGR that use an IR Prepared Imaging Option have protocols named MOLLI FIESTA or MOLLI SPGR.
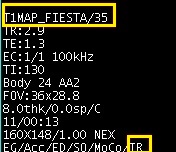
The T1 MAP-FIESTA or T1MAP-SPGR that use an SR Prepared Imaging Option have protocols named SMART1Map FIESTA or SMART1Map SPGR.
At a minimum, include a localizer and T1MAP series.
If you cannot locate a T1MAP protocol in either library, then from the Protocol screen:
From the GE protocol library, click the Template tab.
Click the Applications folder.
From the Applications list, click T1MAP FIESTA or T1MAP SPGR and add it to the Multi-Protocol Basket.
Click Accept.
Acquire a 3-Plane localizer.
From the Workflow Manager, select the T1Map series and click Setup.
From the series summary panel, click Imaging Options... From the Imaging Options screen, click MORE to open the PSD/Applications/Imaging Options screen make adjustments as needed.
From the Applications screen, select one of the T1 Mapping applications:
Typically select T1MAP - FIESTA. T1MAP-SPGR can be used if T1MAP-FIESTA images have objectionable artifacts such as dark bands in the myocardium (most likely seen on 3.0T systems).
From the Imaging Options screen area select a T1 mapping method. Only one of the two can be selected.
IR Prepared the default selection uses a Look-Locker acquisition for measurement of apparent T1 (T1*). It provides limited accuracy but high precision due to the high dynamic range of inversion recovery (IR). The results can vary and are dependent on imaging parameters and the patient's heart rate.
SR Prepared is used for single-point measurement of true T1. It provides excellent accuracy but lower precision due to the lower dynamic range of saturation recovery (SR). The results should be independent of imaging parameters and heart rate.
Select other Imaging Options as needed: ARC or ASSET, and EDR. Note that Cardiac Gating/Triggering is automatically On. T1 mapping is compatible with both ECG (preferred) and peripheral gating techniques.
Select Motion Compensation to reduce respiratory motion and residual cardiac motion. For details, see Motion Compensation.
Click the Cardiac tab and make adjustments as needed.
RR# = 1
Trigger Window = 10-20
Trigger Delay = Diastolic if possible
Click the Advanced tab and make adjustments as needed. Note that the User CVs that appear vary based on the T1MAP application and the selection of SR-Prepared and IR-Prepared.
TI Increment (ms): The incremental change in the initial TI between subsequent magnetization preparation blocks.
Heartbeat Patterns: A short-hand notation for the strategy used to sample the T1 magnetization recovery curve.
Recovery time before inversion (sec): For the IR Prepared option, specifies the time between the last readout of one Look-Locker block and the inversion pulse of the next Look-Locker block to allow for T1 recovery.
Automatic T1 Mapping Settings: For the SR Prepared option, allows the pulse sequence to automatically determine the heartbeat pattern and TI increment based on field strength, heart rate, and whether the scan is pre- or post-contrast.
Apodization Level with T1MAP - FIESTA and with T1MAP SPGR with IrP.
When the prescription is finished, click Save Rx and Scan.
Results
Image display
T1MAP images are post-processed in T1Mapping accessed from the Session Apps list. For details, see T1 Map workflow.
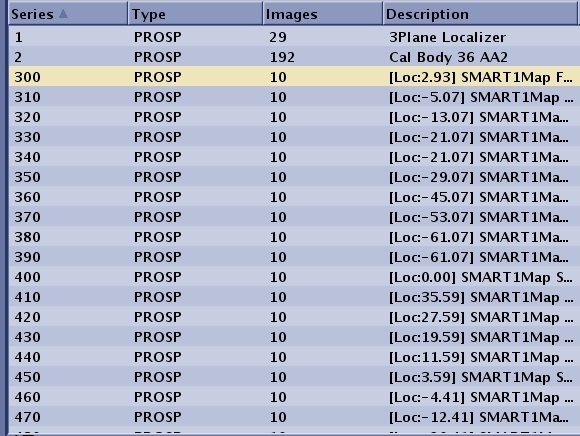
The number of series generated is equal to the number of scan locations. For example, series 3 has 10 slice locations, the system does not create a series 3 in the patient list, but instead creates series 300-390 with each series being 10 phases of one scan location.
Figure 1. Example of T1Mapping post-process series generated