MAGiC: post-process icon description and procedures
About this task
Use these steps from the MAGiC post-process menu bar to manipulate the post-process images.Figure 1. MAGiC menu bar
Table 1. MAGiC menu icons
Icon
Description/procedure
Click the Contrast Layout icon to change the viewports to display MAGiC contrast weighted images. The Contrast navigation window indicates the image contrast weight. When TR or TE is adjusted, use the navigation window to see how the changes affect the contrast weight.
In the viewport a text is also displayed indicating the contrast weight of the image. It can be T1W, T2W, PDW or T1+T2 weight. If an inversion pre-pulse has been activated, this text will be IR, STIR, FLAIR, T1W FLAIR, T2W FLAIR or PSIR. If two inversion pre-pulses have been activated, this text is Double IR.
Keyboard shortcut = Ctrl + R
Click the SysMap Layout icon to change the viewports to display T1-map, T2-map, PD-map and T2W synthetic contrast weighted image.
T1 map: T1 relaxation times are displayed in ms. Interval of measurements are 300 - 4300 ms.
T2 map: T2 relaxation times are displayed in ms. Interval of measurements are 20 - 2000 ms.
R1 map: displayed in s-1, R1 = 1/T1. Interval of measurements: 0.23 – 3.33 s^(-1).
R2 map: displayed in s-1, R2 = 1/T2. Interval of measurements: 0.50 – 50.00 s^(-1).
PD map: displayed in percentage units (pu) relative to a reference value of 100 pu. The reference value used depends on the detected object. For brains the ventricular CSF is used for calibration. Fat has higher signal strength than water and is therefore displayed with values above 100 pu.
Keyboard shortcut = Ctrl + F, which only shows 4 of the parametric maps. To see other maps, place the cursor in viewport, right-click and select Quantitative Maps. Select an option from the Quantitative Maps menu.
Click the Paging icon.
Left-click and drag to scroll through images within the current series.
Keyboard shortcut = F4
Click the Pan/Zoom icon.
Left-click and drag to pan the images.
Keyboard shortcut = F5
Click the Zoom icon.
Left-click and drag to magnify the image.
Keyboard shortcut = Z
Use the Freehand ROI icon to draw an ROI on a MAGiC image.
Place the cursor in the desired viewport.
Click and drag the Freehand ROI around the desired object.
Release the mouse to close the ROI.
Keyboard shortcut = F6
Click the Rectangular ROI icon to place an ROI on an image.
Click and drag each corner to size and shape the ROI.
Keyboard shortcut = F7
Click the Measure Distance icon to place a line measurement on an image.
Click and drag the end points to shape the measurement.
Click and drag the line segment to move the measurement.
The distance of the measurement is in mm. It is displayed next to the line segment.
To remove the measurement:
Click the line segment to make it active.
Right-click the active measurement.
Select an item from the menu: Disable Distance or Disable All Distances.
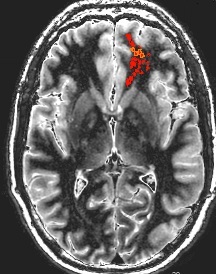
Auto ROI is used to efficiently define a user mask. It creates an ROI that automatically adds to or removes from the user mask. It can also be used as a semi-automation segmentation tool.
Click the Auto ROI icon to make it active.
To toggle Auto ROI between adding or subtracting to the user mask, press the Keyboard shortcut X. Auto ROI starts in the add mode. A minus sign indicates the mouse is in subtract mode.
Method 1: Place the cursor over a region of interest on a contrast-weighted image and left-click and hold the mouse until you are satisfied with the contour. Release the mouse to end the contour.
If your contour overlaps another contour, the system combines them.
Note: When used on contrast weighed images, the functionality is primarily designed for easier selecting findings small areas of interest.
Method 2: Place the cursor over a region of interest on a contrast-weighted image and left-click and drag the mouse until you are satisfied with the contour. Release the mouse to close the ROI.
When the ROI is drawn on a contrast weighted image, the contained pixels are automatically added to the user mask.
Figure 2. Example of Auto ROI
Keyboard shortcut = X
Click the TE icon.
Left- click and drag to adjust the TE.
Keyboard shortcut = Q
Click the TR icon.
Left- click and drag to adjust the TR.
Keyboard shortcut = W
Click the TE/TR icon.
Left- click and drag to adjust the TR/TE simultaneously.
Keyboard shortcut = E
Click the TI icon.
Left-click and drag to adjust the TI.
Keyboard shortcut = R
Click the TI TI icon.
To simultaneously adjust TI and TI2, left-click and drag horizontally to adjust TI vertically to adjust TI2.
Keyboard shortcut = T
Click the Save icon to save all visible stacks to the patient list and close the screen.