

- 00000018WIA30611970GYZ
- id_400271061.6
- Apr 14, 2022 9:24:29 AM
MAGiC: acquire a scan
Before you begin
Indications for use
MAGiC (MAGnetic resonance image Compilation) is a software option based on a combination of acquisition and post processing software that is intended for use on GE imaging platforms. MAGiC generates multiple image contrasts from a single acquisition scan. MAGiC enables post-acquisition image contrast adjustment. MAGiC also allows for the generation of parametric maps for further analysis of MRI acquisition data. MAGiC is indicated for head imaging.
When interpreted by a trained physician, MAGiC images can provide information useful in determining diagnosis.
About this task
Step-by-step instructions
- If desired, define the MAGiC post process parameters.
- From the Workflow Manager, click .
- From the Add Post Processing screen, click MAGiC.
- Click Setup.
- From the MAGiC post process screen, complete the following:
Figure 1. Example of a MAGiC post process selections screen 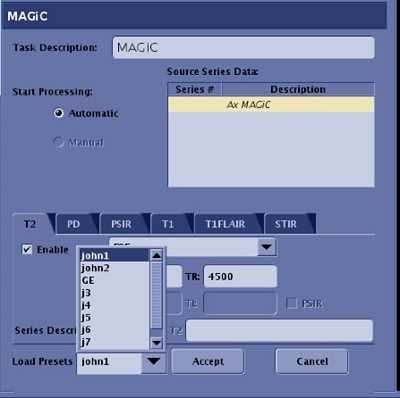
- Click each tab for which you want to generate post process images and adjust the scan parameters as needed. The initial values are derived from the scan prescription. The tabs are determined by the layout defined in the .
- Select one of the options from the menu to choose an image type: FSE, FSE-IR or FSE-DIR. The TI2 setting is only available for FSE-DIR. The PSIR option is only available for FSE-IR and FSE-DIR. The name of the tab and initial part of the series description is generated automatically from the chosen settings.
- Uncheck Enable to disable generation of the image series for the selected tab. A disabled tab is named --. The Enable checkbox is available on every tab.
- Click Automatic to have the post process images automatically reconstructed.
- Click Load Presets if you want to change the values for each tab to the values defined from the MAGiC post process procedure.
- Click Accept.
Results
- T1 relaxation times
- T2 relaxation times
- Proton Density
Using the T1, T2, and PD maps, contrast-weighted T1, T2, T1 FLAIR, T2 FLAIR, STIR, PSIR and DIR images can be synthesized, at any desired combination of echo time TE, repetition time TR, and inversion delay times TI and TI2. The contrast-weighted image settings can be defined on the Add post process screen or from the MAGiC Session Application.
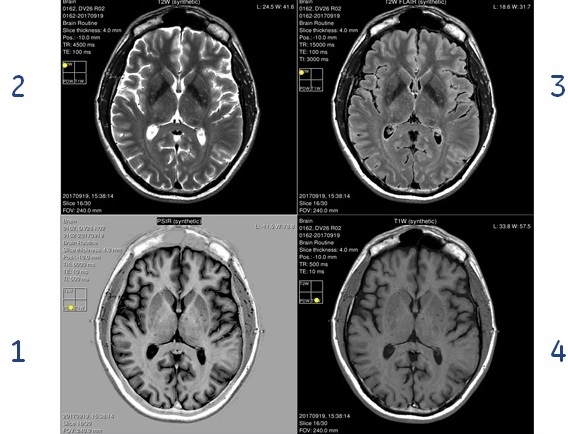
| Number | Description |
|---|---|
| 1 | Synthesized PSIR image |
| 2 | Synthesized T2-weighted image |
| 3 | Synthesized T2-weighted FLAIR image |
| 4 | Synthesized T1-weighted image |
Considerations
For consideration details, see MAGiC warning and considerations