• Object ID: 00000018WIA30600970GYZ
  • Topic ID: id_40025443 Version: 1.6
  • Date: May 4, 2022 2:28:41 AM

BREASE

About this task

BREASE is a single-voxel breast spectroscopy application that is optimized specifically for the breast. This tool provides biochemical information to help characterize breast anatomy and pathology and can also be used to monitor locally advanced breast cancer response to treatment.

Typically, BREASE is performed after first completing a study of the breast using VIBRANT. BREASE uses a TE-averaged, PRESS spectroscopy acquisition, compatible with the 4-, 7-, or 8-channel Breast coil.

Use these steps to acquire a BREASE spectrum for breast spectroscopy. The spectrum is displayed in the Viewer. MR breast spectroscopy can show if elevated concentrations of the Choline metabolite are present in a lesion.
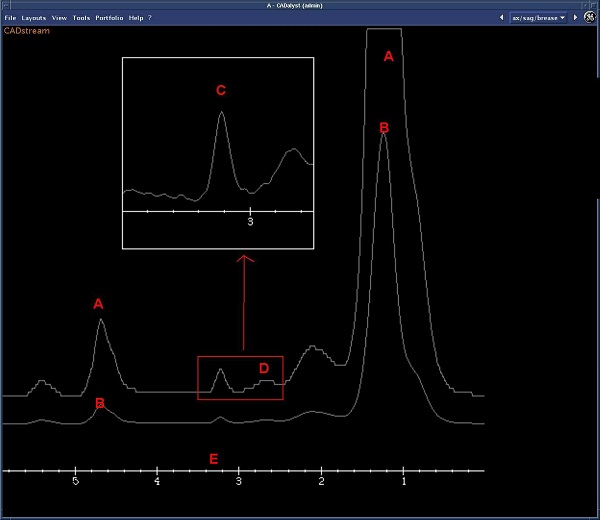
Figure 1. Spectrum from BREASE acquisition
Table 1. Spectrum image legend
Spectrum call outDescription
ASpectrum A is a magnified version of spectrum B.
BSpectrum acquired from BREASE VOI.
CZoomed spectrum from area D. Note that the zoom factor is fixed.
DRepresented by area C (zoomed). It is centered on the choline peak which is located, 3.2 ppm.
EPPM scale.

Step-by-step instructions

  1. Start a scan session.
  2. Acquire a 3-Plane localizer.
  3. From the Workflow Manager, click Add Task > Add Sequence.
  4. From the Protocol screen, select a BREASE protocol from your site or GE library.
    • At a minimum, include a localizer and BREASE series.
    • BREASE is compatible with all current breast coils and auto coil.
    • If you cannot locate a BREASE protocol in either library, then from the Protocol screen:
      1. From the GE protocol library, click the Template tab.
      2. Click the Applications folder.
      3. From the Applications list, click BREASE and add it to the Multi-Protocol Basket.
      4. Click Accept.
  5. From the Workflow Manager, select the BREASE series and click Setup.
    1. Make scan parameter adjustments, as needed.
      • Base the FOV on the size of the patient.
      • Use a Voxel Thickness > 15 and determined by size of abnormality.
      • Use a 32 NEX for a 20×20×20 mm3 voxel, Frequency Direction = unswap, Autoshim = on.
        Note: The NEX value needs to be adjusted as the voxel size changes so that SNR is sufficient to make the diagnosis. If the NEX value is too low, the SNR may be insufficient to make a diagnosis, if it is too high, it may result in patient motion artifact.
        Table 2. 3.0T voxel size/NEX combinations
        Voxel sizeNEXScan time (mn)
        20×20×20 mm324.48
        18×18×18 mm324.48
        15×15×15 mm568.00
    2. Click the Advanced tab and make adjustments as needed.
      • Scan mode = 1
      • Number of TE steps = 4
    Note: If ROI Edge Mask is set to 7 in the protocol, it means that there are 6 SAT bands already selected in S/I/R/L/A/P direction, around the voxel. 3.0T systems only allow a maximum of 6 SAT pulses. If there are SAT bands that need to be graphically prescribed within the voxel, then turn off the SAT band preset in the same direction within ROI Edge Mask User CV.
    Note: The maximum number of SAT pulses allowed may decrease depending on the patient’s weight. Unless the SAT pulses are absolutely necessary due to an irregular shaped lesion, do not apply them.
  6. If desired, see Add post-process task. Compatible post-process tasks include:
    • Image Enhancement Filters
    • Breast Spectroscopy SV
  7. Load the post contrast VIBRANT series in the Graphic Rx viewports.
    • You can use an acquired scan or a reformatted scan as the localizer for the VOI.
    • If you need additional planes to better visualize the lesion, display reformatted images in the Graphic Rx viewports. The reformatted image type must be RFMT and cannot be SSAVE. To set the reformat image type, from the Reformat desktop, click Preferences > Export > Check Save as Reformatted or PJN when possible. For details, see Toolbar: export icons.
  8. Zoom the images as needed to improve visualization of anatomy/pathology.
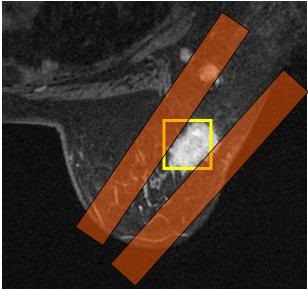
  9. When prescribing the voxel, make sure the size of the voxel matches the lesion size. For example, do not prescribe a 20×20×20 mm voxel if the lesion is only 10 mm in diameter.
    Figure 2. Optimal voxel size and placement (yellow box). The voxel is within the lesion; therefore there is no contamination from fat tissue.
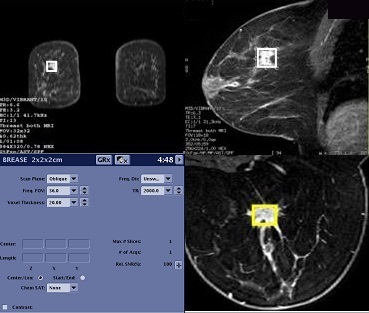
    • BREASE is only available as a single-voxel prescription.
    • Place the VOI over the reference line so that the reference image appears in READY View .
  10. If the lesion is very irregular in shape and the voxel includes some fat tissue, from the Graphic Rx Toolbar, click SAT to prescribe saturation bands to aid fat suppression.
    Figure 3. Voxel and SAT band placement on irregular shaped lesion
  11. Click Save Rx.
  12. From the Scan menu, select Auto Prescan.
    • The line width value is a measure of the voxel homogeneity; the smaller the line width, the better the homogeneity. Keeping the line width value within the recommended ranges is critical to the success of the spectroscopy scan.
    • If the values exceed the recommended values, repeat Auto Prescan.
  13. Optional: from the Scan menu, select Manual Prescan and adjust the center frequency so that it is centered on the water peak.
    1. From the Manual Prescan screen, click CF Fine.
    2. Select the receiver that provides the highest signal.
    3. Adjust the center frequency on the water peak.
    4. Click Done to close the Manual Prescan screen.
  14. Click Scan.