

- 00000018WIA30750970GYZ
- id_400220531.9
- Aug 17, 2022 5:48:52 PM
MUSE
About this task
Use these steps to acquire high resolution, multi-shot DWI/DTI scans: MUSE application. It acquires a segmented scan in the phase encoding direction, which mitigates shot-to-shot motion-induced phase errors inherent in multi-shot diffusion and diffusion tensor scans. The result is images with reduced blurring and susceptibility artifacts. Note that it does not correct voluntary patient motion artifacts.
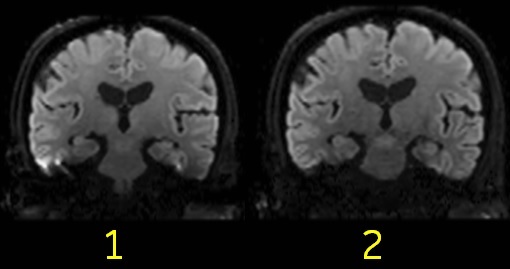
| Number | Description |
|---|---|
| 1 | MUSE de-selected. Note the blurring and susceptibility artifacts. |
| 2 | MUSE selected from the PSD/Application screen. |
Step-by-step instructions
Results
- It is not compatible with EPI FLAIR.
- It is not compatible with PROPELLER DWI.
- Image reconstruction time is slightly longer in comparison to a DWI or DTI scan.
- Image annotation:
- epi2muse
- When all of the anatomy is not included in the phase FOV, a sharp line may appear across the images. If this occurs, repeat the scan and use a larger FOV to remove the artifact.
Figure 2. Scan acquired with no air around Phase FOV with end result of artifact 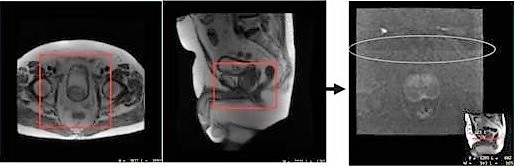
Scan acquired with air-to-air in the phase FOV with MUSE Diffusion. The addition of anterior and posterior saturation bands help to reduce motion and artifacts from fat.
Figure 3. Scan with air-to-air space around FOV 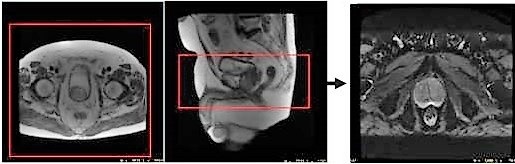
- The inherent susceptibility-induced geometric distortions in EPI-based DWI and DTI scans can be reduced by applying ASSET Imaging Option. ASSET requires a calibration scan and a mismatch between the calibration scan (RF sensitivity profile) and the EPI-based DWI/DTI scan due to susceptibility effects and motion might result in aliasing of bright structures such as eyeballs in T2 (b=0) and/or lower b-value images [1], see the following image. In the case of MUSE, potential shot-to-shot mismatch due to motion/inherent phase errors coupled with higher resolution images might exacerbate the problem such that aliasing artifacts from bright structures (e.g eyeballs) could be seen more frequently [2]. It is also important to note that derived images such as ADC and FA maps will also show this artifact if it is visible on lower b-value and/or T2 (b=0) images.
SAT band placement over the eyeballs was reported in literature as an effective way to mitigate eyeball aliasing [1]. Care should be taken to avoid inadvertent suppression of signals from the region of interest.
Figure 4. Eyeball artifact 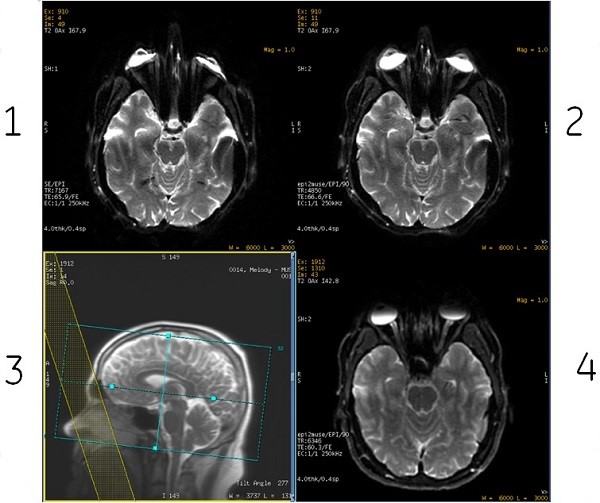
Table 2. Image legend Number Description 1 Example of eyeball ghosting in a single-shot EPI scan. 2 Example of eyeball ghosting in a multi-shot-EPI scan. 3 SAT band placement over eyeballs mitigates the eyeball artifact. 4 Mitigated the eyeball artifact from SAT band. [1] Chou, M-C., et al. "Pseudolesions arising from unfolding artifacts in diffusion imaging with use of parallel acquisition: origin and remedies." American journal of neuroradiology 28.6 (2007): 1099-1101.
[2] Chang, Hing‐Chiu, Shayan Guhaniyogi, and Nan‐kuei Chen. "Interleaved diffusion‐weighted improved by adaptive partial‐Fourier and multiband multiplexed sensitivity‐encoding reconstruction." Magnetic resonance in medicine 73.5 (2015): 1872-1884.