

- 00000018WIA307E0970GYZ
- id_400255131.4
- Apr 14, 2022 9:14:27 AM
Cine IR
About this task
Cine IR is a one-click application that uses a 2D FAST GRE pulse sequence with IR-Prepared, Cardiac Gating, and Sequential. Cine IR features a single adiabatic inversion pulse after detection of the cardiac R wave, which precedes the multi-cardiac-phase read-out. Each image (i.e. each cardiac phase) is acquired at a progressively longer TI time.
Use these steps to acquire a cardiac scan that allows you to acquire a fast visualization of tissue contrast at multiple inversion times (TI time) to select an optimal TI for your data set.
Step-by-step instructions
- From the AutoView screen, review the images and note the TI time of each image. The Cine IR images provide an evolution of T1-contrast based on the TI time of each phase. Select the TI of the image that demonstrates the optimal myocardium contrast that can be used for the MDE scan.
Figure 1. Example of Cine IR images 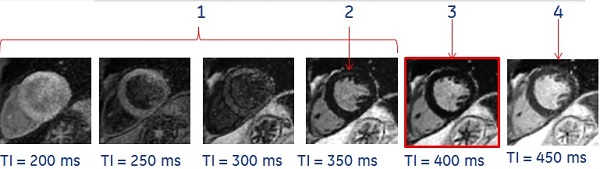

Table 1. Image legend Number Description 1 TI is too short. 2 Bounce point artifact. 3 Optimal TI value. 4 TI is too long. -
Note: the optimal inversion time (TI) that displays nulled normal myocardium signal. In the example above, the optimum TI is 400 ms. Use this TI time for the 2D MDE scan.
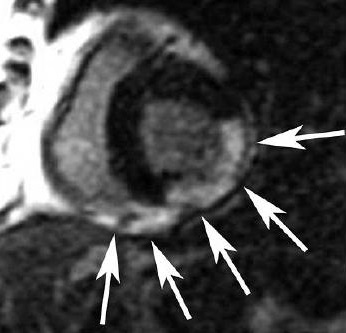
- Beware of the bounce point artifact, that indicates the TI is shorter than optimal. It is caused by signal cancellation at the tissue/blood interface. The bounce point artifact looks like a black outline along the endocardial and epicardial borders. Avoid this by choosing a higher TI.
-
Results
Background
Typically, a MDE (FGRE, cardiac gated, IR-Prep) scan is acquired for cardiac exams to asses myocardial viability.
Cine IR uses a multi-phase Fastcard/FastCINE scan where each phase represents a different TI and one image is generated for each phase. The TI time is annotated on each image.
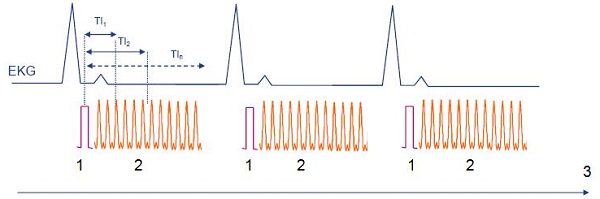
| Number | Description |
|---|---|
| 1 | IR Prep pulse |
| 2 | Data acquisition where one phase is one image |
| 3 | Time |
Selecting the optimum TI for the MDE scan is critical to enhance differences in the myocardium.
- TI selection varies from patient to patient based on circulatory status, renal function, cardiac output and disease state.
- Improper selection can lead to sub-optimal image contrast and potentially result in a repeat MDE scan.
Considerations
- Acquire the Cine IR scan once, immediately before the 2D MDE scan, approximately 8 minutes post-contrast injection for late enhancement.
- From the Cardiac tab, select the same #RR for both the Cine IR and the 2D MDE scans.