Use these steps to acquire images for patients with ischemic heart.
Step-by-step instructions
Acquire a sagittal localizer using an ungated 2D FIESTA sequence, or 2D FIESTA with Real Time Imaging Option.
On a sagittal localizer, prescribe and acquire a series of axial locations that cover the heart anatomy of interest using an ungated 2D FIESTA sequence.
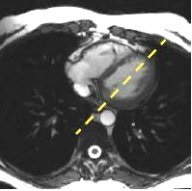
On an axial that displays the mitral valve, prescribe and acquire a long axis 2-chamber view using an ungated 2D FIESTA sequence.
On the 2-chamber view, prescribe and acquire a long axis 4-chamber view using an ungated 2D FIESTA.
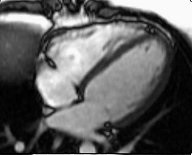
Figure 3. Long axis 2-chamber viewFigure 4. 4-chamber view
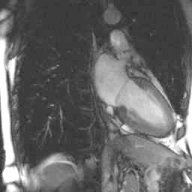
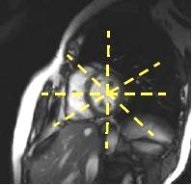
Another method to acquire a long axis view is to prescribe it from a short axis view. Figure 5. Short axis view
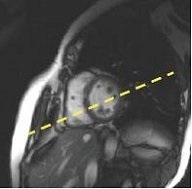
Prescribe and acquire a stack of short axis FIESTA Cine images using an ungated 2D FIESTA sequence.
The slices should cover the entire left ventricle from the mitral valve to the apex.
The short axis images are typically used for ventricular function calculations (stroke volume, ejection fraction, etc.). Figure 6. Graphic Rx slice prescription of short axis stack
Consider turning on the ASSET Imaging Option to reduce the breath hold time or to increase temporal resolution. If using ASSET, be sure that the Phase FOV incorporates all the anatomy.
If there is wrap-around artifact, prescribing the stack of slices from the mitral valve to the apex allows you to see the wrap artifact on the first acquisitions. Therefore, you can stop the scan and adjust the FOV before completing acquisition of all locations.
Prescribe and acquire a Myocardial Time Course series using FGRE-ET.
Prescribe a stack of short axis images to fully cover the left ventricle. Depending on the patient’s heart rate, you may have to adjust the number of slices and slice thickness or spacing.
Figure 7. Short axis locations from a 4-chamber view
When you copy/paste an FGRE-ET series, the heart rate is copied even if it changes. The heart rate is updated only when the Cardiac tab is opened.
Wait at least 5 seconds for the Heart Rate field to be updated.
If the heart rate increased, then a message displays at the bottom of the scan screen posting the maximum number of slices that can be acquired with the new heart rate.
Close the Cardiac Gating screen.
Click and drag the number of slices on the Graphic Rx screen to match the maximum number of slices message.
Click Save Rx and Scan when you are ready to acquire the scan data.
Prescribe and acquire a Cine IR scan, from which you can select the optimum TI for the Myocardial Evaluation series.
The RR interval for the Cine IR series must match the RR interval used for the MDE scan.
Prescribe and acquire a Myocardial Evaluation series: FGRE, IR-Prepared, cardiac gated.
The slices should cover the area of interest in at least two planes, typically a long and short axis (or long axis radial prescription).
Review the Cine IR images in Auto View and select the TI that optimized myocardium image contrast.
The RR interval for the MDE series must match the RR interval used in the Cine IR scan.
Figure 8. Short axis prescriptionFigure 9. Long axis radial prescription