

- 00000018WIA302F0970GYZ
- id_400262311.7
- May 4, 2022 2:47:40 AM
DISCO
About this task
DISCO is a 3D single-slab application involving a pseudo-random interleaved undersampling technique.
Use these steps to acquire a 3D single-slab with high temporal resolution. Typical DISCO dynamic contrast-enhanced scans include:
- Liver imaging with multiple arterial phases acquired within a single breath-hold.
Figure 1. DISCO liver image 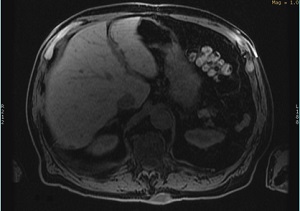
- Pelvis imaging for improved temporal resolution, for example, in the prostate.
- Breast imaging for improved temporal resolution.
| CAUTION | |
|---|---|
- DISCO automatically selects Extended Dynamic Range and Multi-phase Imaging Options. They cannot be de-selected.
- DISCO uses a view-sharing technique that can cause some temporal blurring.
- Respiratory motion artifacts may result from suboptimal breath-holding when scanning the liver.
- When using Flex, achieving in-phase/out-of-phase TEs may limit readout resolution.
- On 1.5T systems, the T1-weighted contrast is reduced due to the long TR required.
Step-by-step instructions
- From the Workflow Manager, select the DISCO series and click Setup. From the Scan Parameter and Details screens make adjustments, as needed.The effective temporal resolution of the wash-in phases (time interval from one wash-in phase to the next phase) value is displayed on the Scan Parameter screen. Note the value may change as you alter other scan parameters.
Figure 2. Scan parameter screen advisory area 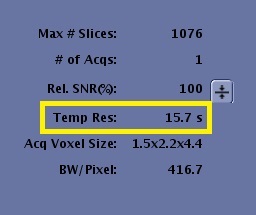
- To view the Details screen, click the
 of the scan parameters screen tab. Make scan parameter adjustments, as needed.
- A high bandwidth is used to minimize chemical shift effects.
- If any or all of these scan parameters are selected (ASSET, HyperBand, PURE), and if you select On from the Calibration in Prescan menu, which is located on the Details tab, a calibration scan is acquired during Auto Prescan.
- Due to chemical shift challenges, use the following recommended TE values. These TE values will limit the maximum resolution (Frequency parameter) you can choose:
- 1.5T: set the out-of-phase TE range between 2.0 - 2.5 ms and the in-phase TE range between 4.0 - 5.3 ms.
- A high bandwidth is used to minimize chemical shift effects.
- Click the Dixon tab.
Figure 3. Dixon tab 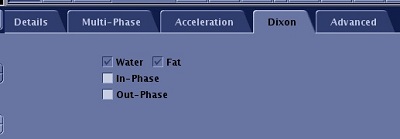
- The In-Phase and Out-Phase options on the Dixon tab are only available if Flex is selected with DISCO, the default state. Flex generates water-fat separated images and optional source images (in-phase and/or out-of-phase).
- If fat suppression is not needed, do NOT select Flex, SSRF, nor Chem SAT: SPECIAL.
- Click the Multi-phase tab and make adjustments as needed.
- For details regarding the multi-phase tab when DISCO is combined with Star Imaging Option, see DISCO Star.
Figure 4. Detail and Multi-phase tabs with DISCO: Variable Delay 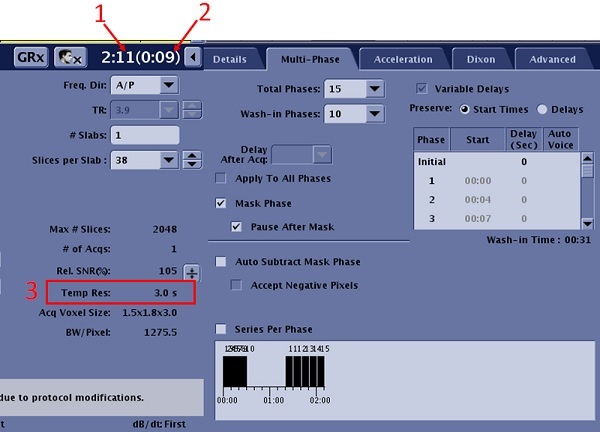
Table 1. Image legend Number Description of Detail tab 1 Total time excluding Mask. 2 Duration for Mask or non-wash-in phases. 3 Temporal resolution for wash-in phases. Table 2. Multi-Phase tab selections Selection Description Total Phases 
- The Total Phases does not include the mask phase.
- For a prostate exam, enter the number of phases required to adequately capture the contrast wash-out, approximately 6 minutes.
- For a breast exam, enter the number of phases required to adequately capture the contrast wash-out, approximately 10 minutes.
Wash-in Phases 
- The number of phases from the time of injection to the completion of contrast uptake in the area of interest.
- For a liver exam, enter the number of wash-in phases that will fit within a breath-hold
Variable Delays 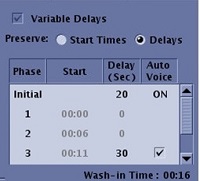
- Variable Delays is forced On for DISCO.
- When Smart Prep is selected with Multi-Phase and Variable Delays, the Image Acquisition Delay User CV and the first phase delay have the same value. If either value is changed, the other value is automatically adjusted.
- Preserve options determine if the start time is kept or the delay time is kept for each phase when the scan time is changed.
- Initial represents the delay time that occurs before the first phase and after the mask phase. The time delay is the time from clicking Scan to the start of the acquisition of the first phase, post mask. Screen contents and ability to edit the values in the table varies, based on other Multi-phase tab selections.
- The mask phase is not represented in the Variable Delay display and is not included in the Total Time. You can change the delay time for the initial phase and it will not change the Total Time. Change the delay time for any of the other phases and the Total Time updates.
- Each time you enter a phase delay, the system recomputes and updates the corresponding and subsequent phase start times.
Mask Phase and Pause After Mask 
Select Mask Phase to create a mask phase and select Pause after Mask to pause the scan after the mask phase. Series Per Phase 
If desired, click the Series per Phase option to generate each phase in a separate series. Visual display 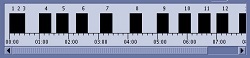
The visual display illustrates the acquisition time line. The time line diagram does not include the mask phase. - When the Total Phases value is greater than the Wash-in Phases value, the following scenario occurs.
Figure 5. Phases acquired when the Total Phases value is greater than the Wash-in Phases value. Note that every box represents a phase 
Table 3. Image legend Number Description 1 
Mask phase that occurs when the Mask Phase option box is selected. 2 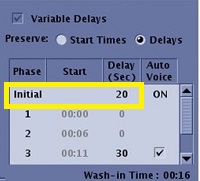
Time of injection and initial delay that you enter for a pause between injection and start of the first phase. 3, 4 Phase 1 and phase 2---> W, where "W" represents the number of Wash-in Phases. 5 Delay after the last wash-in phase. 6, 7 Phase W +1 ---> Phase N, where "N" represents the number of Total Phases. - When the Total Phases value is the same as the Wash-in Phases value, the following scenario occurs.
Figure 6. Phases acquired when the Total Phases value is the same as the Wash-in Phases value. Note that every box represents a phase 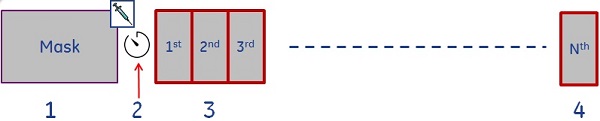
Table 4. Image legend Number Description 1 Mask phase that occurs when the Mask Phase option box is selected. 2 Time of injection and the initial delay that you enter. 3, 4 Phase 1---> N, where "N" represents the number of Total Phases and the Wash-in Phases.
- For details regarding the multi-phase tab when DISCO is combined with Star Imaging Option, see DISCO Star.