

- 00000018WIA30A71970GYZ
- id_400255431.5
- Jun 22, 2022 1:16:41 PM
Multi Station: acquire a localizer scan
About this task
Use these steps to build and scan a Multi Station localizer for a peripheral vascular run-off exam.
Step-by-step instructions
- To setup the localizer for the Multi Station protocol, follow these steps.
- The protocol should have the following components:
- 3 series of Vascular TOF localizers for Bottom, Middle and Top, used to visualize vessels.
- 3 series of 3 plane localizers for Bottom, Middle and Top, used to visualize anatomy.
- 3 series of 3D Vascular TOF SPGR contrast for Top, Middle and Bottom.
Figure 1. Workflow Manager showing protocol components 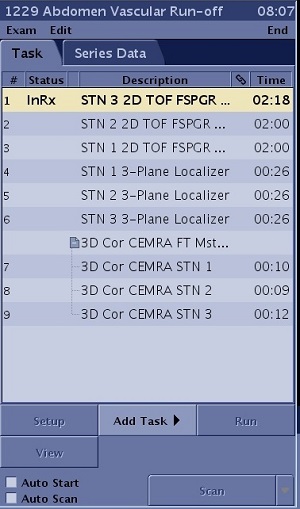
- From the Workflow Manager, select either the TOF or 3-Plane set of localizers, right-click and select Cut to remove the three unnecessary localizer series.
Figure 2. Cut one of the two localizer series from the Workflow Manager 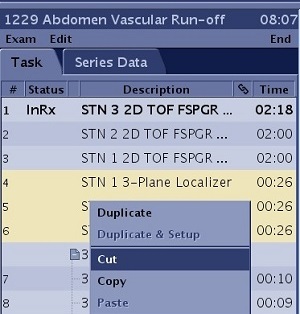
- Individually, select each localizer series in the Workflow Manger and click Setup.
- From the Coil tab, note that auto coil selects the best coil for each station.
- From the Scan Parameter, Details and Vascular screens, consider the following scan parameters for each localizer.
- Image parameters: Plane = Axial, Mode = 2D, Family = Vascular, Pulse = Fast TOF-SPGR.
Table 1. Scan parameters per station FOV FOV center SliceThickness Spacing Range 46 cm P20 6-7 mm 0 S0-S460 46 cm P0 10 mm 0 S410 - S870 46 cm P0 10 mm 0 S820-S1280 - Each station should be approximately 400-450 mm apart with a station overlap of 30-50 mm. The distance is dependent on the patient height.
- Acquisition Timing: Phase = 128, Frequency = 256, NEX = 2, PFOV = 1.0, Shim = Auto
- Vascular tab: Projection Images = 10, Collapse = On.
- To reduce scan time, use a larger FOV with a smaller No Phase Wrap factor, or set No Phase Wrap to 1.0 and either place the patient’s arms above the head or raised on cushions above the abdomen. Reduce the NEX value.
- Image parameters: Plane = Axial, Mode = 2D, Family = Vascular, Pulse = Fast TOF-SPGR.
- Click Save Rx for each series edited.
- From the Workflow Manager, select either the TOF or 3-Plane set of localizers, right-click and select Cut to remove the three unnecessary localizer series.
- The protocol should have the following components: