Use this procedure to acquire a localizer of the patient's whole body. With a Multi-station Whole Body Localizer, the system automatically combines the acquired data to generate stitched together coronal and sagittal images for the scan range and binds the axial data into series that can be used in Graphic Rx for MR prescriptions.
Step-by-step instructions
From the Workflow Manager, select the Multi-station Localizer series.
If you highlight a single station of the Multi-station localizer, the system skips the SAR scout. Therefore, this action is not recommended.
Click Setup to review and/or adjust the scan parameters.
The system defines the overlaps and aligns the FOVs for the Multi-station Localizer.
Verify the patient position/orientation.
Warning
Ensure that the Patient Position selection matches the actual patient orientation. Making a selection that does not match the patient’s actual position results in incorrectly annotated and/or rotated images, possibly resulting in improper medical treatment.
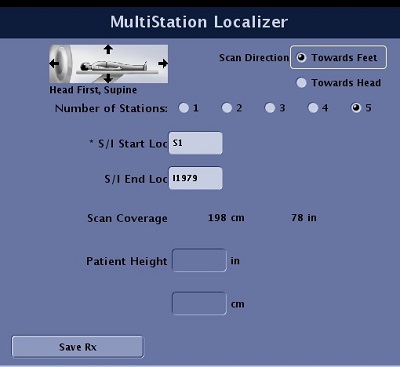
Figure 1. MultiStation Localizer Task
Select a Scan DIR (direction):
Towards Feet
Towards Head
Set the start location.
Select the number of stations to cover the desired area or enter an end location.
Type an end location and press Tab for the system to automatically calculate the number of stations. It is better to over prescribe the end location as the system rounds the number of stations up or down based on the requested scan coverage.
Be careful if you change the A/P or R/L locations. You will need to change all stations if you want the images to align for the whole body coronal and sagittal images.
Individual stations can be setup and modified, although this method is not recommended. Each station has a 45 cm FOV.
Click SaveRx.
Click Scan.
The scan time counts down in the upper-right corner above the AutoView screen.
Wait for all series to complete before graphically prescribing the subsequent MR scan tasks.
Wait for the Multi-station Localizer task status to state, Done.