From the Protocol screen, select an MR-Touch protocol from your site or GE abdomen library.
At a minimum, include a localizer, calibration and an MR-Touch series.
If you cannot locate an MR-Touch protocol in either library, then from the Protocol screen:
From the GE protocol library, click the Template tab.
Click the Applications folder.
From the Applications list, click MR-Touch and add it to the Multi-Protocol Basket.
Click Accept.
Click Start Exam.
Acquire a localizer series.
From the Workflow Manager, select the MR-Touch series and click Setup.
Set the scan parameter Calibration in Prescan option to Off so that a manual calibration is acquired.
Click the Details tab and make scan parameter adjustments, as needed.
Click the MR-Touch tab and make scan parameter adjustments as needed. For details, see MR-Touch: build the protocol.
If your protocol does not include a post-process task, consider adding a task so that the MR-Touch images are automatically generated.
Click Add Task > Add Post-Processing.
Click MR Elastography and click Setup.
Click Automatic and Accept.
When an MR-Touch automatic post processing task is added within a scan, the color images are not DICOM compliant and therefore, most Picture Archiving Communication systems will not accept the color images. Note the gray scale images are DICOM compliant. If color images are preferred, you must post process the MR-Touch series in the READY View MR-Touch application.
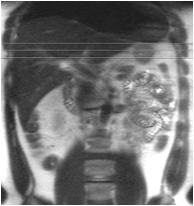
Graphically prescribe axial slices over the area of interest.
To maintain desired wave propagation, do not prescribe images at the dome of the liver nor through the lungs. Prescribe slices at the widest portion of the liver, which is typically 2-10 cm below the superior margin of the liver.
Figure 1. This coronal localizer example displays three axial slices positioned in the middle of the liver
When the prescription is finished, click Save Rx.
Acquire the Calibration scan at end expiration.
Select the MR-Touch series and click Prep Scan.
Note: It can take up to 15 seconds to download the MR-Touch series when it is run the first time after installation or if some scan parameters such as TR, # of slices, MR-Touch parameters have change from the previous MR-Touch series.
Deliver breathing instructions and click Scan.
For consistent results, acquire the scans at end expiration.
MR-Touch acquisition generates the following image types: magnitude, phase maps, wave maps. Six relative stiffness images are reconstructed for each slice location.
View the images in the Viewer.
If you view the automatic post processed maps from the Viewer and within the scan, the images are only available in gray scale.
Optional: if you want to adjust the elastogram color maps, wave maps brightness or fuse functional maps with anatomical images, launch READY View MR-Touch workflow.