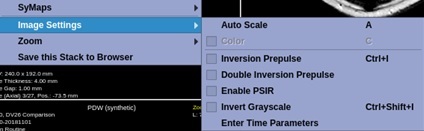
Place the cursor in a viewport and right-click to view the right-click menu.
Click Image Settings to view the Image Settings menu.
Figure 1. Image Settings menu
Click Auto Scale to resets the W/L to the default setting.
Click Color to remove the color from the map.
Click Inversion Prepulse to activate an inversion pre-pulse in the image.
The TI of the inversion pre-pulse is displayed to the left in the view and can be adjusted using the .
Click Double Inversion Prepulse to activate a double inversion pre-pulse in the image.
The inversion times are displayed to the left in the view and can be adjusted using the .
Click Enable PSIR to view a phase-corrected real image.
This increases the range of the signal by preserving its sign (positive/negative) and may increase contrast between different tissues. When PSIR is inactivated, negative values are visualized as the corresponding absolute value (magnitude reconstruction).
Click Invert Grayscale to display the image stack with the intensity of each pixel inverted i.e. black pixels are displayed as white and vice versa.
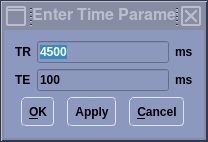
Click Enter Time Parameters and enter TE, TI and TR values in the text boxes to change the image contrast.
Figure 2. Example of Time Parameter screen
Click Apply to update the image contrast and keep the Time Parameter screen open.
Click OK once you have the desired time parameter and image contrast. The time parameter on the image updates, the image contrast updates, and the Time Parameter screen closes.
Click Cancel to not make any changes and close the Time Parameter screen.


 .
. .
.