QuickSTEP is a multi-station, multi-phase acquisition technique that minimizes the set-up and acquisition time for lower extremity run-off examinations. The acquisition technique eliminates the need for a localizer scan and employs efficient prescription methods including an auto volume prescription system with specific coils, which reduces the exam time to approximately 6 to 8 minutes.
QuickSTEP uses RF excitation pulses that are much shorter in duration than other excitation RF pulses. Since they encompass the entire thickness of the body, there is no need for scout imaging. The excitation pulses also permit a substantial reduction in TE and TR, resulting in an acquisition time that is very short and it allows for entire body thickness coverage without impairment of spatial resolution.
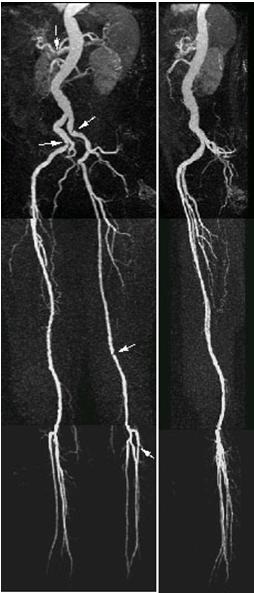
Figure 1. QuickSTEP lower extremity run-off
About this task
Use these steps to acquire a QuickStep scan. Keep in mind the following:
QuickSTEP can only acquire coronal slabs.
It is only compatible with the bolus detection method of Fluoro Trigger.
Most of the scan parameters are automatically selected with QuickSTEP. If you wish to control the scan parameters, then acquire a 3D FGRE scan with the Multi-Phase and Multi-Station Imaging Options selected.
If Multi-Phase is selected, it only applies to Arterial Phase acquisition. Mask and Venous phases remain as single phase scans.
Step-by-step instructions
For patient set-up, follow these steps.
Place a QuickSTEP compatible coil on the table. When a compatible surface coil is used, position the coil used for the last station.
The QuickSTEP protocol must have a coil that matches the coil on the table. If the coil in the protocol does not match the coil on the table, you cannot use the protocol.
Position the patient supine and feet first.
The patient must have the arms raised above the head since there is no anti-aliasing option available.
Place the landmark at the feet. The landmark position informs the system where the patient coverage begins.
Inform the patient of the rapid table movement that occurs during the scan so that the patient is not startled when the table moves between stations.
From the Workflow Manager, click Add Task > Add Sequence.
From the Protocol screen, select a QuickSTEP protocol from your site or GE library. In the GE library, the QuickSTEP protocols are located in the Abdomen body part.
Select a QuickSTEP protocol from one of the sub-folders that uses the following naming convention:
QUICKSTEP <coil name><multiphase option>. The MPH option indicates the number of phases for the arterial stage. If there is no MPH in the protocol title, then it implies a single phase scan.
Select one of the protocols from the selected sub-folder that uses the following naming convention:
QUICKSTEP <coverage><patient size>. Coverage is the S/I runoff coverage and patient size indicates the FOV, which is based on the patient body habitus.
Sample protocol names:
QUICKSTEP 128 cm Lrg = 128 cm coverage and a 48 cm FOV
QUICKSTEP 112 cm Lrg = 112 cm coverage and a 42 cm FOV
QUICKSTEP 128 cm Med = 128 cm coverage and a 48 cm FOV
QUICKSTEP 112 cm Med = 112 cm coverage and a 42 cm FOV
QUICKSTEP 96 cm Small = 96 cm coverage and a 36 cm FOV
From the Workflow Manager, select the QuickSTEP series and click Setup.
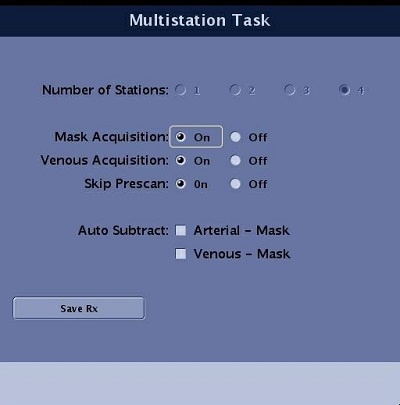
The Multistation Task screen displays. The number of stations cannot be edited. It is part of the protocol. Figure 2. QuickStep and Multistation Task screen
Select desired acquisition types for the exam: Mask to allow subtractions, Venous to acquire venous flow, and Arterial to acquire artery flow.
Skip Prescan On is the default selection for optimum exam speed. This means that prescan data is only acquired from the top station and the other stations have the prescan values calculated from the first station. If you want to acquire prescan data from each station, then select Off for the Skip Prescan option.
Select desired subtraction series that will automatically be generated when the acquisition is finished.
Click Save Rx to close the Multistation Task screen.
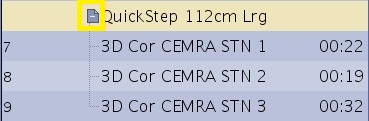
Click the folder + icon to open or expand the QuickSTEP series. Review the scan parameters. The only editable field is contrast and AutoVoice. Make changes as needed.
Figure 3. Click "+" icon to expand the QuickSTEPs
Click the Advanced tab and view the User CV values. Note that they cannot be changed.