Consider this information when you adjust the window width and level.
You can control what pixel values are visible in your image with the degree of contrast by adjusting the window width and level.
Window width adjustment sets how large a range of numbers will be assigned to the gray scale. The wider the window width, the more pixel values each shade represents and the less contrast there will be among the pixels. The lower the width, the image appears more contrasty or black and white rather than many shades of gray.
Window level adjustment sets the image brightness. Picture the window width as a horizontal line. The line has a center point. When you set the level, you are deciding where, on a brightness scale that center point will be placed. Half the gray scale (from black to medium gray) will fall below it; the other half (from medium gray to white) will fall above it.
About this task
Use one of the following methods to adjust the Window Width/Level to control the brightness and contrast of the images.
Step-by-step instructions
Open the Viewer.
Use these steps to adjust W/L using the left mouse button.
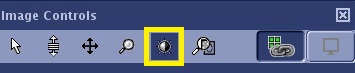
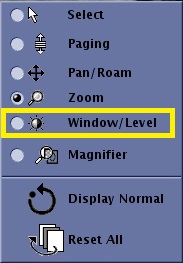
From either the Image Controls panel or the right-click On-view menu, click the Window Width and Level icon to change the left button on the mouse to the W/L control.
Figure 1. W/L icon on the Image Controls panel
Figure 2. W/L icon on the right-click on-view menu
Place the cursor on an image and left-click and drag up and down to change window level.
Place the cursor on an image and left-click and drag right to left to change window width.
Use these steps to adjust W/L using the Presets.
Place the cursor over the orange window width and level in the lower right corner of the viewport.
Right-click and select a preset window width and level.
Figure 3. Preset W/L menu
Use these steps to adjust a predefined W/L from the Apply windowing panel.
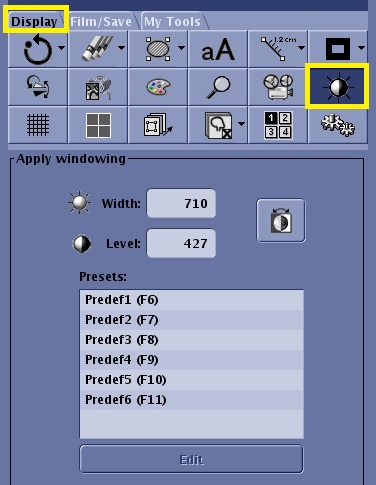
From the Display tab, click the Window Width and Level icon.
Figure 4. Window/Level icon and panel on the Display tab
In the Apply windowing area, select a preset value.
Click Edit.
Enter specific values in the width and level text boxes.
Type a name for the preset value.
Click Save and respond to any prompts.
Use these steps to adjust W/L from the keyboard.
Place the cursor on any viewport.
Left-click the orange window width or level to activate it.
Press and hold or rapidly press and release the up/down arrow keys to change the window level.
Press and hold or rapidly press and release the left/right arrow keys to change the window width.
Press one of the following keys to activate the preset window: F6, F7, F8, F9, F10, F11.