

- 00000018WIA309AD770GYZ
- id_400214681.4
- Mar 28, 2022 11:13:52 AM
Annotation: add/erase
Before you begin
Annotation allows you to comment for labeling purposes or draw attention to a specific area of interest. Multiple areas of annotation can be added to an image and then later deleted. There are two annotation methods.
- Annotation without an arrow
- Annotation with an arrow that includes an on-screen arrow to identify specific structures, as well as to make text entries
About this task
Step-by-step instructions
- To write a message on the viewport, follow these steps.
- Click the viewport in which you want to write a message.
- From the Display tab, click the Annotation icon.
Figure 1. Annotation icon on the Display tab 
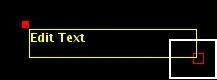
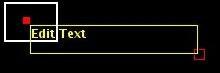
- In the Annotation text box, edit the annotation as needed.Click and drag the open box to define the text box size.
- Move the cursor into the text box and enter a message. The tool automatically wraps the text and expands the box size as you enter text.
- Insert the cursor within a string of text and type information.
- Select existing text and either type over it or press Delete.
- To add or remove an arrow to the text box, click
 and select or de-select Include Arrow on the Annotation screen.
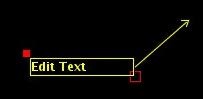
- Click and drag the arrow tip to position the arrow.
- Click and drag the arrow line to move the arrow and box as one unit.
- Click and drag the solid box to move the text box.
- Click and drag the open box to change the text box size.

- After you have added annotation to your image, use these steps to duplicate the annotation to other images.
- From the Display tab, click the .
- Make a propagation selection.
- Select All images in series to have annotation changes apply to all images within the series.
- Select This image forward to only have the annotation changes apply to images with a larger number within the series.
- Select Range and specify a range of slices.
- Click Apply.
- From the Display tab, click the
- To remove annotation, follow these steps.
- Confirm that the annotation is active (yellow). If it is not, click the annotation to make it active.
- From the Display tab, Erase/Hide menu, click the
 to remove the active annotation on the active viewport.
 - To delete the annotation message from all images within the current series, click the
 .
.