Consider this information when you use the Save Localizer tool.
When Save Localizer is set to off from either the exam or system preference settings the off setting overrides the state of the Save Localizer set from the Graphic Rx toolbar. For example, if it is in the Off state on Preference screen and the Save Localizers option is set to On from the Graphic Rx screen, it will be reset to off for all series except spectroscopy serieses.
Click Save Localizer On from the Exam Preference screen and the System Preference screen before setting up a series if the Save Localizer view is desired.
About this task
Use these steps to view a saved localizer images from a unique viewport. The Localizer Viewer is a dedicated single-viewport viewer, accessible from the Viewer, that displays localizer images for a given series. This feature allows you to keep the Viewer open and the Localizer viewport open simultaneously, thus improving viewing and filming workflows when using the Viewer.Figure 1. Example of Save Localizer viewport
Step-by-step instructions
From the patient list, select the desired series.
From the Session Apps list, click Viewer.
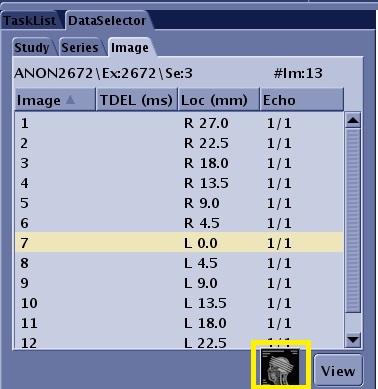
From the DataSelector area of the screen, click the Save Localizer icon.
Figure 2. Save Localizer icon on the DataSelector screen
Only one Localizer Viewer can be opened at a time.
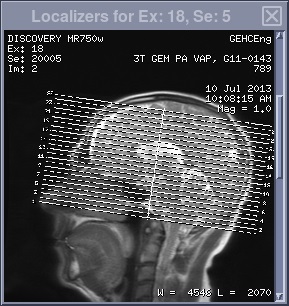
The scan locations from the selected series are automatically posted in the localizer viewer. Click and drag the image scroll bar to see all images in the localizer series. Note that you can view images in the Localizer viewport when you are selecting a series from the browser. Figure 3. Example of Sagittal localizer
Figure 4. Example of Coronal localizer
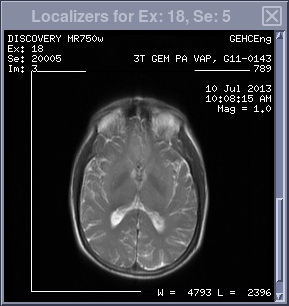
Figure 5. Example of Axial localizer
The Localizer Viewer displays the localizers of the series currently displayed in the viewer, if available. If the currently displayed series has no localizer images, the Localizer Viewer displays a black screen with the message: “No localizers found.”
Adjust the size and location of the localizer viewport.
Click and drag the edge of the localizer viewport to expand the size within limits.
Position it anywhere on the screen. If a Localizer Viewer has been opened but has been hidden by other windows (for example, Viewer, READY View, etc.), click the to bring it forward.
When opened, it will retain the size and position it had when it was previously closed.
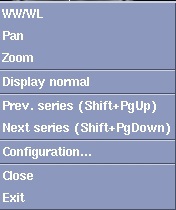
Right-click within the Localizer Viewport to display the Localizer menu.
Figure 6. Localizer menu
Make a selection from the menu.
If you select WW/WL, Pan or Zoom, middle-click and drag to change the image.
Next series and Previous series display other series in the exam.
From the Localizer menu, click Configuration.
Select annotation level and font size option buttons as needed.
Click Accept to register the selections and close the window.
Use F1 or drag and drop methods to film images in the Localizer viewport.
Right-click and select Close from the menu to close the Localizer viewport.
If the Localizer icon no longer resides on the Data Selector, then execute the following steps.
Right-click and select Exit to close the Localizer icon ().
To reset the Localizer icon onto the Data Selector, close the Viewer session and then reopen a Viewer session.


 to bring it forward.