Use the Cine tool to page through images as if you were viewing a moving picture.
Step-by-step instructions
Open the Viewer.
Select the series you want to view in cine mode.
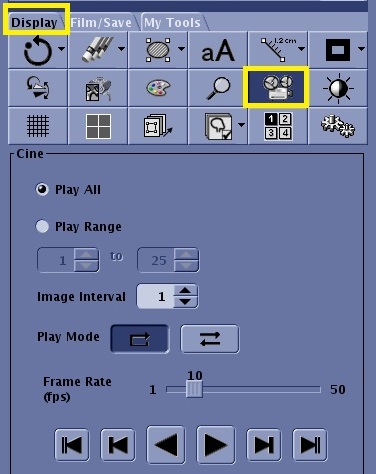
From the Display tab, click the Cine/Movie icon.
Figure 1. Cine/Movie icon on the Display tab
In the Cine area, click the Play icon (), which uses all the default settings. Alternatively, make selections from the Cine area.
The system automatically changes the format to 1-on-1.
Define the slice range.
Click Play All to have all images within the series placed into the movie.
Click Play Range and enter a From and To image number in the text fields.
Define the Image Interval. Typically leave this at 1, the default value. When displaying a movie from a multi-phase series, enter the number representing the number of phases in the image range.
Select an Image interval which allows you to skip images within the series when displaying them in the movie. For example, if your series is a 4-phase acquisition, you may wish to view only one phase at a time and therefore would enter a 4 interval.
Select a viewing mode.
The Loop icon () displays the movie from start to end, then start to end. For example, if there are 20 images in the movie, the images display 1-20, 1-20, 1-20, etc.
The Rock icon () displays the movie from start to end, then end to start. For example, if there are 20 images in the movie, the images display 1-20, 20-1, 1-20, 20-1, etc.
Select a Frame Rate, which is the number of images that display within a second.
Click the Play Backward and Forward icon () to start the movie from the point at which it was stopped or paused.
Click the Pause icon () to stop the movie.
Click the End icon () to place the last image within the movie into the active viewport.
Click the Beginning icon () to place the first image within the movie into the active viewport.
Click the Step Forward icon () to increment the images one at a time from front to back. Use this icon to increment the images to a start point that is not the first image in the movie slice range.
Click the Step Back icon () to increment the images one at a time from back to front. Use this icon to increment the images to a start point that is not the first image in the movie slice range.


 ), which uses all the default settings. Alternatively, make selections from the Cine area.The system automatically changes the format to 1-on-1.
 ) displays the movie from start to end, then start to end. For example, if there are 20 images in the movie, the images display 1-20, 1-20, 1-20, etc.
 ) displays the movie from start to end, then end to start. For example, if there are 20 images in the movie, the images display 1-20, 20-1, 1-20, 20-1, etc.
 ) to stop the movie.
 ) to place the last image within the movie into the active viewport.
 ) to place the first image within the movie into the active viewport.
 ) to increment the images one at a time from front to back. Use this icon to increment the images to a start point that is not the first image in the movie slice range.
 ) to increment the images one at a time from back to front. Use this icon to increment the images to a start point that is not the first image in the movie slice range.