

- 00000018WIA30B67970GYZ
- id_400216831.3
- Mar 28, 2022 10:43:30 AM
On-view: right-click
About this task
Step-by-step instructions
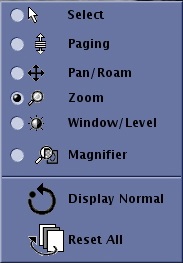
- Make a selection from the menu.
- Click the Select icon (
 ) to use the left mouse as a selection function and deactivate all other Image Controls.
 - Click the Paging icon (
 ) to use the left mouse to scroll through images within the current series. Click and drag up/down or right/left to advance to higher or lower image numbers.
 - Click the Pan/Roam icon (
 ) to use the left mouse to scroll images. Click and drag the image in the active viewport to new location.
 - Click the Zoom icon (
 ) to use the left mouse as a zoom function. Click and drag up to increase the zoom factor and click and drag down to decrease the zoom factor. The zoom factor is annotated in the upper right area of the image. The zoom is applied to the image in the active and forward viewports.
 - Click the Window Level icon (
 ) to use the left mouse to window width and level images. Click and drag the cursor in the following directions to change the W/L:
 - Up to brighten the image (the level value decreases)
- Down to darken the image (the level increases)
- Right to widen the window width
- Left to narrow the window width
- Click the Magnifier icon (
 ) to use the left mouse as a magnifying glass.
- Click the Select icon (
- To reset the image to the original display parameters, select one of the following icons.
- Click the Display Normal icon (
 ).
). - Click the Reset All icon (
 ).
). - For more details, see the Display Normal procedure.
- Click the Display Normal icon (