Consider this information when you use the ROI tool.
The ROI tool allows you to select an ROI style, deposit it and then size, shape, and move it on an image to obtain the standard deviation, mean, and area.
A yellow ROI indicates the ROI is active and that it can be moved, sized and rotated. Cyan ROIs indicate that the ROI is inactive.
CAUTION
Post processing results may be affected by the presence of MR Conditional implants. Consider the following related to post-processing MAVRIC SL images on your MR, PACS, or AW systems: If an image includes susceptibility artifact, such as from MR Conditional metal implants, measurements made on the image may be incorrect due to distortion of actual physical locations.
About this task
Use these steps to activate an ROI to obtain information on the standard deviation, mean, and area. The ROI statistics are displayed in the lower-right corner of an image. Up to three statistics can be displayed.
Step-by-step instructions
Open the Viewer.
Click the viewport in which you want to deposit an ROI.
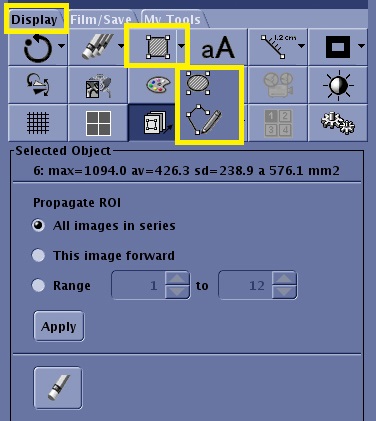
From the Display tab, click the ROI arrow and choose an ROI icon.
Figure 1. ROI icon and menu on the Display tab
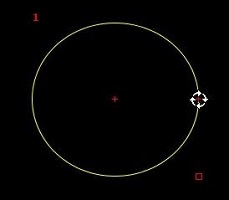
Size, shape, and move the ROI.
For an elliptical or rectangular ROI: Figure 2. Elliptical and Rectangular ROI
Click and drag the open ended box to size the ROI.
Click and drag the center cross or edges to move the ROI.
To rotate the box ROI, click the side with the cross hair cursor, position the cursor over the cross hair cursor to display a white rotate symbol. Click and drag the rotate symbol to rotate the box cursor.
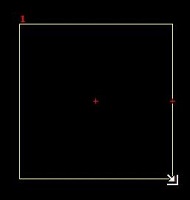
For a polygon ROI, place the cursor in the viewport and click to deposit each point.
Figure 3. Polygon ROI
Click and drag a box to reshape the ROI.
Right-click a box to delete the box.
Click and drag the edges to move the ROI.
Place the cursor on a line between two closed boxes and right-click to deposit another box.
Click anywhere on the edge of a cyan (inactive) ROI to make it yellow and active.
To propagate the ROI, follow these steps.
Click anywhere on the edge of a cyan (inactive) ROI to make it yellow and active.
Make a selection from the Selected Object area of the ROI screen area.
Select All images in series to change all images within the series when one image changes.
Select This image forward to only change the images with a larger number within the series.
Select Range and specify a range of slices to propagate the ROI.
Click Apply.
Use these steps to remove an ROI from an image.
Click anywhere on the edge of a cyan (inactive) measurement to make it yellow and active.
To delete an active ROI from a single image, do one of the following.
Press Delete.
From the Display tab or from the Selected Object area of the ROI screen, click the Erase Selected icon ().
To delete multiple ROIs from an active viewport, from the Display tab, click the Erase All icon ().


 ).
). ).
).