Use these steps to acquire a scan with a Pasting post-process task. Pasting applications include spine, peripheral vascular and whole body oncology screening exams. The procedure below uses a spine as an example for a pasting exam.
Warning
Do not use Pasting post process application with images that demonstrate metal implants.
Step-by-step instructions
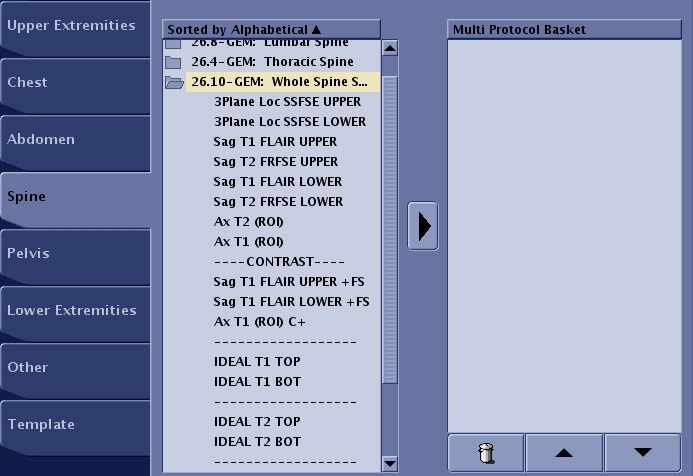
From the Protocol screen, select a protocol for Auto Paste.
Figure 1. Example of a whole spine protocol that would use Auto Paste
Click the to send the protocol to the Multi Protocol Basket.
From the Protocol screen, click Accept.
From the Workflow Manager, click the protocol for the upper spine range.
From the Workflow Manager Control area, click Add Task > Add Post Processing.
From the Add Post Processing Task screen, click Pasting for the whole spine application.
From the Add Post Processing Task screen, click Setup.
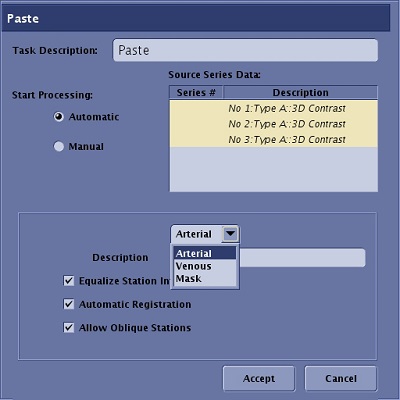
From the Paste screen, complete all fields and selections.
Figure 2. Paste screen
Typically select Automatic. Alternatively, click Manual to paste the images after the scan session has ended
From the Source Series Data list, select the series that you want to Paste. The series should have the same contrast type, for example sagittal T1 FLAIR.
For multi-phase 3D Vascular scans, a menu appears from which you can select Arterial, Venous or Mask to determine the image type for pasting.
From the Description text box, type and enter a series description, for example Sagittal T1 spine.
Click Equalize Station Intensity option to reduce the difference in the intensity ranges between stations or series and provide more uniform brightness and contrast.
Click Automatic Registration option to perform automatic registration of overlap regions.
If needed, click Allow Oblique Stations to permit an oblique plane up to 30 degrees between the superior/inferior patient axis.
Click Accept
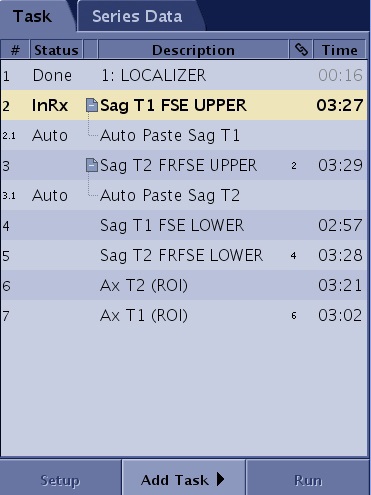
The Paste screen closes and Auto displays as the status of the post process task in the Workflow Manager. Figure 3. Workflow Manager with Auto task
To define another Paste task, repeat this step.
Graphically prescribe the scan locations.
For vascular studies, make sure that the vessels are within the same scan plane, to produce optimum Paste images.
If the Paste task shows INV (Invalid State) and a warning that pasting restrictions are not honored and the images will not be pasted, adjust the scan slices until the Paste task shows Auto. In the Workflow Manger, place your cursor over the INV series to see the roll-over message that describes the reason for the invalid state. The following are several scenarios that result in an Invalid State.
If possible, acquire the sagittal and coronal images without an oblique angle.
A single oblique axis is allowed. Keep in mind that oblique data sets degrade the accuracy of the pasted series. The automatic and manual Paste tasks display a warning of degraded performance if the image column axis exceeds 0.1 degrees with respect to the superior/inferior axis. The paste task will not complete if the column axis is greater than 30 degrees with respect to the superior/inferior axis. The Paste task will not process series with a dual oblique.
Always overlap the two series FOV in the scan prescriptions by at least 15% but no greater than 50%. If the overlap is less than 15%, the Registration algorithm does not apply and a prompt appears. If the overlap is greater than 50%, the Paste series is invalid until the overlap is corrected.
Click Save Rx > Scan.
When the two linked series are completed, and the Paste post-process task is in the Done state, select the pasted series and from the Workflow Manager control panel, click View.


 to send the protocol to the Multi Protocol Basket.