Important: Closely observe the patient throughout the scan to make sure the patient does not move and create any contact points between adjacent body parts such as clasping the hands on the abdomen. For details, review the cautions and warnings in the Patient position procedure.
Step-by-step instructions
From the Worklist Manager, select an exam from the Patient List.
Click the or if the patient is not on the patient list.
Complete the patient demographic information from the Patient, Exam, or Other Information areas.
Patient weight is not pulled with the other patient information from the ConnectPro worklist. You must manually enter the weight.
CAUTION
The patient’s weight determines the SAR. Entering a weight more than the actual patient weight could potentially harm the patient. Patient weight is not pulled with the other patient information from the ConnectPro worklist. You must manually enter the weight.
Click Show All Protocols. Select adult or pediatric, a library, anatomical region and filter.
On the Protocol screen, select a protocol and then click the arrow to move the desired protocol(s) from the Protocol list to the Multi-Protocol Basket.
Click Accept.
When all patient information is correct, click Start Exam.
From the footer area of the screen, click to open the SAR screen.
Observe the SAR screen to monitor the patient's SAR during the exam. For details, see Monitor SAR during an exam.
On the Exam dB/dt and SAR Limits screen, select a dB/dt and SAR limit.
Click Accept.
Acquire a localizer scan.
In the Workflow Manager, the first series in the list is selected; typically it is a localizer series. This is the active series.
Adjust the localizer scan parameters as needed.
Click Save RX > Scan.
Result
For head and neck scans, a Scout series is placed in the Workflow manager and is acquired before the 3-plane localizer. The Scout scan optimizes the SAR. For details, see SAR Scout scan.
Select a series from the Workflow Manager.
Click Setup to review the scan parameters of the currently selected series.
Warning
Ensure that the Patient Position selection matches the actual patient orientation. Making a selection that does not match the patient’s actual position results in incorrectly annotated and/or rotated images, possibly resulting in improper medical treatment.
To view the Details screen, click the of the scan parameter screen.
If any or all of these scan parameters are selected (ASSET, HyperBand, PURE), and if you select On from the Calibration in Prescan menu, which is located on the Details tab, a calibration scan is acquired during Auto Prescan.
Adjust the slice location lines, as needed.
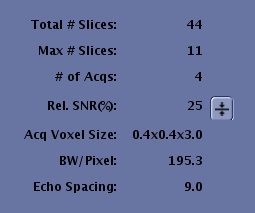
Check the Max # of slices and # of Acqs and the acquisition time in the Workflow Manager to manage the scan time.
Check the TR to optimize the TR and scan time.
From the expanded Details screen, click each tab to view the tab's contents. Figure 1. Scan parameter tabs
Review the content in Scan Parameter Advisory area. For details, see Advisory area.
Figure 2. Example of Advisory area
If desired, add a post-process task. For more information, see Add scan sequence.
When you are satisfied with the scan parameter selections, click Save Rx.
Click Scan to acquire the data for the currently selected series.
Result
The scan counts down in the upper-right corner above the AutoView screen.
When the acquisition is finished, "Done" displays in the status column on the Workflow Manager.
Once the series is in the Done state, you can select it and post process the data while you are acquiring scan data for other series.
Select the next desired series in the Workflow Manager and click Setup.
Prescribe the scan locations. For details, see Graphic Rx.
If the scan range has been defined in the protocol, the scan lines automatically display on the localizer acquired in the first series. For details about slice order, see Slice order.
If you have manual post process tasks in your Workflow Manager, then select the task and click Run.
To view images, click View from the Workflow Manager control panel.
Click Show Filmer from the Scan session tab to open the Film Composer.
If the selected series has a patient orientation defined in the protocol that is different from the current exam, the system automatically adjusts the patient orientation to match the current exam. For example, if the protocol was defined with the patient orientation prone, feet first and the patient on the table is supine, head-first orientation, subsequent series in the Workflow Manager are automatically adjusted to a supine, head-first orientation. No messages display to note the orientation change. Due to this change in orientation, the start and end locations saved in the protocol may become invalid.
When you are satisfied with the scan prescription, click Save Rx > Scan.
Under some scan conditions, the bore fan automatically is activated in high mode during the acquisition. The fan cannot be turned off when this occurs.
Repeat the appropriate steps for all series in the Workflow Manager.
Note: You can set up each series in the Workflow Manager, use Save Rx, and then scan all the series back-to-back.


 or
or  if the patient is not on the patient list.
 to open the SAR screen.Observe the SAR screen to monitor the patient's SAR during the exam. For details, see Monitor SAR during an exam.
 of the scan parameter screen.