Use these steps to add a patient to the Worklist Manager Patient List and begin an exam.
Step-by-step instructions
Open the Worklist Manager.
Click the .
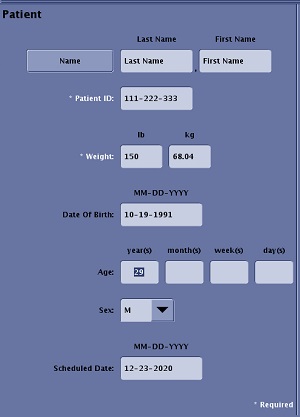
Complete all fields in the New Patient screen.
Note: Patient ID and Weight are required fields. You cannot save the data to the Worklist Manager list until these fields have been completed.
Figure 1. New Patient screen
Carefully enter the Patient ID and name checking for accuracy.
Patient Name can be entered with any combination of letters and numbers. There is a 64 character limitation for patient name, although only 24 characters can be displayed on an image. If more than 24 characters are entered from the patient name field during scan prescription, then the displayed image shows the first 24 characters followed by a *. The * indicates that more text was entered at scan prescription.
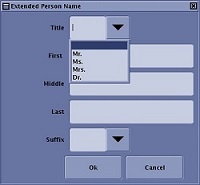
To add more name details, click Name. Figure 2. Extended Person Name screen
Patient Identification (ID) can be any combination of numbers, letters, and dashes. It cannot contain a backslash (\). If the system finds a matching ID in its memory, it displays all the pertinent data so long as the entry is identical, including the use of upper-case and lower-case letters. Enter MR and the system displays the last (most recent) patient’s data. This text box is limited to 64 characters.
Weight can be entered in pounds or kilograms. The system automatically calculates and displays the other weight measure. Weight range is from 1 kilogram to 551 lb (250 kg). Accurate weight information is essential for safe scanning.
As patient weight increases, image quality is compromised.
Patient weight is not pulled with the other patient information from the ConnectPro worklist. You must manually enter the weight.
CAUTION
The patient’s weight determines the SAR. Entering a weight more than the actual patient weight could potentially harm the patient. Patient weight is not pulled with the other patient information from the ConnectPro worklist. You must manually enter the weight.
Date of Birth can be entered using numbers 1 to 12 for the month, 1 to 31 for the day, and 19xx or 20xx for the year as mm/dd/yyyy or mm-dd-yyyy. The year entry must contain four digits. This entry is optional when pre-registering patients. The system can be configured for dd/mm/yyyy by the service engineer.
Age is automatically calculated if the birth date is entered. Only whole numbers (i.e., no decimals) can be entered. The calculation of the patient age ranges from 1 to 123 years, days (1 to 90), weeks (1 to 52), or months (1 to 23). For example, 28d, 4w or 1m.
Sex or gender can be entered as M for male or F for female and O for other (for example hermaphrodite).
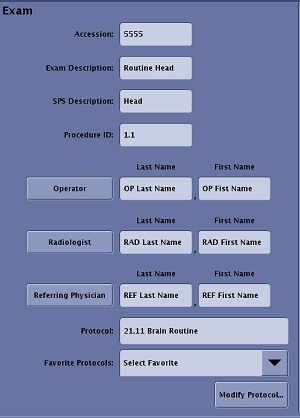
Complete all fields in the Exam area.
Figure 3. Exam screen
Accession Number is related to a number assigned by the hospital, clinic, or site, and is tied to the patient’s records. Enter the number manually or by using the optional barcode reader (if applicable. This text box is limited to 16 characters.
Exam Description is a patient specific description of the exam. The exam description can be viewed, screen saved and filmed from the Viewer Exam Text page window.
SPS Description is the exam the referring physician requests that is populated from a HIS/RIS system or it can be entered manually. Some PACS systems use the SPS information for the hanging protocol. SPS is a column on the Patient List.
Procedure ID field is filled in with Requested Procedure ID DICOM element (0040,1001) that is sent from the connected HIS/RIS server worklist.
Operator, Radiologist, Referring Physician Name fields are limited to 64 characters. Click on the name button to open the Extended Person Name screen.
Protocol field displays the selected protocol. You can also enter the protocol number in this field.
Favorite Protocols arrow displays a list of protocols tagged as Work List Favorite from the Protocol Properties screen.
Show All Protocols or Modify Protocols button displays the Protocol screen. Show All Protocols displays when a new patient is entered. Modify Protocols displays when a Worklist Manager item is being edited.
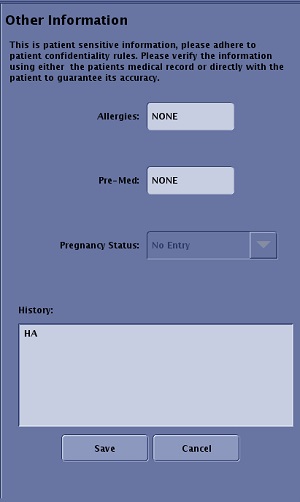
Verify the patient's allergies, pre-meds and pregnancy status when you complete all relevant fields in the Other Information area.
Figure 4. Other Information screen
Allergy field is used to enter the patient's allergies. If an allergy was entered in the HIS/RIS system and you pulled the patient from the HIS/RIS list, then this field is automatically completed with the patient's allergy information. A appears on the next to the Allergies field when any text is entered.
Pre-Med field is used to enter the patient's pre-medication. A appears on the next to the Pre-Medication field when any text is entered.
Pregnancy status menu is used if F (Female) or O (Other) are entered as the gender. Select an item from the menu. If Possibly Pregnant or Definitely Pregnant is selected, a appears in the Worklist next to Pregnancy Status.
History field is used to enter relevant background information regarding the patient’s symptoms or other relevant information. The first 35 characters of the history appear on the Exam text page and can be filmed as part of the patient’s record. Only the History text is mapped to the Exam Text page that can be viewed from the Viewer. Allergies, pre-med, and pregnancy status are only displayed on the Other Information area of the patient demographic window.
Click Save.
Save/Cancel are only displayed if New or Edit patient icons have been selected.
Save adds the patient data to the Worklist Manager Patient List.


 .
.
 appears on the
  next to the Allergies field when any text is entered.