Figure 1. Worklist Manager header and Patient List area
Step-by-step instructions
To open the Worklist Manager work area, click the from the header area of the screen
Use these steps to edit a patient's information.
From the Patient List area, select a patient you want to edit.
Click the .
Edit the necessary information.
Click Save.
Use these steps to generate a new scan session on a patient that is already in the Patient List.
From the Patient List area, select a patient you want to duplicate.
Click the .
If you scan a patient twice by duplicating the patient from the Modality Worklist, this results in two separate exam numbers and subsequent series and images. For example, exam 1000 with series 1, 2, and 3 and exam 1001 with series 1, 2, and 3. When these images are networked to an AW or PACS, the two exams are combined and therefore the single exam will have two series one, two series two, etc. To avoid this problem, when you need to rescan a patient due to some failure, do one of the following:
Enter a new patient to the modality worklist so you do not need to reuse the one where the error (including system failure) occurred.
Use Edit Patient Data on the first exam to regenerate a new study UID which will break the hard connection between the two studies.
Use these steps to delete a patient that is already in the Patient List.
From the Patient List area, select a patient you want to delete from the list.
Click the
Click Yes to the confirmation prompt.
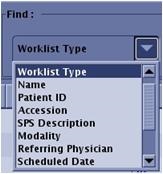
Use these steps to modify the contents of the patient list to more easily find a particular patient.
From the Worklist Manager Find header area, click the Worklist Type arrow to open the Find menu.
Figure 2. Worklist Type menu
Select an item from the Worklist Type menu.
Enter the information in the Find text fields, which changes based on the selected Worklist Type.
The Worklist Manager Patient List is refreshed and only the patients that meet the selected find criteria are displayed.
Use these steps to modify the contents of the patient list to display exams that are in completed or in progress state.
From the View header area, click the Details check box.
Click the Complete check box to expand the Patient List to include all patient exams that are in a completed state.
Click the In Progress check box to expand the Patient List to include all patient exams that are still in progress and have not been identified as completed.
An example of an In Progress exam is an exam from which you selected End Scanning from the Scan Session tab menu, rather than clicked End Exam.
If In Progress is not selected, patient exams that are in progress are removed from the Patient List.
Use these steps to sort the Patient List from an ascending to descending order.
From the Patient List, click a menu bar title.
Figure 3. Example that shows Name is selected for sort criteria
The patient list is sorted by the selected menu bar item. For example, if you click Patient Name, the list is sorted alphabetically by patient name.
The arrow changes to indicate if the sort order is ascending or descending.
Use these steps to reorganize the columns in the Worklist Manager Patient List header.
Place the cursor over a Patient List column header.
Click and drag the header to a new location in the Patient List.
Place the cursor over the edge of a column and click and drag to expand or contract the column.
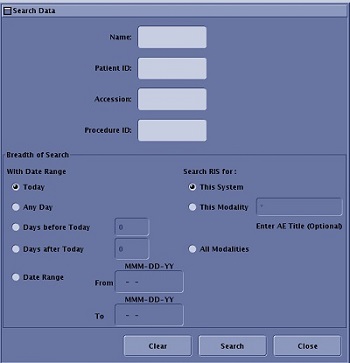
Use these steps to search for data in the Worklist Manager Patient List.
From the Search/Refresh header area, click Search Data.
From the Search Data screen, enter text in all relevant fields in the top half of the screen.
Figure 4. Search Data screen
You need only enter data in a single field if desired. For example, if you only know the patient's name and not ID, then only enter the name.
Enter a procedure ID in the text field to search the data base for all exams with the same procedure ID.
Make a single selection from the With Date Range and Search RIS for columns.
Only one of the systems can be selected for the search. If you are searching by modality and want to search a specific system (for example, you have three CT systems at your facility), enter the system's host (AE) name.
Click Search to activate the search.
Search activates the search procedure and closes the Search Data screen. The horizontal bar by the Refresh button on the Worklist Manager work area is active during the search.
When the progress bar is no longer active, the Patient List updates with the search results.
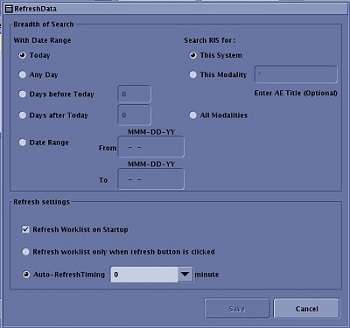
Use these steps to update or refresh the Worklist Manager Patient List.
From the Search/Refresh header area, click the to Refresh the Patient List based on the criteria defined from the Refresh screen.
From the Search/Refresh header area, click the arrow to open the Refresh screen.
Make selections from the Refresh screen.
Figure 5. Refresh Screen
If you have a RIS system, the Worklist Manager Patient List is updated with the most recent RIS information.
The extent of the Patient List is defined by the options made from the Breadth of Refresh area on the Refresh screen and selections made in the View area of the header area of the Worklist Manager. Each time you click the Refresh icon, the MR system pings the RIS system and adds/modifies/deletes the patient worklist with updated information.
With Date Range allows selection of only one of the option buttons.
Search RIS for allows selection of only one of the systems for the search.
This System only searches the host system.
This Modality retrieves all the worklists from the RIS system that match the modality of the host machine is you place an asterisk (*) in the search query field. Each host system at your facility is configured with a unique AE title (Application Entity in DICOM terms). If you want to retrieve the worklist that is configured for a particular host, you must specify the AE Title of the host in the search query field.
All Modalities searches work lists on all systems on the RIS system.
Refresh Worklist on startup results in each time the MR system is booted or rebooted, the MR system pings the RIS system and adds/modifies/deletes the patient worklist with updated information.
Auto refresh timing is the refresh time (the minutes entered in the text field) that the MR system pings the RIS system and adds/modifies/deletes the patient worklist with updated information.
Click Save to save the Refresh Data selections and close the screen.
The Cancel button cancels the Refresh Data selections, restores the previous selections, and closes the screen.
Click the Refresh icon again, to update the Patient List with the changed criteria on the Refresh screen.


 from the header area of the screen
 .
. .
.

 to Refresh the Patient List based on the criteria defined from the Refresh screen.