

- 00000018WIA30D19870GYZ
- id_400250901.2
- Feb 7, 2022 2:19:21 PM
Control speed
Before you begin
About this task
Step-by-step instructions
- From the Tools menu, select Preferences to open the System Preferences screen.
Figure 1. Tools menu 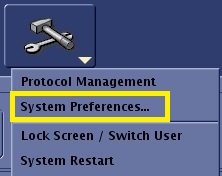
- From the System Preferences screen, click Auto Voice... to open the AutoVoice Management Tool screen.
Figure 2. Top area of System Preferences screen 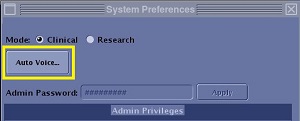
- From the AutoVoice Management Tool screen, click and drag the Voice Speed slider or enter a specific value in the Play Time field. The slider and text field update when the other is modified.
Figure 3. Voice Speed slider 
- Play Time speed calculation: (original data play time) / (Voice Speed)
- Click the left groove of Voice Speed slider to decrease the speed by 0.1. Click the right groove of Voice Speed slider to increase the speed by 0.1.
- Voice Speed range is from 0.5 to 1.5. When the Voice Speed is set to 1.0, the playback is performed at the same tempo as it is recorded. When it is set to 1.5, playback is performed in 2/3 the interval time. When it is set to 0.5, playback it is performed in twice the interval time.
- The default Voice Speed setting is 1.0.
- Voice Speed cannot be adjusted during a scan.
- The Voice Speed settings are stored/restored with a Save/Restore Information.
- An asterisk is displayed in the message area indicating that the voice speed has been changed from the default value.
Figure 4. Asterisk indicating voice speed change 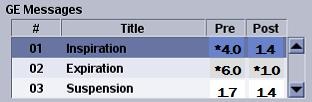
- To reset the speed to default value, follow these steps.
- From the AutoVoice Management screen, place the cursor over the Site Message are and right-click to display the pop-up window.
Figure 5. Right-click menu 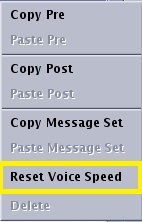
- Select Reset Voice Speed to reset the speed to 1.
- From the AutoVoice Management screen, place the cursor over the Site Message are and right-click to display the pop-up window.