- 00000018WIA309BC970GYZ
- id_400239281.5
- Apr 15, 2022 12:35:56 PM
AutoBind
About this task
An intensity, normalization correction algorithm is applied station-by-station, slice-by-slice to the axial bound datasets. This algorithm is applied to minimize a band-like appearance that results from different intensity levels between stations. The images from the different stations may have different pixel sizes. Stations with different pixel sizes are bound together by upscaling the slices, that have lower resolutions than the slice with the maximum resolution.
Do not use the bound images as a single source for any diagnosis.
Step-by-step instructions
- From the header area of the screen, click the
 to open the Image Management work area.
 - From the Patient List, select AutoBind appropriate axial series from an exam that is whole body with multiple stations.
- Screen saved images are not allowed.
- Axial MR series with variable L-R and A-P FOV centers are supported.
- Variable FOV of up to 50% are supported.
- Variable matrix sizes between stations are supported.
- A four slice axial overlap is required for good intensity correction between stations. Fewer overlap slices may result in a band-like appearance between stations.
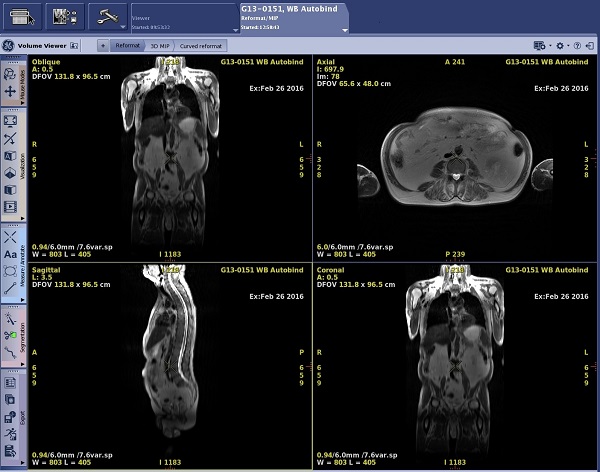
Figure 1. Example of an AutoBind appropriate series 
- From the Session Apps list, click AutoBind.
Figure 2. Session Apps list 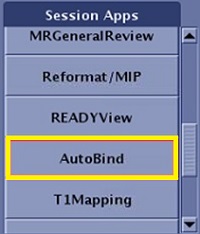
- An AutoBind session opens.
Figure 3. AutoBind session 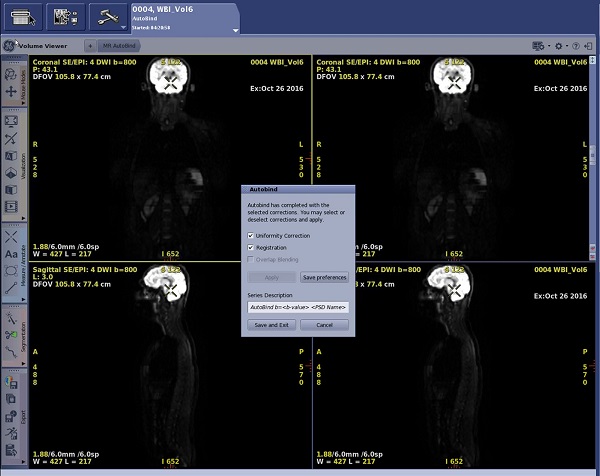
- An AutoBind session opens.
- From the AutoBind screen, make the following selections.
Figure 4. AutoBind screen 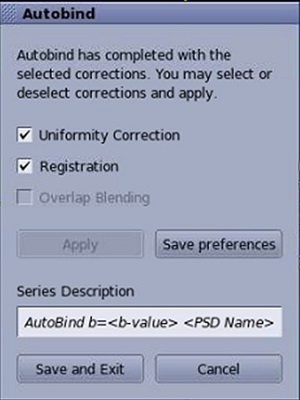
- Turn on/off Uniformity Correct, which is the intensity, normalization algorithm.
- For multi-b value DWI datasets, the same scaling factor is applied to all b-values to maintain accurate ADC quantification.
- Turn on/off Overlap Blending to smooth the transition from series to series.
- Click Save preferences to save the AutoBind settings.
- A default Series Description displays. Place the cursor in the text field and type a new description, if desired.The default series description is AutoBind, the PSD name, and a date/time stamp.
- Click .
- An AutoBind series, type REFMT or reformat, is displayed in the Patient List.
- The first series number is followed by 50. For example, Figure 1 the first of the selected series was series 23 and therefore the AutoBind series is 2350, Figure 5.
Figure 5. AutoBind series 
- Cancel exits the AutoBind screen and does not apply the selections.
- Turn on/off Uniformity Correct, which is the intensity, normalization algorithm.
- After you have closed the AutoBind session, to view the bound series in different planes, follow these steps.
- From the Patient list, click the AutoBind series.
- From the Session Apps list, click Reformat/MIP.
- A Reformat session opens.
Figure 6. Reformat/MIP session with AutoBind images