Use these steps to add specific and unique annotation to an image.
Step-by-step instructions
Open the MR General Review.
From the Measure/Annotate Toolbar, do one of the following:
Click the Annotate icon () to add an annotation box in which you can type text.
Click the Preset Annotation icon () to add an annotation that has already been defined.
Click the Linked Annotation icon () to add a line to the annotation.
If you selected the Annotate icon, follow these steps.
Place the cursor on the image and click to deposit the text box.
Place your cursor in the text box and type the desired annotation.
The text automatically expands the box as you enter text.
Press Enter on the keyboard, or click outside the text box to complete the annotation.
To change the annotation, place the cursor over the annotation and click to activate the text box. Modify the text as needed.
If you selected the Preset Annotation icon, follow these steps.
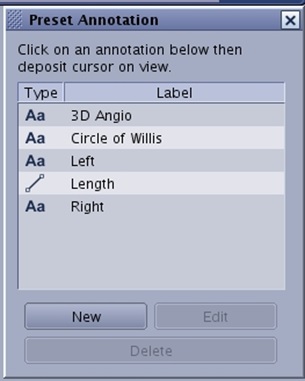
From the Preset Annotation screen, click the desired annotations from the list.
Figure 1. Preset Annotation screen
Place the cursor in the desired viewport, and click to deposit the Preset Annotation text.
To edit the preset on that viewport, place the cursor over the annotation and click to activate the text box. Modify the text as needed.
Note: The edit you interactively make does not update the Preset Annotation.
To close the Preset annotation screen, click the X in the upper right corner.
If necessary, click and drag the text to move the annotation to a new location within the viewport.
To add an arrow between the text box and the anatomy/pathology of interest, from the Measure/Annotate Toolbar area, see Arrows: deposit, size and position.


 ) to add an annotation box in which you can type text.
 ) to add an annotation that has already been defined.
 ) to add a line to the annotation.