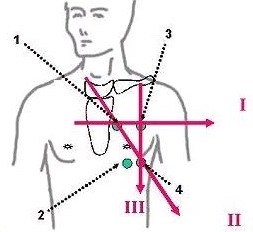
Place the GE recommended lead as shown in Figure 1.
1 = RA or right arm (white)
2 = RL or right leg (green)
3 = LA or left arm (black)
4 = LL or left leg (red)
Figure 1. Standard ECG electrode placement
Table 1. Image legend
Number
Description
I
Lead 1
II
Lead 2
III
Lead 3
1
Electrode one placement
2
Electrode two placement
3
Electrode three placement
4
Electrode four placement
In the footer area, click the . to open the Gating Control screen.
Click Gating Reset to reset the gating values from the previous patient to the current patient.
From the Cardiac Gating Selection area, click Standard Gating (ECG).
From the Trigger Lead area, select a lead.
ECG I lead defaults on and the waveform is displays on the Waveform tab.
Select each ECG lead and observe the waveforms on the monitor.
Choose the ECG lead that produces the optimum signal.
On normal volunteers, ECG ll generally provides the best signal.
The heart may present itself in a different orientation within the thorax of a patient with heart disease. In these patients, for Standard gating, ECG l or ECG lll may provide the best signal.
Tick marks automatically display on the waveform.
Check the position of the tick marks to verify proper R-wave detection.
View the R-peak amp display and make sure it reads > 0.5mV. If it is less than 0.5mV, verify that the leads are properly connected or reposition the leads until you see a good signal.
If there are missing triggers, reduce the Cardiac Trigger Level to 50% and confirm that the tick marks now appear on the waveform.


 . to open the Gating Control screen.