From the BrainStat GVF screen, click and drag the left threshold slider until the brain is outlined in green and all the anatomy inside the image displays green lines. This indicates that all the anatomy inside the brain is used for the map calculations and the noise outside the brain is not used.
Compute does not update the threshold. As the upper or lower slider is moved or a value entered in the text box, the threshold automatically updates.
From the BrainStat GVF screen, click the preprocessing arrow and click Motion Correction if the images exhibit distortions with respect to the reference image.
Use the on the Review Controller to review all the input images for motion artifact or incorrect geometry before processing.
Use Motion Correction to minimize the effects of patient motion.
To save the new set of processed images so that you can access the corrected series repeatedly, click Quick Export on the export toolbar. For details see, Quick Export.
In preparation to select the Skip Images, generate a signal intensity/time curve from an ROI. Complete the following steps:
From the Measure/Annotate toolbar, click one of the ROI icons, typically a 3D ROI.
Place the cursor in an image viewport and left-click to deposit the ROI.
Adjust the ROI size and shape - make it fairly large. For details see, Modify measurements.
From the BrainStat GVF screen, click the skip images arrow and click and drag the slider to select the number of initial phases to discard from the calculations (default selection is 5 images).
As you move the slider the rank annotation and the white vertical line that intersects the curve at the selected phase on the graph, update. The discarded images typically represent phases before the steady state is reached.
From the BrainStat GVF settings screen, click Compute to update the maps.
Figure 1. Data set where steady state is achieved before bolus arrival. Skip image set to 5
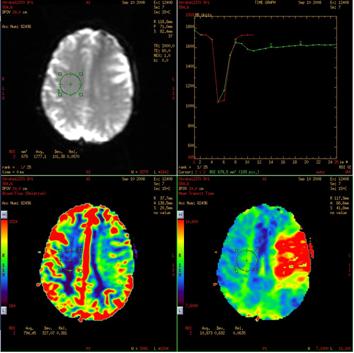
Figure 2. Data set where steady state is not achieved before bolus arrival. Skip image set to 1
From the BrainStat GVF title bar, click the .
From the BrainStat GVF screen, click the BrainStat - Advanced Settings arrow and change the Kernel Spatial Smoothing.
As the kernel size increases, voxel averaging occurs and the image maps appear smoother. The Kernel spatial smoothing default value is 0.
Change the desired settings.
Click Compute to generate updated maps.
Reset changes the selections to the factory default values.
Save All saves your selections as the new default values.
From the BrainStat GVF screen, click the BrainStat- Final Settings arrow and review the settings. If you want to change any of the settings, click the appropriate selection from the BrainStat GVF screen. Click Compute to generate updated map.
Optional:
Select one of the Review Steps to view layouts with other maps.
To compare ROI statistics from two locations on either side of an axis of symmetry, from the Review steps, click Mirror ROI. Follow the Mirror ROI.


 on the Review Controller to review all the input images for motion artifact or incorrect geometry before processing.
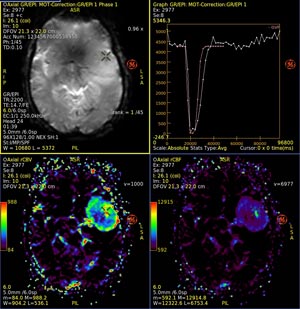
 .
. .
.