Use these steps to position the cardiac coil, leads, and respiratory sensor (respiratory bellow), and to set up the ECG parameters.
Step-by-step instructions
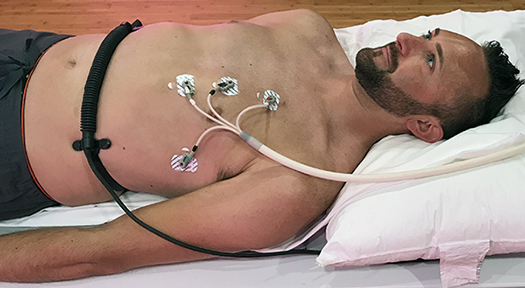
Position the patient supine, feet-first, and in the center of the table.
Prepare the patient for lead placement.
Shave the chest, if necessary.
Scrub the area where the electrodes will be placed to remove any dead skin. This improves the cardiac signal and reduces noise.
Apply an abrasive gel (such as NuPrep) to a cotton swab or gauze and rub lightly on the skin where the electrodes will be placed.
Remove excess gel when done cleaning.
Apply only recommended electrodes and leads.
Connect the leads to the PAC for wired gating
Depending on your configuration, the PAC may be on the magnet or in the table.
Connect the patient alert bulb to the PAC.
For wired exams (respiratory bellows):
Put the respiratory bellows around the patient and explain the breath-holding instructions.
Figure 1. Respiratory bellows and vector lead placement--wired
Position the cardiac coil in the proper orientation, making sure the anterior and posterior coils align with each other.
Typically, place the arms by the side for both the Small AA coil and the AA coil.Figure 2. Cardiac coil in place
Put the top of the posterior coil at the scapular spine or top part of scapula.
The top of the anterior coil typically lines up with the clavicle.
Do not let the anterior and posterior coils touch. They should be positioned so that the distance between the coils is half the coil diameter.
Use sponges or blankets placed between the patient and coil to achieve this distance for small patients (typically younger than 3).
If necessary, put a wedge-shaped sponge under the clavicle to help the anterior coil lie flat.
Confirm that the lead wires and cables are undamaged.
Position the cable so that it is not looped and a minimum length of cable remains within the bore of the magnet.
Prevent cardiac cables from touching the patient, coil cables, or magnet bore. Cables need to exit the bore down the center of the table.
Keep surface coils and their cables away from the ECG cables and wires.
Explain to the patient what will happen during the exam.
Provide the patient with ear plugs.
Move the patient into the magnet and landmark in the mid-chest area. Use the anatomical marker on the coil to help position the landmark.
Position the ECG cable down the center of the table so that it does not touch the magnet bore.
On the Gating Control window, select the correct parameters for your exam.
Confirm that the respiratory waveform in the Waveform tab shows signal activity.
Select Gating Reset to clear the triggering history and relearn the patient’s waveforms.
Do this before scanning when the patient is at the scan position and the waveforms are free of interferences.
Check for proper ECG signal prior to starting the acquisition.
If you copy and paste a series from the Workflow Manager, the heart rate is copied and pasted, along with all other scan parameters. Therefore, if you anticipate the heart rate is going to change, open the Cardiac tab so that the Heart Rate field updates every 5 seconds.
Gating and triggering can elongate the scan time. If the gating signal is lost for more than 30 seconds during a scanning acquisition, the scan aborts.
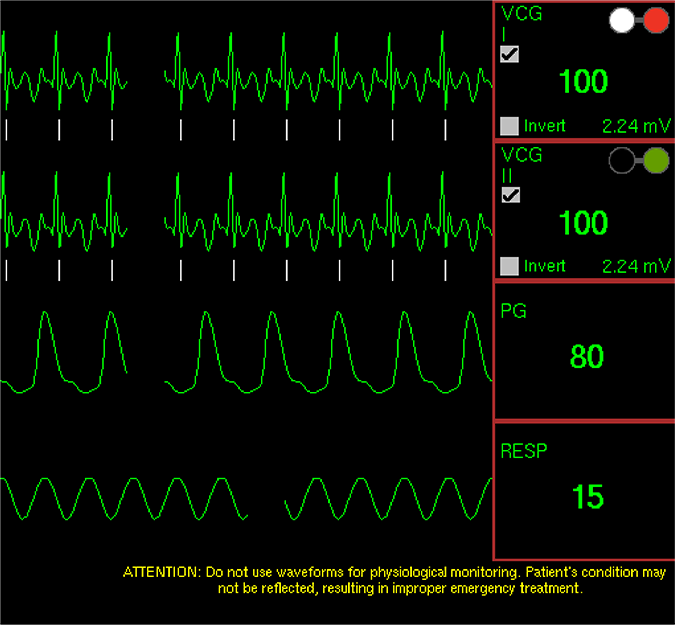
The colors of the electrodes are displayed on the Waveform tab (white= RA, black=LA, green=RL, red=LL). For example, if you see a bad signal on VCGI, reposition the white and red electrodes. Figure 3. Waveform tab
Observe the waveforms during the scan.
Warning
Do not use waveforms for physiological monitoring. Patient condition may not be reflected, resulting in improper treatment.
If during the acquisition you note that the signal is poor from one of the waveforms and it is no longer displaying trigger marks on that waveform, switch the trigger lead from the Gating Control screen to the waveform that is producing the optimum signal (not available in all cardiac gating modes).
Waveform distortion is not an indicator of bad triggering. Use the trigger tick marks as an indicator of triggering status. If tick marks repeat regularly, in sync with the repeat of waveform pattern, it indicates good triggering.