Use these steps to apply a tracker pulse for a SmartPrep scan. To apply a tracker with the Navigator Imaging Option, see Navigator: position the tracker.
Step-by-step instructions
From the Graphic Rx Toolbar, click the .
Place the cursor in the desired viewport and click to deposit the tracker.
Result
The tracker is deposited on all three viewports if the images in each viewport intersect with the tracker location.
Make sure that the majority of your tracker length is within your imaging volume.
Adjust the size of the tracker.
Figure 1. Tracker tool
Table 1. Image legend
Number
Description
1
Tracker length
2
Tracker width
3
Rotation handle
Use a cubic tracker pulse no larger than 4×4×4 cm and no smaller than 2×2×2 cm.
The size needs to be appropriate for the vessel, and, while it should allow for some vessel movement due to pulsation, it should include as little static tissue as possible. A 3×3×3 cm tracker volume for the aorta is recommended. Show particular care when entering the values.
Click the rotation handles to rotate the tracker.
Click on the bisecting lines within the tracker to move the tracker.
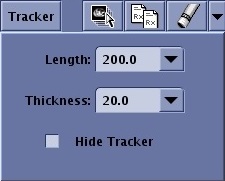
From the Tracker menu, click the arrow keys or type a new value in the Tracker Length and Tracker Thickness text fields.
Figure 2. Tracker menu
Adjust the tracker position.
Place the tracker pulse no further than one quarter of the FOV away from the center of the FOV. In other words, if you have prescribed a 20 cm FOV, the tracker pulse should be placed no further than 5 cm from the center of the FOV.
Gradient field non-linearity affects the actual position of the tracker pulse and becomes worse as the distance from isocenter increases. A tracker pulse placed at the edge of the FOV shifts once imaging begins, and it will probably not lie over the vessel due to the non-linear effects of the gradients.
The trigger threshold depends on the contrast volume entered on the system. The system uses one threshold for a volume of 20 cc or less and a threshold 5% higher for a volume greater than 20 cc.
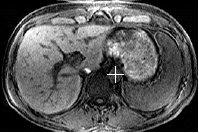
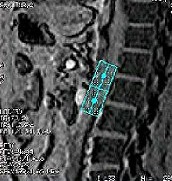
Figure 3. Tracker Position on Axial AbdomenFigure 4. Tracker tool on a sagittal localizer
Prescribe your 3D imaging volume by placing the cursor over the desired image and click to deposit the volume.
The prescribed volume can be tailored to match the coverage area.
Prescribe any even number of slices to balance coverage with scan time.
Adjust the location, as needed.
The tracker should be contained completely inside the imaging volume so that SmartPrep detects the bolus.
From the Tracker menu, click Hide Tracker to toggle the Tracker cursor on/off from the viewport to better visualize the anatomy when placing Graphic Rx scan locations or SAT pulses.
To remove the tracker, from the Graphic Rx Toolbar, click Erase > Erase All.


 .
.