

- 00000018WIA305EF870GYZ
- id_400237621.3
- Mar 4, 2022 12:06:01 PM
Copy/paste
About this task
Use these steps to copy/paste graphic prescriptions. You can copy a prescription with Copy Rx as long as the patient orientation matches between the two series. The scan plane from which you are copying the prescription can be an orthogonal plane and you can copy it to a series that is an oblique plane, but not vice versa.
Consider the following as you copy/paste a graphic Rx.
- If the Graphic Rx lines result in an unexpected behavior (for example, double lines), click Erase All and start your graphic prescription over.
- If you change the slice thickness or spacing of the series to which you are copying the graphic prescription, then only the start and end locations are kept. In other words, if the series you are copying has a slice thickness and spacing of 5 mm each and you have prescribed the start and end locations of I0 to S100, and the series to which you are copying the graphic prescription has a slice thickness and spacing of 10 mm, the start and end location remain I0 and S100. The original series will have 10 slices and the series to which you copied the graphic prescription will only have 5 slices. The behavior of Copy Rx changes based on how the copied series is selected: Original Loc or Present Loc. Each scenario applies slices in a unique fashion.
Step-by-step instructions
- Follow these steps to Copy Rx on the localizer in the active viewport.
- From the Graphic Rx Toolbar, click
 to open the Copy Rx screen.
Figure 1. Copy Rx screen 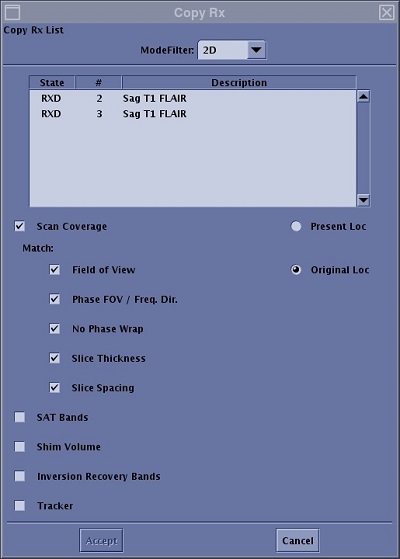
- Select a Mode Filter.
- Only those series matching the current plane display.
- Typically, select All.
- Click Present Loc.
- Double-click the desired series and images from the selected series appear in the currently highlighted viewport and the Copy Rx screen closes.
- Alternatively, you can click the desired series and click Accept to display the images in the currently highlighted viewport and close the Copy Rx screen.
- From the Graphic Rx Toolbar, click
- Follow these steps to Copy Rx on the original localizer procedure
- From the Graphic Rx Toolbar, click to open the Copy Rx screen.
- Select a Mode Filter.
- Only those series matching the current plane display.
- Typically, select All.
- Click the desired series from the Series List window.
- Click Original Loc.
- Click Accept.
- Regardless of the viewport active or the images displayed in the viewports, the system displays the original localizer in the original active viewport and posts the graphic lines.
- From the Graphic Rx Toolbar, click
- Follow these steps to copy scan parameters to a new prescription procedure
- From the Graphic Rx Toolbar, click to open the Copy Rx screen.
- Click any of the option boxes to copy the parameters of the series selected in the Copy Rx list. If the options were not used in the series from which you are copying from, then they are not available to copy.
- This overwrites the scan parameters of the series to which you are copying the Graphic Rx locations.
- From the Graphic Rx Toolbar, click
- Follow these steps to Copy Rx between 2D and 3D Graphic Rx procedure
- From the Copy Rx screen, click All as the Mode Filter to view both 2D and 3D available series.
- When prescribing a 2D series from a 3D series, the slab is translated into a number of slices based on the slab thickness.
- When prescribing a 3D series from a 2D series, the number of locs/slab is determined by the start/end location of your 2D prescription. The system only deposits a single slab and automatically calculates the number of locs/slab required to accommodate the 2D prescription without adding extra slabs. If the start/end range requires more than 128 locs/slab, then the system will only place a single slab of 128 locs/slab. A warning message displays.
- From the Copy Rx screen, click All as the Mode Filter to view both 2D and 3D available series.