Place the cursor in a viewport and right-click Display Properties.
From the Display Properties menu, click Reference Image.
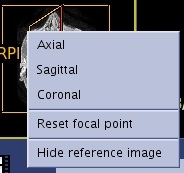
Follow these steps to select a baseline view to be used as a reference image.
Place the cursor on the reference image.
Right-click and select Axial, Sagittal, or Coronal from the Reference Image menu.
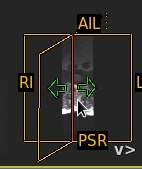
Follow these steps to chose another Reference image within Reference image series.
Place the cursor on the reference image.
Click the arrows to navigate through the images.
Figure 2. Reference Image move arrows
Follow these steps to reset the focal point.
Place the cursor on the reference image.
Right-click and select Reset focal point from the Reference Image menu, to switch the baseline image used for the reference image to the one that matches the current 3D cursor location.
Follow these steps to remove the reference image from the viewport.
Place the cursor on the reference image.
Right-click and select Hide reference Image from the Reference Image menu.
Follow these steps to modify window level of reference image.
Place the cursor on the reference image.
Click and drag the middle mouse button. You can move the cursor out of the reference image and still continue to modify W/L.