

- 00000018WIA30B4F770GYZ
- id_400240451.3
- May 23, 2022 5:21:36 AM
Change the image/map in a viewport
About this task
Use these steps to display a new image orientation or map in a viewport. Maps specific to the currently displayed application (DTI, DWI, Brainstat, etc.) can be placed in any map viewport by selecting the desired map from active annotation.
Step-by-step instructions
- To change the image orientation of 3D or Oblique reformatted images, from the Visualization toolbar, click any of the Orientation icons.
- To change a View type, right or left-click the
 and select an option from the menu.
Figure 1. View Type menu that may vary based on the image in the viewport 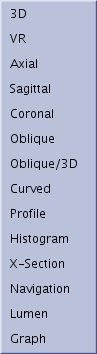
- To change a Projection type, right click the
 and select an option from the menu.
Figure 2. Projection type menu that varies based on the image in the viewport 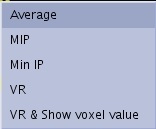
- To change a Functional map, follow these steps.
- Place the cursor over the active annotation that represents the image/map and click to display the menu. The series are organized from top to bottom in the following manner:
- If functional series have already been calculated from an earlier session, the series are displayed with corresponding sub-groups. In the example below, the ADC/eADC maps are grouped together within the ADC Protocol.
- Original or source series.
- SCPT series
Figure 3. MR General Review menu organization from a READY View application 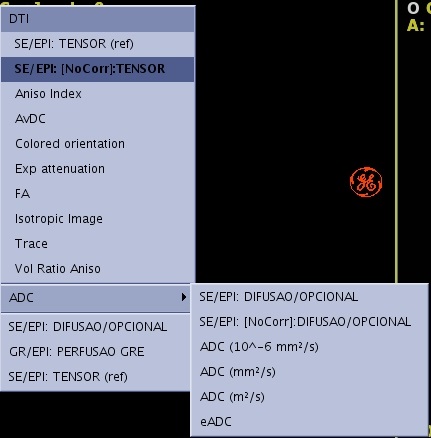
- Select an image/map from the list.
- Place the cursor over the active annotation that represents the image/map and click to display the menu. The series are organized from top to bottom in the following manner: