

- 00000018WIA3096E770GYZ
- id_400216201.3
- Mar 25, 2022 11:50:44 AM
Procedures
Step-by-step instructions
- Follow these steps to adjust the W/L, magnification, and center placement of images in the thumbnail area of the Patient List.
- From the thumbnail area, click and drag the scroll bar located below the image thumbnails to view all thumbnails.
- If only an exam is selected, then the center slice of each series is displayed.
- If a series is selected, all image thumbnails in the series are displayed.
- If multiple exams or series are selected, no thumbnail images are displayed.
- Click an image in the Image List areas.
Figure 1. Image List area on Patient List 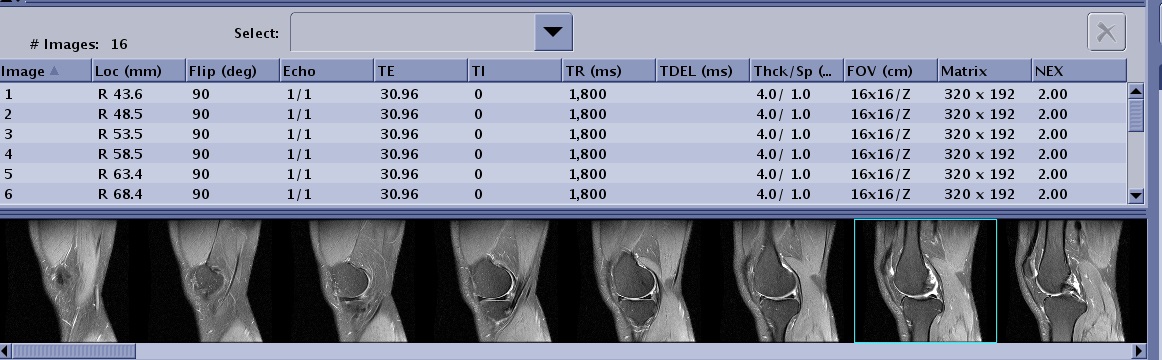
- W/L: Middle-click and drag the cursor to adjust the W/L
- You must start the W/L adjustment with the cursor within the image, but with the mouse button held down, you can move the cursor outside the image.
- All images in the list are adjusted. You cannot independently adjust the W/L for a single image.
- Zoom: Right-click and drag the cursor up to magnify the image and move the cursor down to minify the image.
- You must start the zoom adjustment with the cursor within the image, but with the mouse button held down, you can move the cursor outside the image.
- All images in the list are adjusted. You cannot independently adjust the zoom for a single image.
- Scroll: Click and drag the cursor in the direction you want to move the image.
- You must start the scroll adjustment with the cursor within the image, but with the mouse button held down, you can move the cursor outside the image to adjust the scroll.
- All images in the list are adjusted. You cannot independently adjust the scroll for a single image.
- From the thumbnail area, click and drag the scroll bar located below the image thumbnails to view all thumbnails.
- Follow these steps to search by exam number in the Patient List.
- In the Exam Title area, click Find and select a category, such as Exam.
Figure 2. Find area on Exam menu bar 
- In the Find text box, type the exam number you want to locate, such as 121.
- The exam is selected in the Exam list if it is in the active data base.
- If the exam is not in the data base, it locates a number that starts with the entered number.
- In the Exam Title area, click Find and select a category, such as Exam.
- Follow these steps to sort the data in the Patient List.
- From the Patient List, click a menu bar title.
- The Patient List is sorted by menu item. For example, if you click Name, the list is sorted alphabetically by patient name.
- The menu item with the
 is the active sort method.
- Click the arrow next to the menu item to change the sort order.
- An up arrow indicates an ascending sort order.
- A down arrow indicates descending sort order.
- To sort the series numerically or with related series, click .
Figure 3. Series Sort Configuration screen 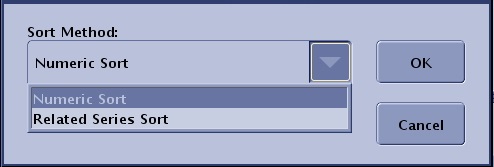
- From the Series Sort Configuration screen, select a sort method.
- Numeric Sort sorts the series by number, e.g., 1, 2, 3, 200, 300.
- Related Series Sort sorts the series by related numbers, e.g., 1, 2, 200, 3, 300.
- Click OK to accept your selection and close the screen.
- From the Patient List, click a menu bar title.
- Follow these steps to add a filter to the Patient List.The Filter feature is only available on remote hosts.
- Select a remote host from the Source menu.
- For more details about remote Patient List, see Remote patient list.
Figure 4. Source menu 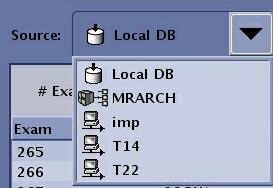
- For more details about remote Patient List, see Remote patient list.
- Click the
 to open the Filter Data screen.
 Figure 5. Patient List Filter Data screen 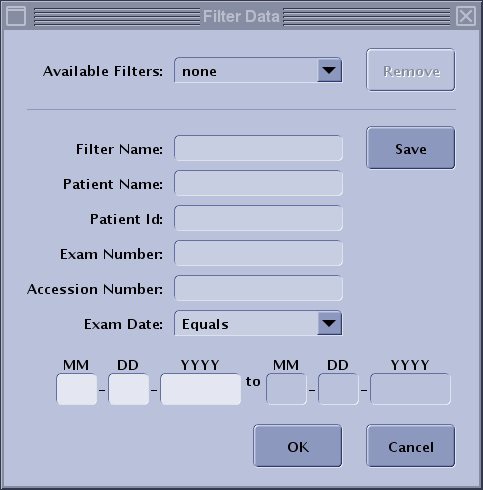
- Enter all desired fields. In the Filter Name field, enter a descriptive name for the filter.
- The text you enter must be an exact match for the patient to appear in the filtered list. The entries are case sensitive. Note that the day, month and year text fields can be configured to as needed based on the global region.
- Click Save.
- When the filter has been saved, a confirmation prompt appears.
- Click OK to the confirmation prompt.
- To remove the filter and display all of the exams in the active remote Patient List, click the erase icon.
Figure 6. Erase filter icon 
- Select a remote host from the Source menu.
- Follow these steps to remove a Patient List filter. The filter features is only available on remote hosts.
- From the Source menu, select a remote host.
Figure 7. Example of a Source menu - Click the to open the Filter Data screen.
- From the Available Filters menu, select a filter.
Figure 8. Available Filters menu 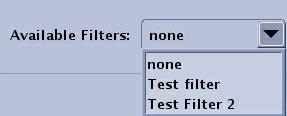
- Click Remove.
- Click Yes to the confirmation prompt.
- From the Source menu, select a remote host.
- Follow these steps to update or refresh the patient list.
- Click the
 .
.- The database from the currently selected source, updates.
- Click the
- Follow these actions to resize areas in the Patient List.
Figure 9. Patient List area - note that all systems may not have the same fields 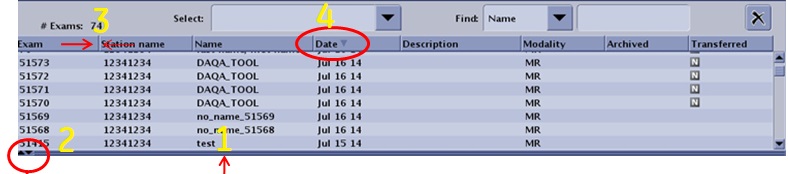
Table 1. Image legend Number Procedure 1 Click and drag the double line divider between each data group to customize the size of the work area. 2 Click the up/down arrows to collapse or expand a data group area. 3 Click and drag vertical line between titles within each data area to change the size of the column. 4 The column heading with the arrow is the currently active sort mode. Click it to reverse the sort order, for example from descending to ascending. - Follow these steps to delete an exam, series or images.
- From the Patient List, select the exams/series/images you want to delete.
- Click an individual item.
- Press Shift and simultaneously click the first and last item.
- Press Ctrl and simultaneously click individual items.
- Click the
 located above the image list.
 - Click Yes to the confirmation prompt.
- From the Patient List, select the exams/series/images you want to delete.