

- 00000018WIA3071C970GYZ
- id_400253771.3
- Jun 23, 2022 3:42:29 PM
Auto send procedures
The following steps are detailed in this topics:
- Enable/disable auto transfer for each series
- Define the node for Auto send in the Tools preferences
- Define the node for Auto send in the Scan Session
- Use these steps to enable/disable auto transfer for each series listed in the Workflow Manager Series Data screen.
- For example, if you have certain series in your protocol that do not need to be automatically transferred to a PAC or other viewing station, you can disable the send feature for that particular series. The enable/disable settings can be saved to the protocol.
- The transfer destinations are set from the system preference screen or exam preference screen.
- You cannot turn off auto transfer for series created by manual post processing tasks or for series created during a review session.
- Start a scan session.
- From the Workflow Manager, click the Series Data tab.
- From the Workflow Manager header area, click . This allows you to set auto transfer enable/disable for series that have not been scanned yet.
- The check box selection state in the auto transfer column is determined by how you set auto transfer in the protocol. If the exam is not pulled from a protocol, the default state for all boxes is selected, which means that the series will be transferred by exam or series as determined from the preference screens. Click the check box to de-select the series from auto transfer.
Figure 1. Series Data tab in Workflow Manager 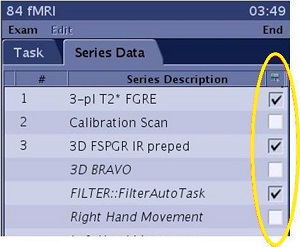
- Only the boxes selected in your protocol are checked in the Series Data tab.
- You can modify the state of the checkbox, only if network transfer is turned on.
- The check box status can be changed anytime up until the scan data is completely acquired.
- If you have transfer by exam On, series that are created outside of the scan Viewer are transferred even though those series do not appear on the Series Data tab.
- As soon as the series completes, the selection becomes disabled. If the box is selected, data is placed in the network queue.
- Data transfer begins only if the Network icon at the head of the column is active.
- Active icon appearnce:

- Inactive icon appearance:

- If you have transfer by series On and transfer by exam Off, once a series is completed and transferred, it becomes inactive. In other words, you cannot deselect the series or send it to another destination via the Series Data screen.
- If you have transfer by series On and transfer by exam On, once the series is completed, it remains active after it is transferred. In other words, you can chose to deselect it for the transfer by exam activity.
- Use these steps to define the node for Auto send from the System Preferences screen. Saving third party images is allowed, however saving these images may cause the task to pause.
- From the header area of the screen, click the menu .
- From the System Preferences screen, in the Admin Password text box, type your password and click Apply.
Figure 2. System Preferences Admin text box 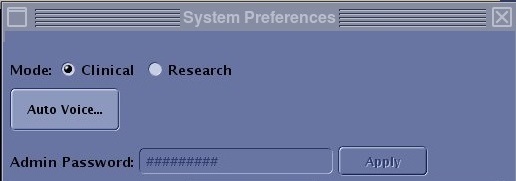
- From the System Preferences screen, click the On button to make auto send selections.
- To select network auto send option, click Auto Transfer by Exam or Auto Transfer by Series. Only one option can be selected.
- To select the archive auto send option, click Auto Archive.
Figure 3. Auto send Exam Preferences 
- Click the
 to display the Auto Transfer by Exam or Series screen.
- The screen title and lists title change based on the Auto send icon selected. For example, if the Auto Archive button is selected, the lists read Available Archive Hosts and Selected Archive Hosts and the screen title reads Auto Archive.
Figure 4. Auto Transfer by Exam screen. Note that the Auto Transfer by Series screen is similar 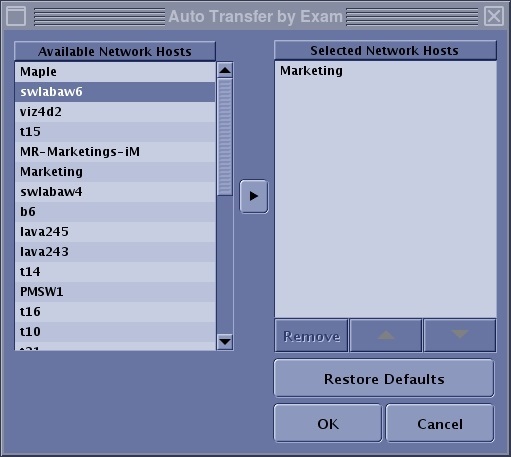
- The screen title and lists title change based on the Auto send icon selected. For example, if the Auto Archive button is selected, the lists read Available Archive Hosts and Selected Archive Hosts and the screen title reads Auto Archive.
- Select a node in the Available Archive or Network Hosts list and click the arrow to move it to the Selected Archive or Network Hosts list.
- The Available Archive or Network Hosts list displays all the archive or network hosts that are available to be used with auto send. A host is identified as a device from the Configure Network Hosts screen.
- The Selected Archive or Network Hosts list displays all the selected hosts. For example, when Auto Transfer by Exam is turned on, all nodes in this list automatically receive the exam once an exam has ended.
- Click the
 to move a selected node up or down in the Selected Archive or Network Hosts list.
 - The order of the nodes in the list reflects the order in which the data is transferred.
- When saving images to a remote device, items queued to be saved remotely are listed in the Job Queue on the Job Management screen.
- Auto Archive: the node can be an archive station such as a PACs system.
- Click Remove to delete the currently selected host on the list.
- Click Restore Defaults to restore the selections that were displayed before you made any changes.
- Click OK to activate the selected node or nodes and to close the screen.
- Click Close.
- Use these steps to define the node for Auto Archive in the Scan Session.
- Start a scan session
- Click the .
- From the Exam Preferences screen, click the On button to make auto send selections.
Figure 5. Auto send Exam Preferences - To select network auto send option, click Auto Transfer by Exam or Auto Transfer by Series. Only one option can be selected.
- To select the archive auto send option, click Auto Archive.
- Click the to display the Auto Transfer by Exam or Series screen.
- Select a node in the Available Archive or Network Hosts list and click the arrow to move it to the Selected Archive or Network Hosts list.
- See the previous step for selecting a node.
- Click OK to activate the selected node as the auto archive node and to close the Auto Archive screen.
- Click Close.