Values listed in this procedure are typical. Modify them based on your clinical needs. For specific scan parameter values, select a protocol from your GE or Site library.
Step-by-step instructions
Select the Breast protocol.
From the GE Library, select the chest anatomical area and the Breast Routine protocol.
Prepare the patient.
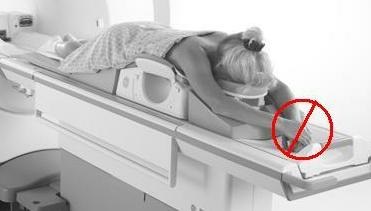
Position the patient prone, feet first in the breast coil. Make sure that the breast is centered in the middle of the coil. Pull the breasts downward to insure that as much breast tissue as possible is included in the coil. Make sure that the breast is hanging free and that there are no breast skin wrinkles. The nipple should be the most anterior anatomy in the coil.
Figure 1. Patient Positioned in HD 8-channel VIBRANT Breast Array Coil
Use a phase-array Breast coil such as the HD 8-channel VIBRANT Breast Array coil.
Read the manufacturer’s operator manual and follow the positioning instructions.
Landmark to the center of the breast.
Advance the patient into the scanner.
From the Series Summary panel, select a patient orientation that matches the patient's position.
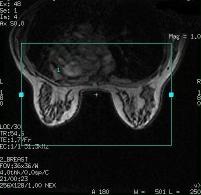
Prescribe and acquire the 3-plane SSFSE localizer. Consider using the protocol in the GE library, Chest > Breast Routine.
Prescribe the VIBRANT Multi-Phase acquisitions.
Select a Site VIBRANT protocol if one is in your library. If not, consider using the protocol in the GE library, Chest > Breast Routine and modify as needed.
It is critical for consistent image quality that all phases of the VIBRANT acquisition be acquired within one series.
Either axial or sagittal bilateral scans can be acquired.
Auto Scan = Off
Confirm that Frequency direction is A/P to reduce motion artifact.
Imaging Options: Multi-Phase, ASSET for axial or ASSET.
Scan parameter No Phase Wrap value: 1.0 for sagittal scans.
Warning
It is possible that a spatial distortion can be seen on 3D data sets, especially in the lateral-most VIBRANT images. The distortion can be demonstrated in sagittal versus axial data sets. There is a potential risk for lesion localization misregistration during biopsy procedures, which could result in a re-biopsy of the patient.
Enter the Scanning Range parameters to cover the patient's breasts.
Select the A/P Freq DIR to avoid artifact from heart motion.
On the Scan Parameters menu bar, click the arrow to expand the screen to see the Details tab.
From the Calibration in Prescan menu, select On to automatically acquire a calibration scan as part of Auto Prescan
From the Calibration in Prescan menu, select Off to manually acquire a calibration scan.
Enter the Multi-Phase values: Phases per Location = 4-7, Variable Delays = On, Mask Phase =On, Pause After Mask Phase = On.
If Variable Delays is not selected, the Mask phase cannot be enabled. Be certain to select Variable Delays.
When Mask Phase is selected, Pause After Mask is automatically turned on. This allows time for getting the patient ready for the next phase of the exam.
If you want each phase to be reconstructed into a separate series, then click Series per Phase radio button.
When using READY View to post-process the images, click Auto Subtract > Accept, Negative Pixels, and 1st Phase of Same Series.
For sagittal scans:
SSRF imaging option is selected for water suppression technique with 3.0T systems. Select Min Full and adjust the bandwidth and Frequency values to make sure the TE is less than or equal to 4.4 ms.
For SPECIAL fat SAT technique, select a in-phase TE to minimize chemical shift artifact.
Select a Turbo Mode in the User CV to reduce the RF pulse width and, therefore, shorten the TR. Shorter RF pulses can result in reduced image homogeneity at edge slices.
Axial = 3 for bilateral coverage with 8 or more-channel coil modes
Axial = 2 for bilateral coverage with 4 and 7-channel coils modes
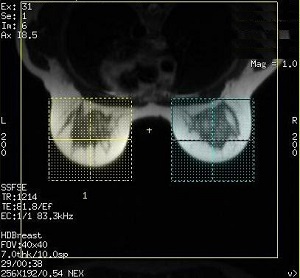
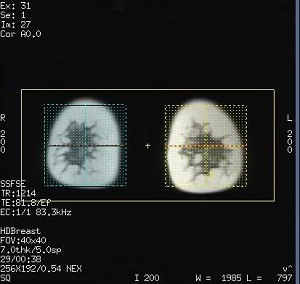
Graphically prescribe the VIBRANT scan locations.
Position the cursor over the breast area and click to deposit the volume.
Adjust the slice thickness and Slices per Slab to cover the anatomy of interest.
FOV and Slices per Slab vary depending on the patient size
Prescribe the 3D volume to include all breast and axillary tissue. For optimum sagittal image quality, use a wider right/left 3D volume that includes the entire torso with extra slices at the ends.
Check the water/fat peak in Manual Prescan. If the water peak is barely visible from the Manual Prescan menu, click Options > Modify RSP. At the RSP Name text field, type showfp and change Current Value to 1. This procedure increases the water peak and displays the fat peak.
When Auto Prescan is complete, click Manual Prescan.
From the Manual Prescan screen, select Center Freq Fine and Vol = 1.
The volume number corresponds to the order in which you graphically placed the shim volume.
Check for the HR value in the upper right corner of the spectrum display,, for example HR:8.
Slide the Rec slider to match the HR value, for example click and drag the slider to 8.
Adjust the center frequency to center over the water peak.
Change the Vol value to 2 and repeat all bullets listed in step b.
Volume 0 is the average of volumes 1 and 2 and therefore it cannot be adjusted.
Click Done to exit the Manual Prescan screen.
For the best image quality, it is critical that you set the center frequency to water, especially for fatty breasts. If you do not use Manual Prescan to check the center frequency, the system may set the peak to fat and, thus, the image quality is compromised.
Click Prep Scan > Scan.
The mask scan begins and the Scan Time area begins the count-down. Figure 5. Count-down
Acquire the remaining phases.
After the Mask phase is completed, the scan stops.
Prepare the patient for the remainder of the phases.
Start the remaining phases by clicking Scan or pressing Start on the keyboard.
Figure 6. The Scan time area counts down the phase time and updates the Total scan time as each phase is completed
Post-process the images.
From the Browser, select the VIBRANT multi-phase series.
Click READY View .
Click Ser and follow the instructions detailed in the READY View section (SER workflow).