Use these steps to acquire an AIR xTM knee scan. Consider the following before you begin the AIR xTM knee exam:
For accurate AIR xTM calculations, ensure the coverage spans from above the patella to below the tibial plateau.
AIR xTM is not compatible with the T/R body coil or when both knees are visible on a localizer.
The patient position must be supine.
AIR xTM is not compatible with severe external/internal rotation.
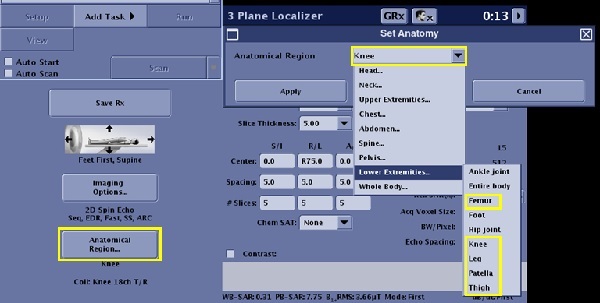
You must have one of the following selections from the Lower Extremities Anatomical Region so that the Anatomical Reference menu displays the AIR xTM knee options.
Lower Extremities
Femur
Knee
Leg
Patella
Thigh Figure 1. Anatomical Region
Step-by-step instructions
From the Protocol screen, select the lower extremity category, and then select a knee protocol.
Acquire a 2D 3-plane FGRE or SSFSE localizer. SSFSE localizer is preferred to ensure the best results.
The 3-plane localizer must meet the following criteria:
Frequency and phase resolution >= 192 or in-plane resolution <=1.5mm for both frequency direction and phase direction
Slice thickness <= 10 mm
Slice coverage for all axial, sagittal, coronal planes >= 4 cm.
Slice gap <= 5 mm
TE for SSFSE <= 80 ms
From the Workflow Manager, select Task 2 and click Setup to review the scan parameters.
To view the Details screen, click the of the scan parameter screen.
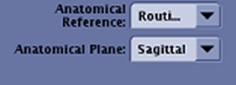
From the Anatomical Reference menu on the Details tab, select an option:
Figure 2. Anatomical Reference menu
None
Routine Knee
ACL
PCL
Meniscus
Patella
From the Anatomical Plane menu on the Details tab, select an option. Note that the scan plane options are based on the selected Anatomical Reference.
Sagittal
Coronal
Axial
Result
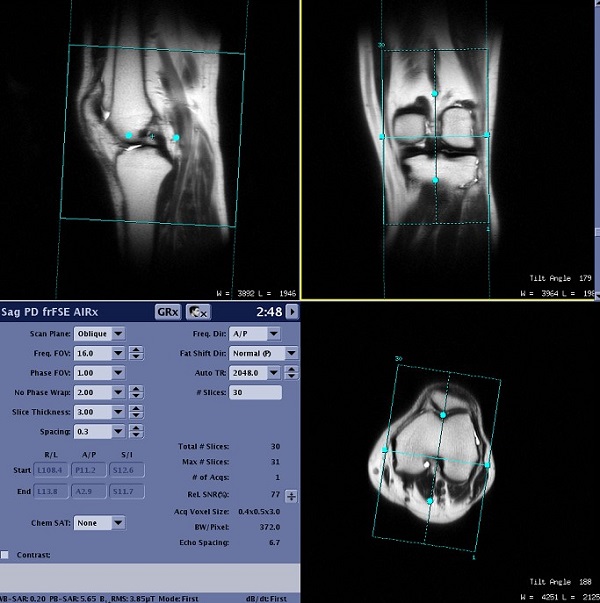
The AIR xTM-computed results display in the Graphic Rx viewports as soon as the computation completes after the localizer scan.Figure 3. Example of a AIR x™ viewports with Routine Knee sagittal plane computed results
Make graphic prescription adjustments and any other scan parameter changes, as needed.
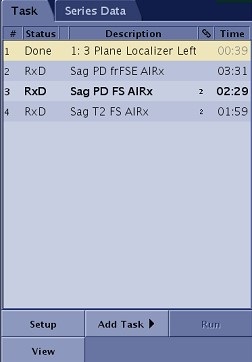
Link all subsequent tasks that require the same Anatomical Reference selections as task 2.
Click Save Rx.
The prescription gets propagated to the linked destination tasks, which get auto-saved if it was specified in the link creation.
Result
Figure 4. Tasks linked to task 2
From the Workflow Manager, select another task that has a different reference line.
Click Setup.
From the Details tab, select the Anatomical Reference option.
Result
The system displays the new AIR xTM-computed results in the Graphic Rx viewports.
Link all subsequent tasks that require the same Anatomical Reference selections as the new task.


 of the scan parameter screen.