

- 00000018WIA307CF770GYZ
- id_400235391.3
- Mar 29, 2022 2:12:24 PM
VR: adjust the volume rendered object opacity
About this task
Use these steps to adjust a VR object opacity and to use preset opacity settings.
Step-by-step instructions
- From the Visualization Toolbar, click the VR Basic Settings icon (
 ) to view the Basic Settings screen.
Figure 1. Basic Settings screen 
- To save the new opacity setting, follow these steps.
Figure 2. VR preset name screen 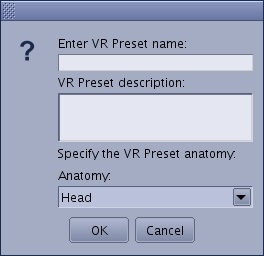
- Click Save New VR Preset.
- Enter a name in the text field and a VR Preset description, if desired.
- From the Anatomy menu, click the arrow and select a desired anatomical location.
- Click OK.
- To delete a user-defined preset, click the Trash Can icon (
 ) that appears next to a VR Preset icon.You cannot delete the factory-defined presets.