Use these steps to place a shim volume on a Graphic Rx viewport.
Step-by-step instructions
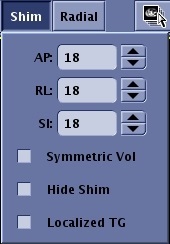
From the Graphic Rx Toolbar, click to open the Shim volume window.
Figure 1. Shim Volume menu
Verify that the Shim selection located on the Details tab is set to Auto or On.
Figure 2. Shim selection on Details tab
Select Auto to allow smart Prescan to make the decision of whether or not to activate Shim during the prescan process based on if the pulse sequence requires it to optimize image quality. This is the typical selection.
Select On to activate Shim during the prescan process. Shim should not be turned on after a high order shim has been completed.
If the Shim selection is Off, the Shim volume deposited from Graphic Rx is not applied to the scan.
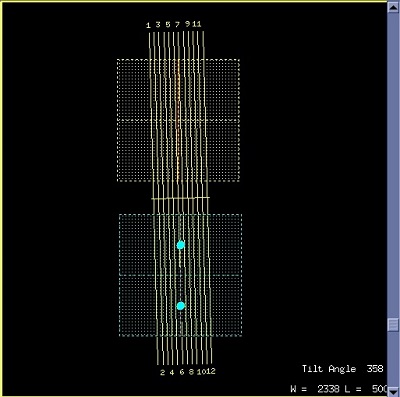
Place the cursor in the desired viewport and click to deposit the shim volume.
Dual shim volumes are allowed for all PSDs other than spectroscopy.
From the Graphic Rx Toolbar, press and hold Shift and click Shim again, to deposit a second shim volume. Figure 3. Shim Volume placed over Graphic Rx slices
To adjust the Shim volume ROI follow these steps.
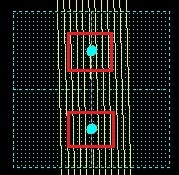
Place the cursor inside the Shim volume and click and drag it to the desired location.
Click and drag the rotation handle (circles within the shim ROI) to rotate the ROI over the desired anatomy.
Figure 4. Shim volume rotation handles
You can move the Shim volume from any viewport on which it is visible.
Adjust the Shim volume size and type values in the Shim text fields: AP (Anterior Posterior), RL (Right Left) and SI (Superior Inferior).
If dual shim volumes are deposited, they share the same dimensions.
The Shim volume does not have to match the scan FOV. Typically, the Shim FOV is smaller than the scan FOV.
The maximum Shim volume is the scan FOV.
The recommended minimum Shim volume is 25% of the scan FOV.
To improve auto prescan's TG estimation based on the average B1 from the focused ROI, click the Localized TG option on the Shim menu.
Localized TG is only available with one shim volume.
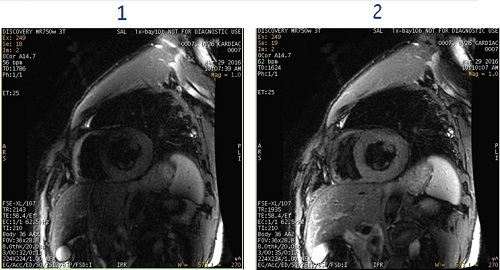
Localized TG is used to improve the accuracy of the TG for a specifically defined local area, such as cardiac, pelvis or prostate imaging or when an elbow is positioned by the patient's side. It can be used with any pulse sequence to improve signal uniformity.
Figure 5. Example of cardiac images with TG off and on
Table 1. Image legend
Number
Description
1
Black Blood FSE IR (Triple IR) image: Shim menu Localized TG option off. Note the shading effects.
2
Black Blood FSE IR (Triple IR) image: Shim menu Localized TG option on. Note the shading effects have been significantly reduced.
To make all three sides of the shim volume the same dimension, click Symmetric Vol (Volume). If you change one value, the other two dimensions automatically update.
From the Shim volume menu, click Hide Shim to remove the shim volume ROI from the viewport to better visualize the anatomy when placing Graphic Rx scan locations or SAT pulses.
Optional: Select the desired chemical saturation (fat, fat classic, water, or SPECIAL) and prescribe concatenated SAT pulses, if desired.
The saturation pulse abbreviations are displayed on the scan parameters screen. Lower case means that the SAT pulse is inside the FOV and upper case means that the SAT pulse is outside the FOV.
SAT suppression pulses are displayed on the scan parameters screen.
If you want to review the shim volume location on a downloaded or scanned task, copy/paste the series and click Setup.


 to open the Shim volume window.