

- 00000018WIA3044D770GYZ
- id_400259381.5
- Aug 17, 2022 11:56:52 AM
SAT: spatial
About this task
Spatial SAT (SATuration Pulse) pulses are 90° RF pulses applied before the slice-selective excitation pulse. They deliver the RF pulses to anatomy outside or inside the imaging volume to saturate nuclei, so that the signal from this area does not contribute to the image. The tissues affected by the SAT pulses do not have time to adequately recover; thus, there is little or no longitudinal magnetization to excite from these tissues and little or no signal is produced. Immediately following the SAT pulse, a dephasing gradient is applied to dephase the spins in the region of the SAT pulse. A combination of RF and gradient pulses decrease SNR in the locations spatial SAT has been applied.
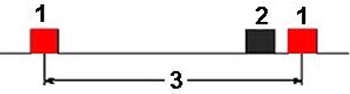
| Number | Description |
|---|---|
| 1 | 90° |
| 2 | SAT pulse |
| 3 | TR |
- When using SAT in the FOV over or near air-tissue interface, a loss of saturation due to susceptibility may be noticed.
- When using these SAT pulses in very large FOV (48 cm) scans, the SAT bands may appear to bend outward at the bottom and the top of the image. This is due to the magnetic field remapping process (GradWARP – Conformal Remapping) that occurs. This technique is used to correct for non-linearity inherent in any gradient magnetic field. This bend of the SAT pulse can be used as an advantage by moving the pulse closer to the anatomy in the middle.
- Directional pairs of SAT pulses (S, I or R, L or A, P) with the same thickness and tilt (Hadamard pairs) can be applied in 8 ms. If the pair have different thicknesses or tilts, they are applied individually causing a further reduction in the number of slices, which can be acquired per TR.
- Overlapping SAT bands can result in artifacts.
- SAT pulses take time to apply and increase the SAR. Therefore, SAT pulses can reduce the number of slices available.
Use these steps to prescribe a spatial SAT pulse on a scan.
Step-by-step instructions
- From the Graphic Rx toolbar, click SAT to open the SAT menu and to ensure that the left-mouse button controls the SAT deposit.
Figure 2. SAT menu 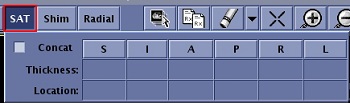
- Graphically position and size the SAT band as needed.
Figure 3. Spatial SAT tool 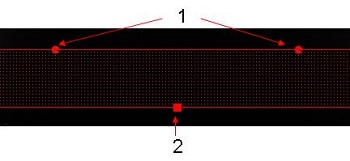
Table 2. Image legend Number Description 1 Rotation handle 2 Size handle - Click and drag the square handle to change the SAT pulse thickness.
- Click and drag the circle handles to rotate the SAT pulse.
- Click and drag the edge of the SAT pulse to move the SAT pulse.
- Position a SAT pulse inside the FOV to suppress tissue motion from moving structures such as:
- Anterior abdominal wall
- Descending aorta when imaging the lumbar and thoracic spine
- Swallowing motion for the cervical spine
- Signal from tissue at the edge of the FOV, reducing wraparound
Figure 4. Example of a SAT pulse in the FOV to minimize breathing and vessel motion 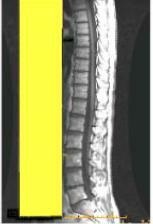
- SAT pulses placed outside the FOV are generally applied in the slice-select direction to saturate blood that may flow into the slice and cause either flow-related enhancement (bright blood) or phase-blurred artifact in areas such as:
- Cardiac imaging
- Cervical, thoracic, and lumbar spines
- Body
- Joints
- Axial heads
- To erase a SAT pulse, use either of the following methods.
- Click the SAT direction button to de-select it from the SAT menu.
- Click the
 to display the Erase menu and click Erase SAT.
- Click the Concat option button if desired. Consider the following:
- When a Concatenated SAT is selected, the scanning range is divided into groups composed of contiguously ordered slices. For each acquisition, it moves the slice-select SAT pulses to pre-saturate regions outside of the acquisition range. For example, in a 10-slice, 2 acquisition prescription, the SAT pulses would be applied first around slices 1 to 5, and then around slices 6 to 10. Slice spacing plays an important role with this sub-grouping, since the acquisitions are grouped in contiguous order. After the system divides the scanning range into as many acquisitions as necessary, slices are distributed within each acquisition. For instance, in the 10 slice example, the first-acquisition 1 to 5 would be acquired: 1, 3, 5, 2, 4. Then, after a 3-second delay, slices 6 to 10 would be acquired in this order: 6, 8, 10, 7, 9.
Figure 5. Slice ordering 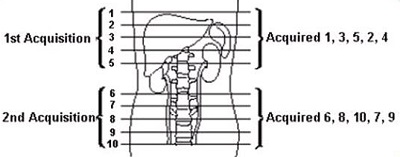
- Concatenated SAT makes Spatial SAT pulses move along with slice-select acquisitions for even more effective suppression of motion in the slice-select direction of concatenated acquisitions. If the prescription is compatible with Concatenated SAT, the SAT pulses are automatically concatenated if:
- A SAT band is prescribed in the slice-select direction, without explicit instructions.
- More slices than a single TR can accommodate are prescribed resulting in a concatenated scan.
- The thicknesses of each slice of a pair, in the slice-select direction, are equal.
- The possibility of getting fewer slices per TR exists because of the time required to apply SAT pulses, increased SAR, and increased application of gradients.
- At least one default band in the slice select direction must exist.
- When a Concatenated SAT is selected, the scanning range is divided into groups composed of contiguously ordered slices. For each acquisition, it moves the slice-select SAT pulses to pre-saturate regions outside of the acquisition range. For example, in a 10-slice, 2 acquisition prescription, the SAT pulses would be applied first around slices 1 to 5, and then around slices 6 to 10. Slice spacing plays an important role with this sub-grouping, since the acquisitions are grouped in contiguous order. After the system divides the scanning range into as many acquisitions as necessary, slices are distributed within each acquisition. For instance, in the 10 slice example, the first-acquisition 1 to 5 would be acquired: 1, 3, 5, 2, 4. Then, after a 3-second delay, slices 6 to 10 would be acquired in this order: 6, 8, 10, 7, 9.
- Use these steps to copy a SAT pulse, if SAT pulses were prescribed from the selected series in the Copy Rx list.
- From the Graphic Rx Toolbar, click the
 top open the Copy Rx screen.
 - From the Copy Rx List area, select the series to which you want to copy the SAT bands.
- Click SAT Bands option box.
- Click Accept to close the Copy Rx screen.
- From the Graphic Rx Toolbar, click the