Use these steps to color an image with varying shades of a singular color, or with a color map in which pixels within certain ranges have different colors applied.
Step-by-step instructions
Open the MR General Review.
From the Visualization Toolbar, click the Color icon () to view the Color screen.
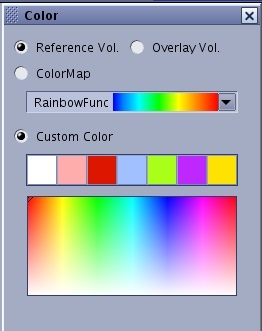
Figure 1. Color screen
To color images using a colormap, follow these steps.
From the Color screen, click the Color Map button.
Click on the arrow next to the displayed color map to view predefined color map choices. Click on a color map choice, such as RainbowFunc.
When a non-merged view is colored, everything in it takes on the same color. To color non-merged views, which is typically done in preparation for a 3D merging operation and makes distinguishing the merged objects easier, follow these steps.
Select the viewport(s) on which to apply the color.
From the Color screen, click the Custom Color button.
Click on a color within the color bar.
Result
The color is applied to the image.
To color an image different from the choices displayed, click and drag the bullseye in the Color screen.
Result
The Custom Color box updates with the color under the bullseye and the image becomes that color.
It is easiest to color the model prior to merging, however you can color merged models. To color merged views, follow these steps.
Click the viewport containing the merged model.
The first model to be colored is the 3D model in the target view prior to merging.
From the Color screen, click on a custom color.
To change the focus to the other part of the merged model, from the Color screen, select the Reference Vol radio button to view the reference image of the merged views.
From the Color screen, select the Overlay Vol radio button to view an overlay image of the merged views.
Click on a custom color.
To reset the color to gray scale, select Linear Gray from the Color Map menu.


 ) to view the Color screen.