

- 00000018WIA308C4970GYZ
- id_400242551.6
- May 19, 2022 11:43:29 AM
VIBRANT with Flex Imaging Option: acquire a scan
Before you begin
Important: VIBRANT with Flex is not recommended to be used with women who have silicone implants because it may result in a fat/water signal swap. Use a VIBRANT protocol for patients with silicone implants. Select a VIBRANT protocol from the Protocol Selection screen, GE library, Chest > Breast Routine. Select any of the VIBRANT protocols.
About this task
Step-by-step instructions
- Prepare the patient.
- Position the patient prone, feet first in the breast coil. Make sure that the breast is centered in the middle of the coil.
Warning Figure 1. Patient Positioned in 8-channel VIBRANT Breast Array Coil. Make sure hands do not touch one another. 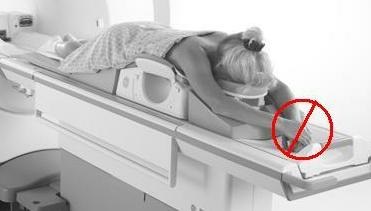
- Pull the breasts downward to insure that as much breast tissue as possible is included in the coil. Make sure that the breast is hanging free and that there are no breast skin wrinkles. The nipple should be the most anterior anatomy in the coil.
- Landmark to the center of the breast.
- Advance the patient into the scanner.
- Position the patient prone, feet first in the breast coil. Make sure that the breast is centered in the middle of the coil.
- Prescribe the VIBRANT with Flex multi-phase acquisition. Either axial or sagittal bilateral scans can be acquired.
- Do not copy the FOV, slice thickness, or spacing from a VIBRANT protocol into a VIBRANT with Flex protocol. VIBRANT with Flex has specific parameters saved in the protocol that if changed can affect parameter compatibility issues. All the scan parameters in the VIBRANT with Flex protocol are compatible and if you change a parameter you may get a compatibility error message.Important: VIBRANT with Flex relies on out-of-phase and in-phase echo collection for robust water/fat image synthesis.
- For 1.5T systems, in-phase and out-of-phase values have twice the separation in comparison to a 3.0T system; thus TE limits are not as critical.
- Navigate to the Protocol screen and select a VIBRANT with Flex multi-phase protocol. Check the multi-phase tab parameters:
- Check Variable Delays. If it is not selected, the Mask phase cannot be enabled.
- When Mask Phase is selected, Pause After Mask is automatically turned on. This allows time for getting the patient ready for the next phase of the exam.
- If you want each phase to be reconstructed into a separate series, then select Series per Phase.
- If no out-put series are defined, in-phase images are reconstructed as the default series.
- Click the Advanced tab and select User CV values, if needed.
- Apodization Level
- Image Acquisition Delay
- K-Space: Select a Viewing Order option: Elliptical Centric or Centric.
- Multiple TR Acquisitions: set image acquisition to a single (CV off) or multiple TRs (CV on). Turning Multiple TR On allows higher Frequency matrix values to be prescribed within the allowed TE limits, at the expense of increased scan time.
- Slice Partial Fourier
- Turbo Mode: Select 1 (turbo) to have a shorter scan time with the trade-off of potentially lower SNR. When turbo mode is selected, Elliptic Centric ordering and Turbo ARC user CVs are not available.
- Turbo ARC which only appears if Turbo mode is off
- Graphically prescribe the 3D volume.
Figure 2. VIBRANT Graphic Rx 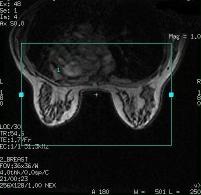
- Position the cursor over the breast area and click to deposit the volume.
- Adjust the slice thickness and Slices per Slab to cover the anatomy of interest. FOV and Slices per Slab vary depending on the patient size.
- Prescribe the 3D volume to include all breast and axillary tissue.
- Confirm that the coil extent lines cover the anatomy of interest.
- Do not copy the FOV, slice thickness, or spacing from a VIBRANT protocol into a VIBRANT with Flex protocol. VIBRANT with Flex has specific parameters saved in the protocol that if changed can affect parameter compatibility issues. All the scan parameters in the VIBRANT with Flex protocol are compatible and if you change a parameter you may get a compatibility error message.
- From the Scan menu, click . The mask scan begins and the Scan Time area begins the count-down.
Figure 3. Count down begins 
- There are occasions when a “memory not enough, please reduce the scan size” message appears. This most frequently occurs with bilateral multi-phase scans. If this occurs, reduce scan parameter values that affect image size and, therefore, affect the memory required for acquisition (number of phases, slices, matrix size, or Zero-fill Interpolation Processing factor). Alternatively, the Phase FOV > 1 scan parameter can be modified to reduce matrix size without sacrificing resolution but reducing memory consumption. For example, both of the following scan parameters result in a 1 mm2 resolution:
- Freq= 360 and Phase=360 with FOV=36 cm and Phase FOV=1.0
Figure 4. VIBRANT with Phase FOV = 1 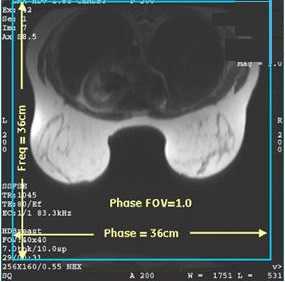
- Freq= 240 and Phase=240 with FOV=24 cm and Phase FOV=1.5
Figure 5. VIBRANT with Phase FOV = 1.5 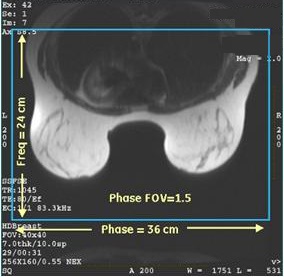
- Freq= 360 and Phase=360 with FOV=36 cm and Phase FOV=1.0
- There are occasions when a “memory not enough, please reduce the scan size” message appears. This most frequently occurs with bilateral multi-phase scans. If this occurs, reduce scan parameter values that affect image size and, therefore, affect the memory required for acquisition (number of phases, slices, matrix size, or Zero-fill Interpolation Processing factor). Alternatively, the Phase FOV > 1 scan parameter can be modified to reduce matrix size without sacrificing resolution but reducing memory consumption. For example, both of the following scan parameters result in a 1 mm2 resolution:
- Acquire the remaining phases.
- After the Mask phase is completed, the scan stops.
- Prepare the patient for the remainder of the phases. Make in-phase and out-of-phase selections from the scan prescription Details screen.
- Start the remaining phases by clicking Scan or pressing Start on the keyboard.
- The Scan Time area counts down the phase time and updates the Total scan time as each phase is completed.
Figure 6. Scan time count down 
Results
Image annotation
M3D/VIBRANT/flip angle
Water and Fat images are synthesized from collected in-phase and out-of-phase images; thus TE values for Water and Fat images are the average of IN-phase and Out-of-Phase TEs. In-phase and out-of-phase gets annotated according to the TE and TE2 values on screen.