Use these steps to burn a region of interest so that the data set can be viewed by other software applications such as surgical planning systems. This feature is typically used with fMRI and to define an ROI or Auto Contours of an area of interest.
You can also select the series with the burned in pixels and launch READY View. For example, if you burned in the pixels of activation maps on a fMRI series, you can select that series, launch READY View and select the FiberTrak application. This feature allows you to visualize white matter tracks with the activation maps on the same images.
Step-by-step instructions
From the Patient List, select an fMRI or other series on which you want to generate burned in pixel contours.
If using the feature to generate burnt in pixels of activation areas, first convert the activation maps to ROIs: right-click and select Convert to ROI.
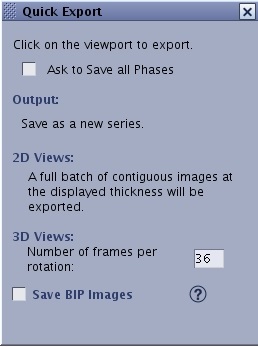
From the Export Toolbar, click the Quick Export icon ().
Figure 1. Quick Export screen
From the Quick Export screen, complete all fields as needed.
Move the cursor over the viewport of interest. For fMRI series, place the cursor over the viewport that displays the source and activation maps. For other series with segmentation contours, place the cursor over the viewport that displays the source and segmentation contour. The cursor changes to a camera. Left-click to activate the Quick Export action.
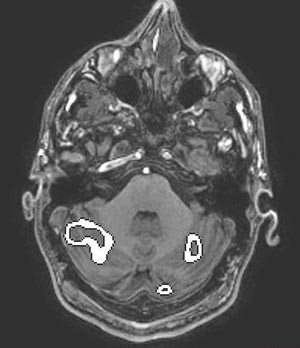
The contour edges or outline of the burned in region appear on the images throughout the data set. When the images are transferred to another application, the contours appear on the images.
It saves the burnt in pixels at all slice locations. If there are multiple ROIs, it saves the active ROI. If no ROI is active amongst the multiple ROIs within the data set, then all ROIs are saved as BIP.
A new series appears in the Patient List: SSAVE for BIP saved images or PROC for non-BIP saved images.
View the BIP series (series type SSAVE) in the Viewer.


 ).
).