

- 00000018WIA30CFB970GYZ
- id_400219281.3
- Mar 30, 2022 2:43:44 PM
Create a batch series
About this task
Use these steps to create a batch series of 3D images. Note that it is not possible to create a protocol using the Loop mode.
Step-by-step instructions
- Open the MR General Review.
- Click on the 3D viewport to make it active.
- From the Export Toolbar, click the Batch icon (
 ) to view the Batch screen.
 - To acquire a Loop batch, follow these steps.
- From the Batch screen, click the Loop tab.
Figure 1. Loop batch tab 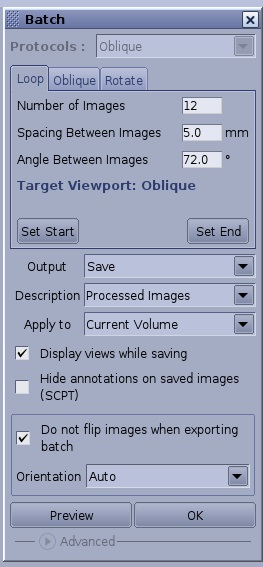
- Enter a value in each of the text fields.
- In the 3D or Oblique viewport, move or rotate the view to the desired first position. and click Set Start.
- Change the image in the 3D or Oblique viewport to the end plane and click Set End. If you only specify a Start view, it results in a default 360 degree rotation around the vertical axis of the image.
- Click Preview to view the movie. For details, see Preview a batch movie.
- From the Batch screen, click the Loop tab.
- To acquire an Oblique batch, follow these steps.
- Click the view to be used as the reference image.
- From the Batch screen, click the Oblique tab.
Figure 2. Oblique batch tab 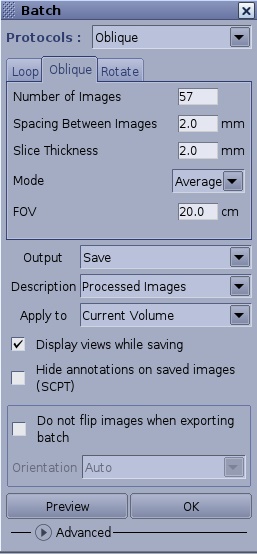
- Select an Oblique protocol from the Protocols menu, if one exists.
- A set of lines are displayed over the selected viewport. Make the following adjustments as needed.
Figure 3. Oblique batch tool 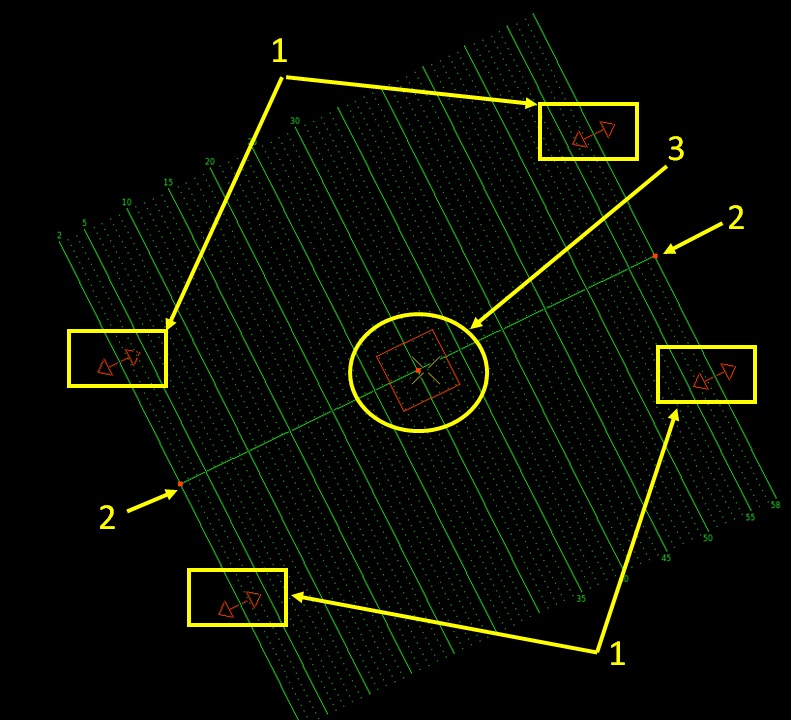
Table 1. Oblique batch tool image legend Number Description 1 Add slice handle 2 Tilt handle 3 Move handle - Click and drag the double arrow (1) to increase or decrease the number of slices.
- Click and drag a box on the side (2) to angle the reformatted slices.
- Click and drag the center box (3 ) to position it over the anatomy of interest.
- Click and drag anywhere on the green line (not on any of the active annotation) to change the slice spacing.
- Enter a value for the Number of Images, Spacing Between Images, FOV and Slice Thickness.
- The spacing is the slice thickness + gap for no overlap.
- Click Preview to view the movie.
- If desired, save the parameters as a protocol.
- To acquire a Rotation batch to create a series of 3D images obtained by rotating a 3D object around an axis, follow these steps.
- Click the view to be used as a reference.
- From the Batch screen, click the Rotate tab.
Figure 4. Rotate tab 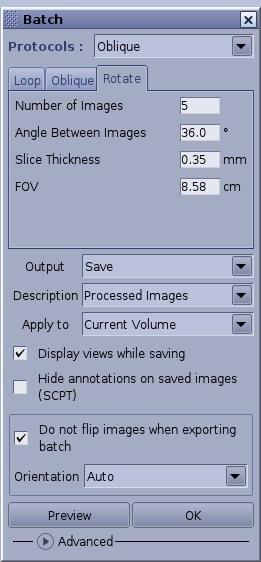
- Select a Rotation protocol from the Protocols menu, if one exists.
- Click and drag the center box of the direction arrows to a location on the image.
- Click on a direction arrow to set the direction of rotation. This does not apply to an Oblique view.
Figure 5. Rotate tool 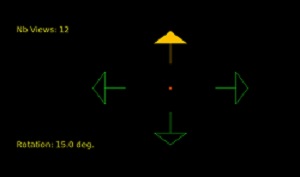
- Change the number of views or rotations. This does not apply to an Oblique view.
- Place the cursor over the Nb Views or Rotation text and type in a new number.
- Left- or right-click to decrease or increase the numbers.
- Type in a new number in the Number of Images, Angle Between Images, Slice Thickness, and FOV text boxes on the Batch screen. Note that 3D, MIP and VR views do not have a slices thickness option.
- As you change the Nb Views/Images, the Angle Between Images changes accordingly.
- Alternatively, as you change the Rotation (Angle Between Images), the Nb Views changes accordingly.
Figure 6. Rotate active annotation 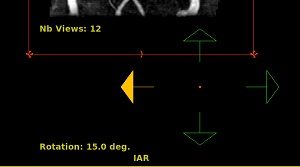
- Click Preview to view the movie.
- If desired, save the parameters as a protocol.
- For all batch options, select the following.
- From the Output menu, select Save , which creates a new series in the Patient List. The series type is determined from the Export Toolbar. Note that if the Global Preference Export tab has the Color format selected, the projections are saved as SSAVE even if Save as Reformat or PJN, when possible, are checked.
- Select an option from the Description menu or type over the current entry to create a new description.
- Select an option from the Apply menu that determines where the batch will be applied.
- Select the Display views while saving option button if you want to see each view as it is generated.
- Select Hide annotation on saved images (SCPT) if you want to hide the annotation.
- Select Do not flip images when exporting a batch, if you don't want the images flipped (for example, a double oblique).Next, select an option from the Orientation menu that determines the orientation of the output images: Auto, Axial, Sagittal or Coronal.
- Open the Advanced menu to create a batch protocol.
- When all parameters have been completed on the Batch screen, click OK to send the Batch prescription to a selected the output.