

- 00000018WIA30A17870GYZ
- id_400230251.5
- Feb 21, 2022 12:34:19 PM
Raw data save
About this task
Raw data is unreconstructed data used to create the MR image or MR spectroscopy results. The service engineer may ask you to save raw data if an image reconstructs with an artifact or distortion. This information can help determine the cause of the artifact or problem. For certain applications such as spectroscopy, raw data is saved automatically to Pfiles, which are stored in the /usr/g/mrraw directory. In cases where the raw data is not automatically saved, it is possible to create a Pfile from the raw data acquired during the most recent scan. This is done via the Raw File Manager tool. It is also possible to set the research CV, autolock =1, to generate Pfiles for each scan. This functionality is supported by most applications.

| Screen area | Description |
|---|---|
| Options menu | Select Save by Pass to save the entire series or Save by Slice to save selected slices. 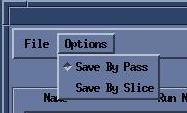 |
| File menu | Click to close the screen. |
| TPS area | The TPS area displays the raw data files that can be saved. It is used to store the raw data on the system hard disk until it is manually removed.  |
| Disk area | The Disk area displays the raw data that has successfully been saved when TPS to Disk is clicked. 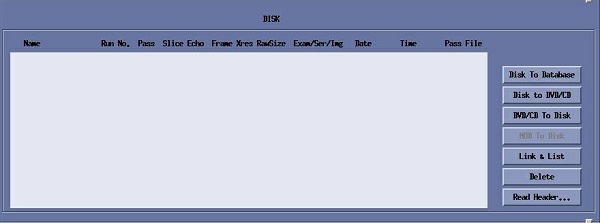 |
Use these steps to save Raw data immediately after a scan has completed. Because the raw data resides in the temporary memory of the system, you must save the raw data before starting the next series. Please be patient during the raw data transfer.
Step-by-step instructions
- From the MR Service Desktop screen, complete the following:
- Click the Utilities tab.
- From the Utilities tab, click Raw File Manager.
- From the Raw File Manager area of the Service Desktop screen, click Click here to start this tool.
Figure 5. Service Desktop 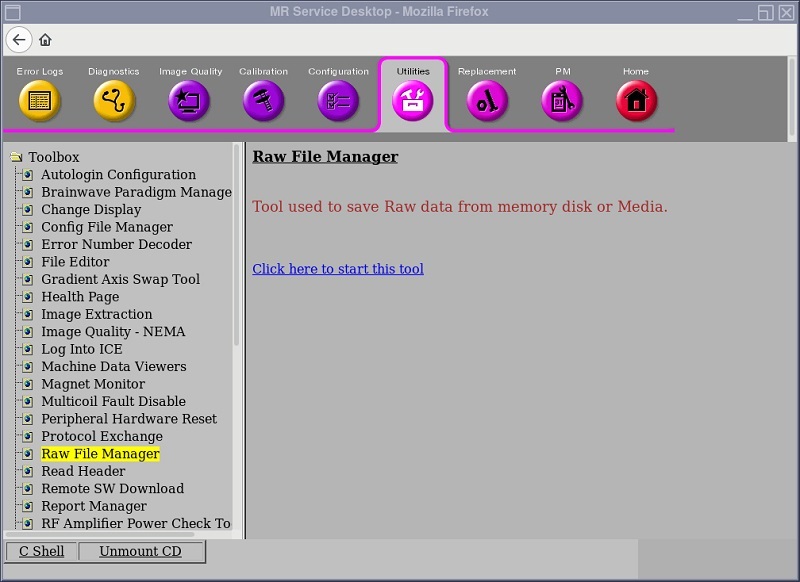
- From the Raw File Manager screen, select the data from the TPS area.
Figure 6. TPS area of Raw File Manager screen - Click TPS to Disk.
Figure 7. TPS to Disk area - The raw data is saved on the system hard disk until it is removed.
- Raw data uses disk space, and, as the disk becomes full, system performance can be degraded.