Use these steps to perform cuts in the 3D volume, to split an object into separate objects, to define a volume of interest, or to remove part of the 3D volume.
Step-by-step instructions
Open the MR General Review.
Select the desired baseline or oblique from which you want to perform a cut.
The cut will always be made at right angles to the view on which you create the trace.
From the Segmentation Toolbar, click the Scalpel icon () to view the Scalpel screen.
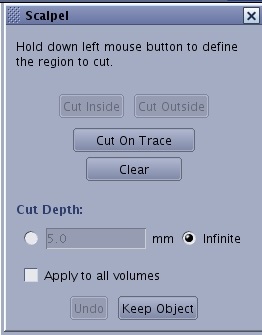
Figure 1. Scalpel screen
From the Scalpel screen, click the Infinite option button to set the cut depth through the entire volume or click on the button next to the mm text field and enter a value.
The cut extends to those slices that are directly above and below the current slice. For example, a 10 mm cut will cut only those slices that are 10 mm above and 10 mm below the current slice.
Place the cursor on the image and click and drag the cursor to draw a region on the image.
Note: Click Undo to undo your last action.
Click Apply to all volumes to apply the cut to all volumes.
From the Scalpel screen, click the type of cut to apply to the trace.
Cut Inside to remove everything from the 3D volume inside the cut.
Cut Outside to remove everything from the 3D volume outside the defined trace.
Cut on Trace for a one voxel wide cut along the trace in the 3D volume defined by the trace and cut depth. Use this function, for example, to separate two anatomical features that are touching, or that are connected by a bridge of a few voxels, into two separate 3D objects.
Clear to remove the trace and start over.
To edit a trace follow these steps.
Note: Once a cut is made outside the trace, it can no longer be edited.
Click and hold the left mouse button on the trace you want to modify.
Drag with the mouse while continuing to hold the left mouse button down.
To keep all pixels with the selected intensity, place the cursor over pixels that represent the pixel intensities you want to keep and click Keep Object. All other pixels are discarded.


 ) to view the Scalpel screen.